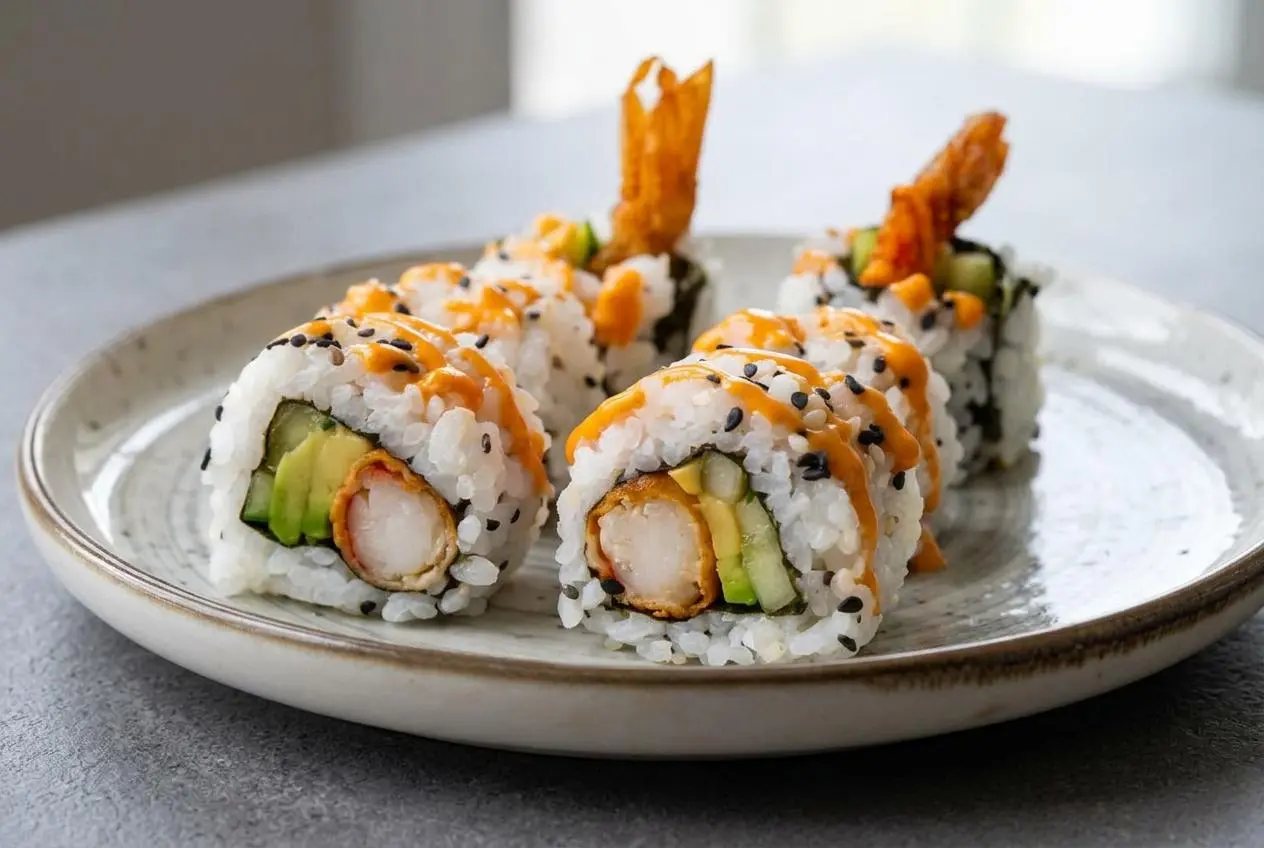
A shrimp tempura roll is sushi filled with cooked, battered shrimp, avocado, and cucumber, wrapped in seasoned rice and nori. This inside-out version pairs crisp tempura with creamy avocado, fresh cucumber, and a sesame-coated rice exterior.
Homemade sushi night is especially satisfying when the shrimp still crunches against the soft rice. You can make the tempura yourself or use prepared frozen shrimp for a more convenient route.
The rolling takes a little care, but a wrapped bamboo mat and a light touch make it manageable. Keep the filling centered and resist packing down the rice. The crunch is worth protecting.
Set a small bowl of water beside your mat so you can dampen your fingers without leaving the workstation.
Key Ingredients and Their Roles
Rice and nori give the roll structure, vinegar balances the fried shrimp, and avocado softens each bite. Cucumber adds freshness, while the flour coating and cold batter create the contrast between tender shrimp and crisp tempura.
Sushi Rice
- 1 cup Japanese sushi rice
- 2 tablespoons rice vinegar
- 1 teaspoon sugar
- Good pinch of salt
Shrimp Tempura
- 8 shrimp tempura – either buy frozen prepared shrimp tempura or make them yourself
- 8 large cleaned and deveined shrimp/prawns
- 1 cup tempura flour
- Ice cold water – refer to tempura flour package instructions for the amount
- ¼ cup plain all purpose flour
- Oil for frying – I’ve used sunflower oil
Filling
- 2 seaweed nori sheets
- ½ avocado
- ½ cucumber
- Sesame seeds
- Optional sriracha mayonnaise for drizzling
Choose one shrimp route: use eight prepared shrimp tempura, or make eight from scratch with the raw shrimp, flours, water, and frying oil. You don’t need both batches.
Japanese short-grain sushi rice has the cling needed to hold a roll together. Long-grain rice won’t give the same cohesive texture. Vinegar supplies tang, while sugar and salt round out the seasoning without overwhelming the filling.
The flours do different jobs. All-purpose flour gives the shrimp a dry surface for the batter to grip; tempura flour forms the outer coating. Use the package water ratio because blends vary. Ice-cold water and brief mixing limit gluten development, helping the coating stay light rather than chewy.
Large tail-on shrimp stretch neatly along the filling after straightening. Choose avocado that yields gently rather than collapsing when sliced, and cucumber that feels firm. Their creamy and crisp textures balance the fried shrimp.
I favor visibly lumpy tempura batter over a perfectly smooth mixture; those last little lumps aren’t worth extra stirring.
How to Make a Shrimp Tempura Roll Step by Step
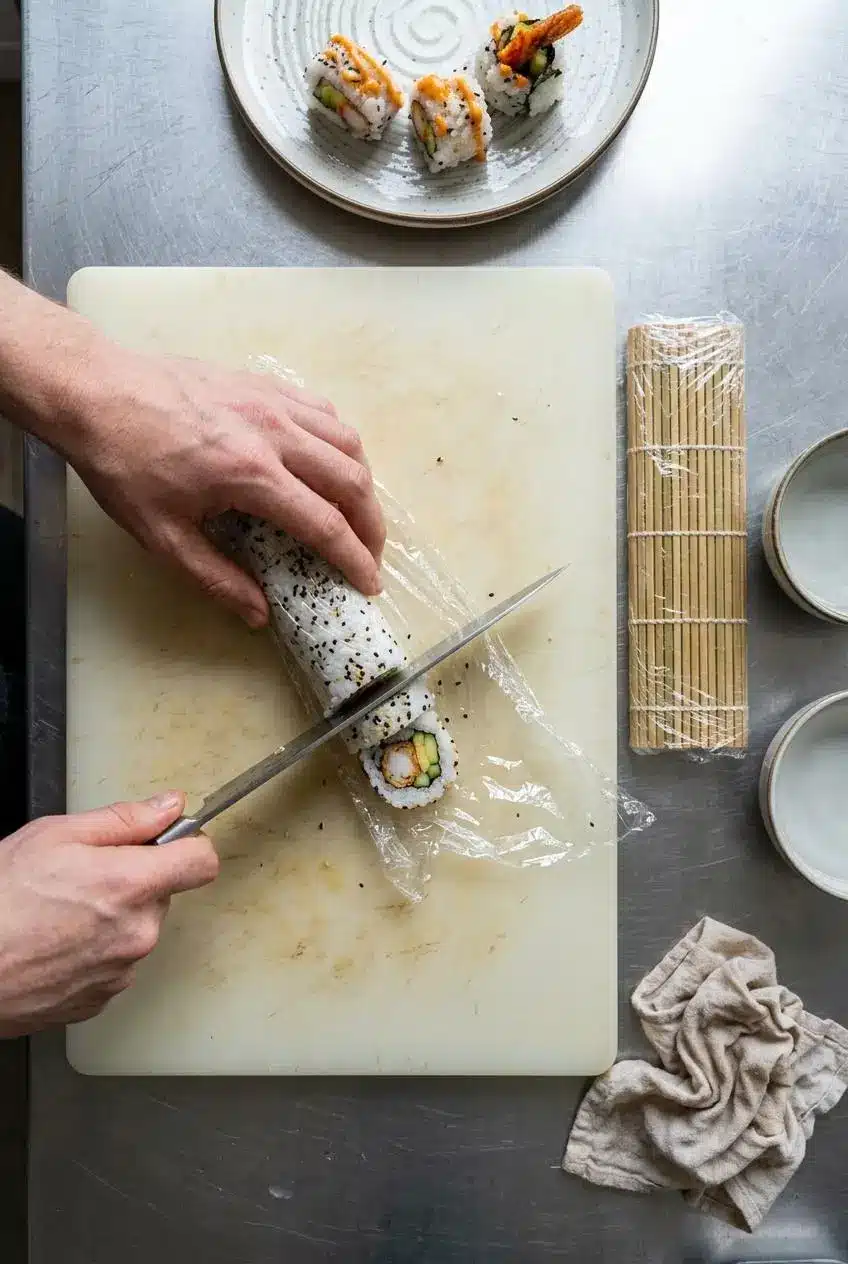
Work through rice, shrimp, and assembly in that order so each component gets the attention it needs.
Prep: 30 minutes. Cook: 20 minutes. Total: 50 minutes. Separately listed steam time: 5–10 minutes. Yield: 4 rolls, sliced into 6 or 8 pieces each. Package directions determine cooking time for prepared shrimp.
1. Cook and Season the Sushi Rice
Cook Sushi Rice
- Rinse the rice in a small pot, drain, then add 1 ¼ cups water and set over medium-high heat.
The final rinse water should look nearly clear rather than milky. - Cover the pot and turn the heat to low once boiling begins, then cook for 15–20 minutes.
The rice should absorb the water. - Warm the vinegar, sugar, and salt together in another small saucepan for a couple of minutes while the rice cooks.
The sugar should disappear into the warm liquid. - Move the covered rice pot off the burner and let it steam for 5–10 minutes.
Keep the lid closed to retain the steam. - Spoon the rice into a large bowl, add the seasoning, and distribute it with gentle folding strokes using a wooden paddle or spatula.
The grains should remain distinct rather than turning into a mashed mass.
2. Straighten and Fry the Shrimp Tempura
Make Shrimp Tempura
- For prepared shrimp tempura, follow the package frying or baking directions instead of the scratch preparation below.
The coating should finish crisp and the shrimp cooked as directed. - Check that the raw shrimp are peeled and deveined with tails attached, then rinse gently and pat thoroughly dry.
No visible surface water should remain. - Make six shallow cuts along the underside of each shrimp, spacing them down its length without cutting through.
Each shrimp should remain in one piece. - Rest the cut side against the board and press along the back toward the tail with controlled fingertip pressure.
The shrimp should lengthen and lie flatter without becoming crushed. - Snip the sharp tail tips diagonally while leaving the tails attached.
The ends should look neatly trimmed. - Turn each shrimp in the all-purpose flour and shake away loose flour.
A thin dusting should cover the surface. - Sift the tempura flour into a separate bowl and add ice-cold water in the amount specified on its package.
The mixture should match the package’s intended batter consistency. - Use chopsticks to bring the batter together with brief, light strokes.
Small flour lumps should remain. - Warm the frying oil in a pot over medium-high heat and test it with a small drop of batter.
The batter should rise to the surface rather than linger at the bottom. - Coat the shrimp in batter, let the excess fall away, and carefully lower them into the oil in small batches.
Leave space between them so the coating can fry evenly. - Fry for 2–3 minutes, then lift the shrimp onto a paper-towel-lined plate to drain.
Look for a lightly golden coating and cooked shrimp with firm, opaque flesh.
3. Assemble and Slice the Inside-Out Rolls
Make Shrimp Tempura Rolls
- Cover the makisu bamboo mat with plastic wrap, set out water, a sharp knife, and a clean towel, then halve a nori sheet and lay it shiny-side down.
The wrap should cover the mat where the sticky rice will touch. - Cut the avocado and cucumber into slender strips.
Keep the pieces narrow enough to form an even filling line. - Dampen your fingers and distribute a thin layer of rice across the nori.
The rice should cover the sheet lightly, without a compressed or bulky layer. - Scatter sesame seeds over the rice, press lightly, and turn the sheet rice-side down for uramaki, or leave it unflipped for nori-outside maki.
For the inside-out version, the bare nori should now face upward. - Arrange cucumber and avocado across the center, then add two shrimp with their tails pointing toward opposite ends.
The filling should form one centered horizontal line. - Bring the near edge of the mat over the filling and tuck the ingredients inward as you begin rolling forward.
The first turn should enclose the filling snugly. - Continue rolling with steady, gentle pressure, using the mat to shape the cylinder and tidy its ends.
The roll should hold together without squeezed-out filling. - Transfer the roll to a cutting board and drape plastic wrap over it with extra extending beyond every side.
The wrap should support the rice exterior during cutting. - Wet the knife, halve the roll, and divide the sections into 6 or 8 pieces, wiping and rewetting the blade between cuts.
The slices should retain their rounded shape rather than flattening. - Remove every piece of plastic wrap and repeat assembly with the remaining ingredients.
The finished yield should be four rolls. - Arrange the uncovered pieces on a serving plate and add the optional sriracha mayonnaise drizzle if desired.
The sesame-coated rice and filling should remain neatly intact.
Expert Tips and Troubleshooting Common Shrimp Tempura Roll Mistakes
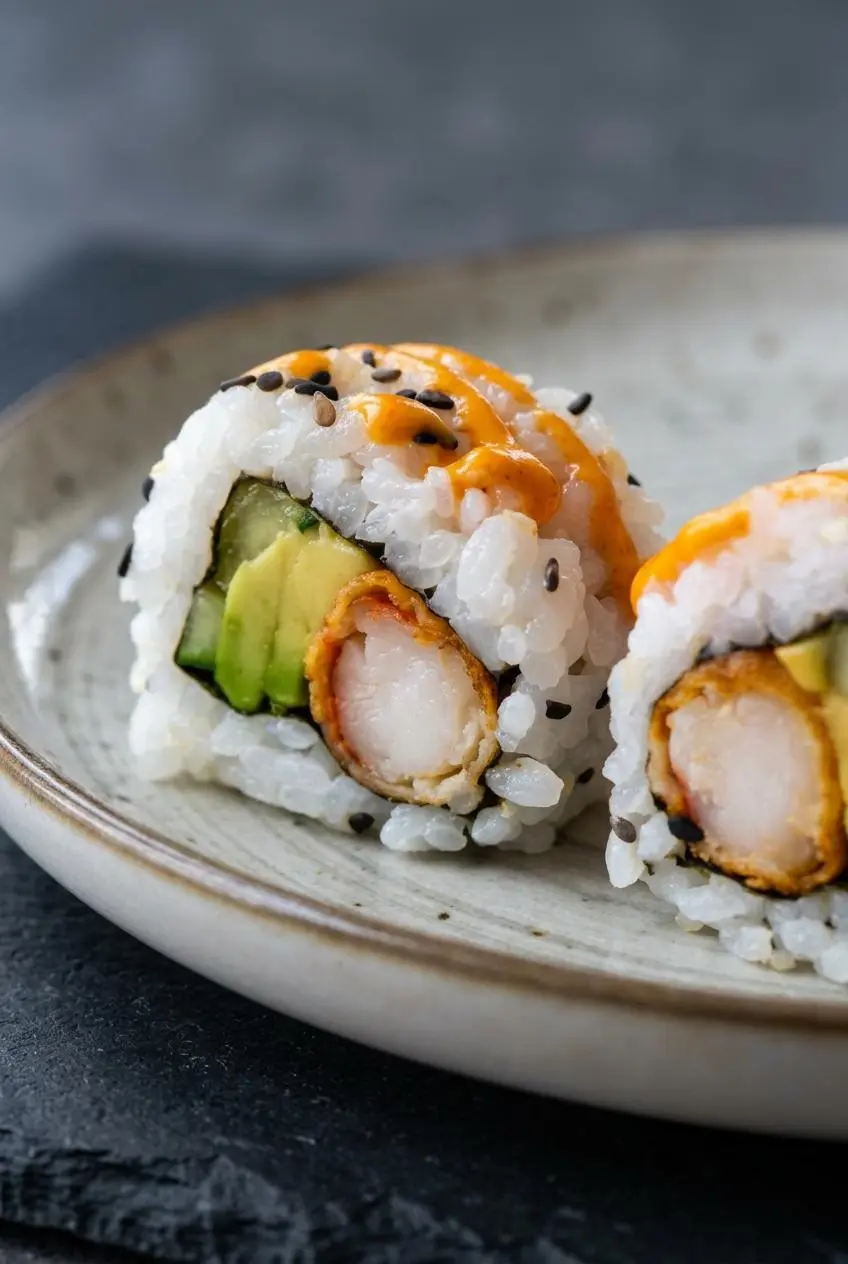
Most texture problems start with excess moisture, heavy handling, or frying before the oil is ready.
- Greasy or soft tempura: Keep the batter cold and slightly lumpy, mix with chopsticks, and avoid crowded batches. Allow the oil to recover between batches. If your tempura package provides a frying-temperature target, check it with a frying thermometer alongside the batter-rise test; oil temperature is separate from checking whether the shrimp itself is cooked.
- Shrimp that curl: Make all six underside cuts shallow but deliberate, then press gently along the back. You may feel a subtle release under your fingers as the shrimp straightens. Stop before the flesh flattens or tears.
- Oil splatter: Thorough drying matters. The angled tail-tip trim also helps release moisture trapped near the tail, but neither step makes frying splatter-free. Lower shrimp carefully rather than dropping them.
- Gummy rice or chewy nori: Fold the seasoning through instead of stirring vigorously. Before assembly, let the rice lose visible steam and cool to roughly body temperature, following prompt cooling and chilled-storage practices rather than leaving it out.
- Wet filling: The cucumber seed core holds extra moisture. Optionally scrape out that watery center before cutting the remaining cucumber into strips.
- Loose rolls or torn nori: Keep the filling restrained and the rice layer light. Use the mat to bring the roll together instead of trying to squeeze it closed with your fingers.
- Crushed slices: A sharp, damp blade glides through sticky rice more cleanly than a dry knife. Wipe between cuts, avoid sawing, and use the plastic-wrap support, removing it completely before serving.
Crunchy Tempura Rolls and Faster Sushi-Night Shortcuts
Choose extra crunch, less frying work, or an easier rolling style without changing the core filling.
Crunchy Shrimp Tempura Roll With Tenkasu Flakes
For an optional crunchy exterior, drizzle a little remaining tempura batter carefully into the hot oil to form tenkasu flakes. Let the droplets become crisp, lift them out, and drain well. Gently press the flakes onto the roll before slicing rather than packing them into a thick crust.
The flakes add delicate crunch around the soft rice. Sweet eel sauce makes an optional finishing drizzle. For another vegetable option alongside sushi, crispy okra tempura uses the same appealing contrast between a light coating and tender filling.
Quick Shortcut Using Frozen Shrimp Tempura
Prepared frozen shrimp skips the peeling, straightening, and batter mixing. Fry or bake it following the package directions. Air frying is another option only when that product provides directions for it; use its settings rather than borrowing instructions from a different brand.
Check the label before cooking. Frozen shrimp tempura isn’t automatically fully cooked or ready to eat.
- Scratch-made tempura: Choose this for control over the batter and freshly fried texture.
- Prepared frozen tempura: Choose this to reduce hands-on preparation while keeping the same rice and vegetables.
- Traditional nori-outside maki: Skip the rice-side flip and keep the same filling quantities. The seaweed exterior is easier to handle than exposed sticky rice.
Sauces, Prep-Ahead Planning, and Keeping Tempura Rolls Fresh
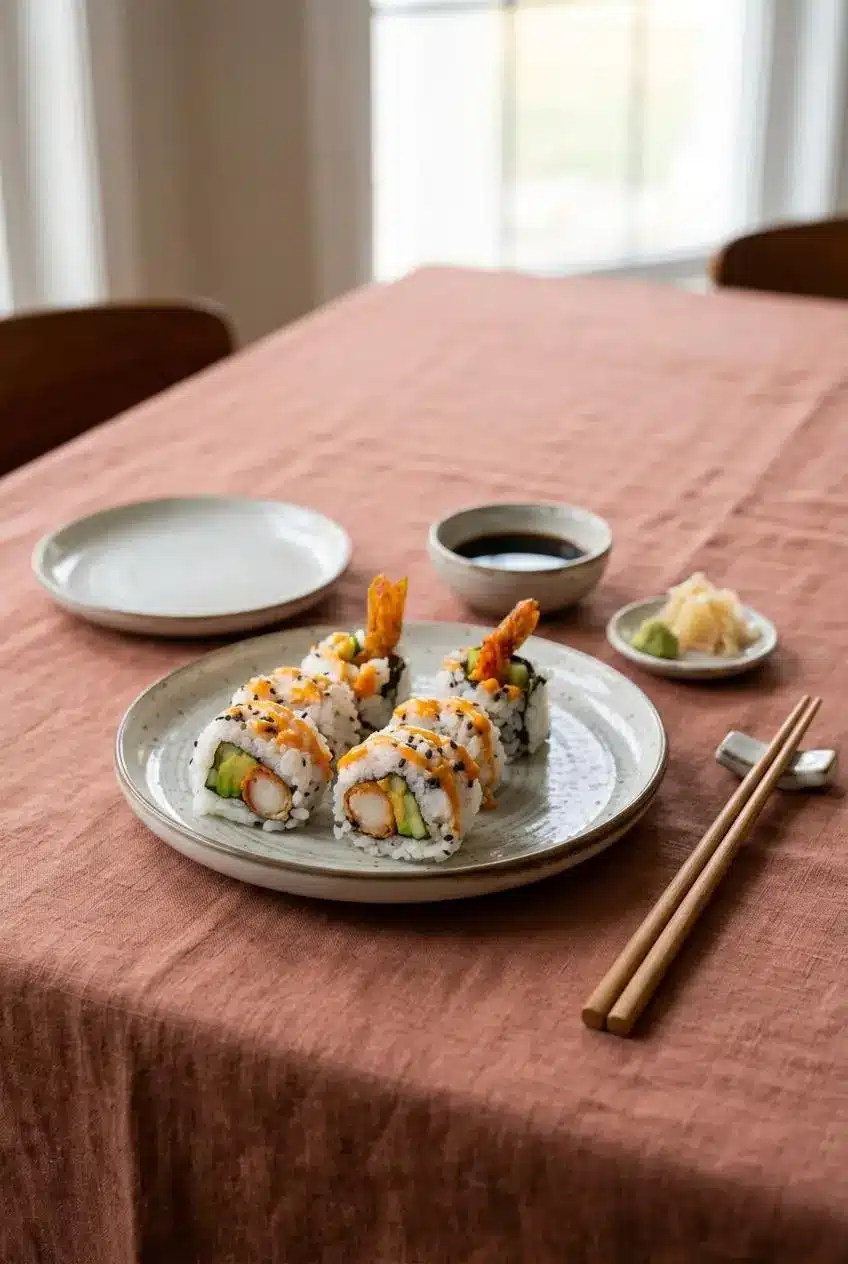
Serve soon after rolling to enjoy savory shrimp, creamy avocado, crisp cucumber, and tangy rice at their best.
Add optional sriracha mayo or sweet eel sauce just before serving so the coating doesn’t soften unnecessarily. Offer soy sauce, pickled ginger, and wasabi alongside. Miso soup or steamed edamame can round out the meal without competing with the rolls.
What to Prepare Before Frying the Shrimp
Set up the wrapped mat, knife, towel, and water bowl before the final frying stage. Prepare the vegetables separately, and have the seasoned rice ready for assembly once it has lost its steam. Keep raw shrimp and its preparation area separate from cooked rice and vegetables.
If preparing rice earlier, cool it promptly and refrigerate it rather than holding it at room temperature. Keep moist fillings separate until rolling, and cook the shrimp close to serving for the strongest texture contrast.
Why Leftover Tempura Rolls Lose Their Crunch
Moisture moves from the rice and vegetables into the fried coating and nori. Refrigeration also firms the rice, so leftovers won’t have the same tender-rice, crisp-shrimp contrast.
Refrigerate leftovers promptly in a covered container. Keep any unused sauces separate, avoid prolonged room-temperature holding, and take extra care in hot conditions. Vinegar seasoning doesn’t replace proper cooling and refrigeration.
Conclusion
Crisp shrimp, creamy avocado, and refreshing cucumber make these rolls satisfying without a complicated filling. Make the tempura yourself or use the prepared option that fits your evening.
Handle the rice gently, let the mat shape the roll, and keep your knife clean and damp. Serve while the shrimp still has its crunch.
Frequently Asked Questions
Is a Shrimp Tempura Roll Cooked or Raw?
The shrimp is cooked in tempura batter, and this recipe contains no raw fish. The sushi rice is cooked too, while the cucumber and avocado remain fresh and uncooked.
What Does a Shrimp Tempura Roll Have in It?
It contains shrimp tempura, seasoned Japanese sushi rice, nori, avocado, cucumber, and sesame seeds. Sriracha mayonnaise is optional, and dipping sauces sit alongside rather than forming part of the core filling.
Can I Use Premade Frozen Shrimp Tempura?
Yes, prepared frozen shrimp tempura is an alternative in this recipe. Follow its frying or baking directions, or air-fryer directions if provided. Check the label rather than assuming the shrimp is already fully cooked.
What Is the Difference Between a California Roll and a Shrimp Tempura Roll?
A California roll usually contains imitation crab or cooked crab, giving it a softer filling. A shrimp tempura roll uses battered, fried shrimp for crunch. Both often include avocado and cucumber, although restaurant fillings and sauces vary.
How Many Calories Are in a Shrimp Tempura Roll?
The listed estimate is 377 kcal per serving, not per piece. Oil absorption, sauce amounts, and restaurant portion sizes can change that considerably. The accompanying estimates per listed serving are 73 g carbohydrate, 10 g protein, 4 g fat, 1 g saturated fat, 4 g unsaturated fat, 32 mg cholesterol, 168 mg sodium, 3 g fiber, and 2 g sugar.
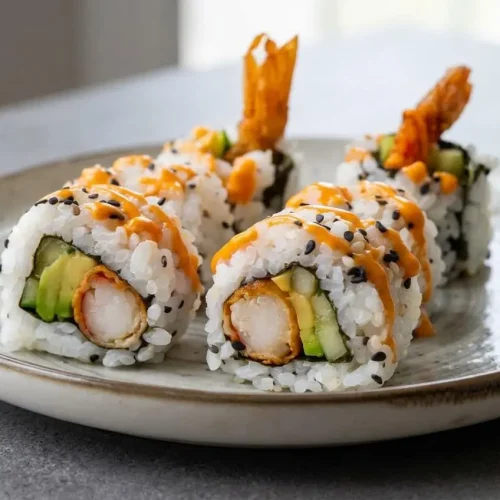
Shrimp Tempura Roll

Equipment
- wooden paddle
- Spatula
- chopsticks
- makisu sushi mat
- Plastic wrap
- Sharp knife
Ingredients
Sushi Rice
- 1 cup Japanese sushi rice
- 2 tablespoons rice vinegar
- 1 teaspoon sugar
- Good pinch of salt
Shrimp Tempura
- 8 shrimp tempura either buy frozen prepared shrimp tempura or make them yourself
- 8 large cleaned and deveined shrimp/prawns
- 1 cup tempura flour
- Ice cold water refer to tempura flour package instructions for the amount
- ¼ cup plain all purpose flour
- Oil for frying I’ve used sunflower oil
Filling
- 2 seaweed nori sheets
- ½ avocado
- ½ cucumber
- Sesame seeds
- Optional sriracha mayonnaise for drizzling
Instructions
Cook Sushi Rice
- Rinse the rice in a small pot, drain, then add 1 ¼ cups water and set over medium-high heat. The final rinse water should look nearly clear rather than milky.
- Cover the pot and turn the heat to low once boiling begins, then cook for 15–20 minutes. The rice should absorb the water.
- Warm the vinegar, sugar, and salt together in another small saucepan for a couple of minutes while the rice cooks. The sugar should disappear into the warm liquid.
- Move the covered rice pot off the burner and let it steam for 5–10 minutes. Keep the lid closed to retain the steam.
- Spoon the rice into a large bowl, add the seasoning, and distribute it with gentle folding strokes using a wooden paddle or spatula. The grains should remain distinct rather than turning into a mashed mass.
Make Shrimp Tempura
- For prepared shrimp tempura, follow the package frying or baking directions instead of the scratch preparation below. The coating should finish crisp and the shrimp cooked as directed.
- Check that the raw shrimp are peeled and deveined with tails attached, then rinse gently and pat thoroughly dry. No visible surface water should remain.
- Make six shallow cuts along the underside of each shrimp, spacing them down its length without cutting through. Each shrimp should remain in one piece.
- Rest the cut side against the board and press along the back toward the tail with controlled fingertip pressure. The shrimp should lengthen and lie flatter without becoming crushed.
- Snip the sharp tail tips diagonally while leaving the tails attached. The ends should look neatly trimmed.
- Turn each shrimp in the all-purpose flour and shake away loose flour. A thin dusting should cover the surface.
- Sift the tempura flour into a separate bowl and add ice-cold water in the amount specified on its package. The mixture should match the package’s intended batter consistency.
- Use chopsticks to bring the batter together with brief, light strokes. Small flour lumps should remain.
- Warm the frying oil in a pot over medium-high heat and test it with a small drop of batter. The batter should rise to the surface rather than linger at the bottom.
- Coat the shrimp in batter, let the excess fall away, and carefully lower them into the oil in small batches. Leave space between them so the coating can fry evenly.
- Fry for 2–3 minutes, then lift the shrimp onto a paper-towel-lined plate to drain. Look for a lightly golden coating and cooked shrimp with firm, opaque flesh.
Make Shrimp Tempura Rolls
- Cover the makisu bamboo mat with plastic wrap, set out water, a sharp knife, and a clean towel, then halve a nori sheet and lay it shiny-side down. The wrap should cover the mat where the sticky rice will touch.
- Cut the avocado and cucumber into slender strips. Keep the pieces narrow enough to form an even filling line.
- Dampen your fingers and distribute a thin layer of rice across the nori. The rice should cover the sheet lightly, without a compressed or bulky layer.
- Scatter sesame seeds over the rice, press lightly, and turn the sheet rice-side down for uramaki, or leave it unflipped for nori-outside maki. For the inside-out version, the bare nori should now face upward.
- Arrange cucumber and avocado across the center, then add two shrimp with their tails pointing toward opposite ends. The filling should form one centered horizontal line.
- Bring the near edge of the mat over the filling and tuck the ingredients inward as you begin rolling forward. The first turn should enclose the filling snugly.
- Continue rolling with steady, gentle pressure, using the mat to help shape the cylinder and tidy its ends. The roll should hold together without squeezed-out filling.
- Transfer the roll to a cutting board and drape plastic wrap over it with extra extending beyond every side. The wrap should support the rice exterior during cutting.
- Wet the knife, halve the roll, and divide the sections into 6 or 8 pieces, wiping and rewetting the blade between cuts. The slices should retain their rounded shape rather than flattening.
- Remove every piece of plastic wrap and repeat assembly with the remaining ingredients. The finished yield should be four rolls.
- Arrange the uncovered pieces on a serving plate and add the optional sriracha mayonnaise drizzle if desired. The sesame-coated rice and filling should remain neatly intact.