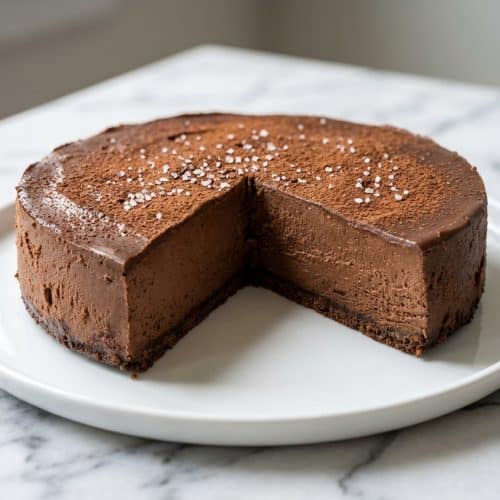
In my American kitchen, there’s a particular kind of quiet that happens right before dessert hits the table, the kind that says, “Okay, this better be good.” That’s exactly the moment this chocolate mousse cheesecake was born for. It’s got that New York style richness you crave, but with a lighter, mousse-like silkiness that feels restaurant-fancy without the stress.
Instead of wrestling with an oven and a water bath, we use a pressure cooker method that behaves like a gentle bain-marie. The result is ultra-moist, deeply chocolatey, and famously crack-resistant, even if you’ve had cheesecake heartbreak before.
Why You’ll Love This Recipe
The Espresso-Salted Cocoa Bloom: In my kitchen, a tiny cocoa “bloom” with hot water and espresso powder wakes up the chocolate aroma instantly, like opening a fresh bag of cocoa. A pinch of flaky salt finishes the flavor so it tastes darker, deeper, and less one-note sweet.
Foolproof Texture: The pressure cooker keeps the heat steady and steamy, basically a built-in water bath. Your springform pan cheesecake bakes evenly, so the edges stay tender instead of turning dry or rubbery.
Sophisticated Balance: Cream cheese and heavy whipping cream bring the luxury, but espresso and salt keep it from feeling heavy. Every bite lands smooth and structured, not greasy, not cloying.
Ingredients and Substitutions

These ingredients are simple, but each one has a job, from the chocolate cookie crumb base to the creamy custard center. Use good chocolate and full-fat dairy for that glossy, mousse-like finish.
Ingredients
- 1/2 cup chocolate cookie crumbs
- 1 pinch ground cinnamon
- 8 ounces semisweet chocolate
- 1 tablespoon butter
- 16 ounces cream cheese, softened
- 1 cup heavy whipping cream
- 1 teaspoon vanilla extract
- 2/3 cup white sugar
- 2 eggs, beaten
- 1 1/2 tablespoons unsweetened cocoa powder
- 1 1/2 cups water
Ingredient Notes and Substitutions
Semisweet chocolate: A good-quality bar (around 60 percent cacao) melts smoother than many chips, and that smoother melt translates to a silkier mousse-like body. If you can find couverture chocolate, the extra cocoa butter makes the texture even more lush.
Unsweetened cocoa powder: Dutch-processed cocoa gives a darker color and a softer, less sharp cocoa taste, while natural cocoa can read brighter and more acidic. If you like the nerdy details, alkalized cocoa powder follows a specific process that changes both pH and flavor.
Cream cheese, softened: Full-fat brick-style cream cheese is the backbone here, it sets with the right structure and doesn’t weep as easily. If it’s not properly softened, you’ll fight little white lumps all the way to the finish.
Chocolate cookie crumbs: Keep the crumbs fairly fine so the crust presses in neatly and slices clean. I avoid extra-filled sandwich cookies for this job because they can melt into a greasy base.
How to Make chocolate mousse cheesecake
Prep the Pan and Crust
- Grease an 8-inch springform pan that fits inside your pressure cooker, and take a second to check the latch feels snug. If you like extra insurance, a parchment round on the bottom helps with a clean release later.
- Stir the chocolate cookie crumbs with the ground cinnamon until the color looks even. Sprinkle them into the pan, then press gently into a level layer, it should feel packed but not rock-hard.
Melt the Chocolate and Build a Silky Batter
- Melt the semisweet chocolate with the butter until it looks glossy and completely smooth, then set it aside to cool slightly. You want it warm and fluid, not steaming hot.
- In a food processor or with an electric mixer, beat the softened cream cheese until it turns satiny with no visible lumps. Stream in the melted chocolate mixture and keep mixing until the color becomes uniform and dark.
- Add the heavy whipping cream, vanilla extract, white sugar, and the beaten eggs, then mix just until the batter looks cohesive and shiny. Sieve the unsweetened cocoa powder over the surface and mix on low until you no longer see cocoa streaks.
- Pour the batter over the crust and gently tap the pan on the counter to pop any larger air bubbles. Cover the top with waxed paper, then wrap the entire pan in aluminum foil so steam can’t sneak in.
Pressure Cook, Then Cool Slowly
- Pour 1 1/2 cups water into the pressure cooker and set the trivet inside. Place the wrapped springform pan on the trivet, seal the cooker, and bring it up to 15 pounds (high) pressure.
- Reduce the heat just enough to maintain pressure, and cook for 45 to 50 minutes. When time is up, remove the cooker from heat and let the pressure drop naturally, this gentle cooldown is a crack-prevention secret.
- Carefully lift the pan out, unwrap the foil, and let the cheesecake cool in the pan on a wire rack until it reaches room temperature. The surface should look set, with the center still having the tiniest, slow jiggle.
Chill for the Final Set
Once it’s at room temperature, release the springform and refrigerate for 8 hours before serving. That long chill is where the mousse-like texture tightens into clean, dramatic slices.
The Secrets to a Flawless Finish

Temperature precision: Even with the steady pressure cooker environment, I still treat internal temperature as the truth teller. An internal temperature of 150 to 155°F is the sweet spot for a custard set, creamy and sliceable without turning dry, and it’s a totally different goal than something like Basque cheesecake, where you actually want that scorched drama.
The science of blooming: Cocoa is full of flavor compounds that stay muted when the powder is dry. A small “bloom” with hot water helps those notes wake up fast, and food science principles explain why heat and moisture intensify chocolate aroma.
Moisture control: In a pressure cooker, steam is powerful and persistent, so foil-wrapping the springform pan is non-negotiable. It protects the crust from turning soggy and keeps water droplets from freckling the top.
Pro Tips & Troubleshooting
Pro Tips
- The room temp rule: Let the cream cheese truly soften so it beats smooth, otherwise you’ll see pale specks in the finished chocolate batter.
- The wobble test: Look for edges that are set and a center that jiggles like set Jell-O, not a loose slosh.
- Clean slicing: Dip a knife in hot water, wipe it dry, and repeat between every single cut for crisp, bakery-style edges.
- Waterproofing: Use a generous layer of foil around the springform pan, especially around the seam and base where leaks love to start.
Common Mistakes to Avoid
- Overbeating the eggs: Too much air makes the cheesecake puff, then collapse as it cools, and that rise-and-fall is crack territory.
- The “double-stuffed” crust problem: Extra-creamy cookies can melt into a greasy layer that won’t hold a neat slice.
- Seizing chocolate: Hot chocolate meeting cold cream cheese can turn into tiny hard bits, and my best insurance is steady, gentle melting chocolate plus slightly cooled chocolate before it goes in.
Serving & Storage

Beautiful Serving Ideas
Fresh raspberries are my favorite with this, their tart pop keeps each bite from feeling too rich. For another elegant, layered dessert on a party table, a chocolate trifle brings that same “wow” factor with a totally different texture.
For contrast, finish with extra-large chocolate shavings or curls, and add a small spoonful of lightly sweetened crème fraîche on the side. That gentle tang makes the chocolate taste even deeper.
Storage and Make-Ahead Instructions
The 8-hour rule: Refrigerating for a full 8 hours is not optional if you want clean slices, because the custard needs time to fully set and relax. If you enjoy chilled desserts with the same patience payoff, a chocolate cream pie lives in that same delicious category.
Refrigerator storage: Keep the cheesecake covered in the fridge, and aim to enjoy it within several days for the best texture. The handling basics for egg-and-dairy desserts matter, and safety requirements lay out smart temperature and storage habits.
Freezing guide: Freeze individual slices by wrapping them tightly in plastic wrap, then again in foil, and store up to 3 months. For a practical benchmark on quality expectations, USDA quality standards outline how commercial cheesecake is defined and stored.
Thawing: Thaw overnight in the refrigerator, still wrapped, so condensation forms on the wrapping instead of on your cheesecake’s surface.
Decadent Chocolate Mousse Cheesecake

Equipment
- Pressure cooker
- 8-inch Springform pan
- Trivet
- Food processor or electric mixer
- Aluminum Foil
Ingredients
- 1/2 cup chocolate cookie crumbs
- 1 pinch ground cinnamon
- 8 ounces semisweet chocolate
- 1 tablespoon butter
- 16 ounces cream cheese softened
- 1 cup heavy whipping cream
- 1 teaspoon vanilla extract
- 2/3 cup white sugar
- 2 eggs beaten
- 1 1/2 tablespoons unsweetened cocoa powder
- 1 1/2 cups water
Instructions
Prep the Pan and Crust
- Grease an 8-inch springform pan that fits your pressure cooker. For easy removal, place a parchment paper round on the bottom. Stir the chocolate cookie crumbs and ground cinnamon together until evenly blended. Press the mixture into the bottom of the pan to create a level, packed layer.
Melt the Chocolate and Build a Silky Batter
- Melt the semisweet chocolate and butter together until glossy and smooth, then set aside to cool slightly. Beat the softened cream cheese with a mixer or food processor until satiny. Gradually stream in the melted chocolate while mixing until the color is uniform.
- Incorporate the heavy whipping cream, vanilla extract, white sugar, and beaten eggs. Mix on low speed until the batter is cohesive and shiny. Sieve the cocoa powder over the top and mix gently until no streaks remain. Pour the batter into the prepared pan and tap it against the counter to release air bubbles.
Pressure Cook, Then Cool Slowly
- Cover the pan with waxed paper and wrap it securely in aluminum foil. Add 1 1/2 cups of water and a trivet to the pressure cooker. Place the pan on the trivet, seal the lid, and cook at high pressure (15 pounds) for 45 to 50 minutes.
- Once cooking is complete, allow the pressure to release naturally. Carefully remove the pan, unwrap the foil, and let the cheesecake reach room temperature on a wire rack. The edges should be set while the center retains a slight jiggle.
Chill for the Final Set
- Refrigerate the cheesecake for at least 8 hours before serving. This step is essential for achieving the perfect mousse-like texture and clean, sharp slices.
Notes
Nutrition
Conclusion
This chocolate mousse cheesecake eats like a dream, silky, decadent, airy, and intensely cocoa-forward, with a structure that holds a perfect slice. If you only steal one trick from my kitchen, let it be the espresso-salted cocoa bloom, it turns “chocolate” into Chocolate with a capital C.
Once you’ve nailed the base, little variations become easy, a raspberry swirl, a brownie bottom, even a different chocolate percentage. When you’re in the mood for a caramel twist, the flavor path from this to a caramel cheesecake makes total sense.