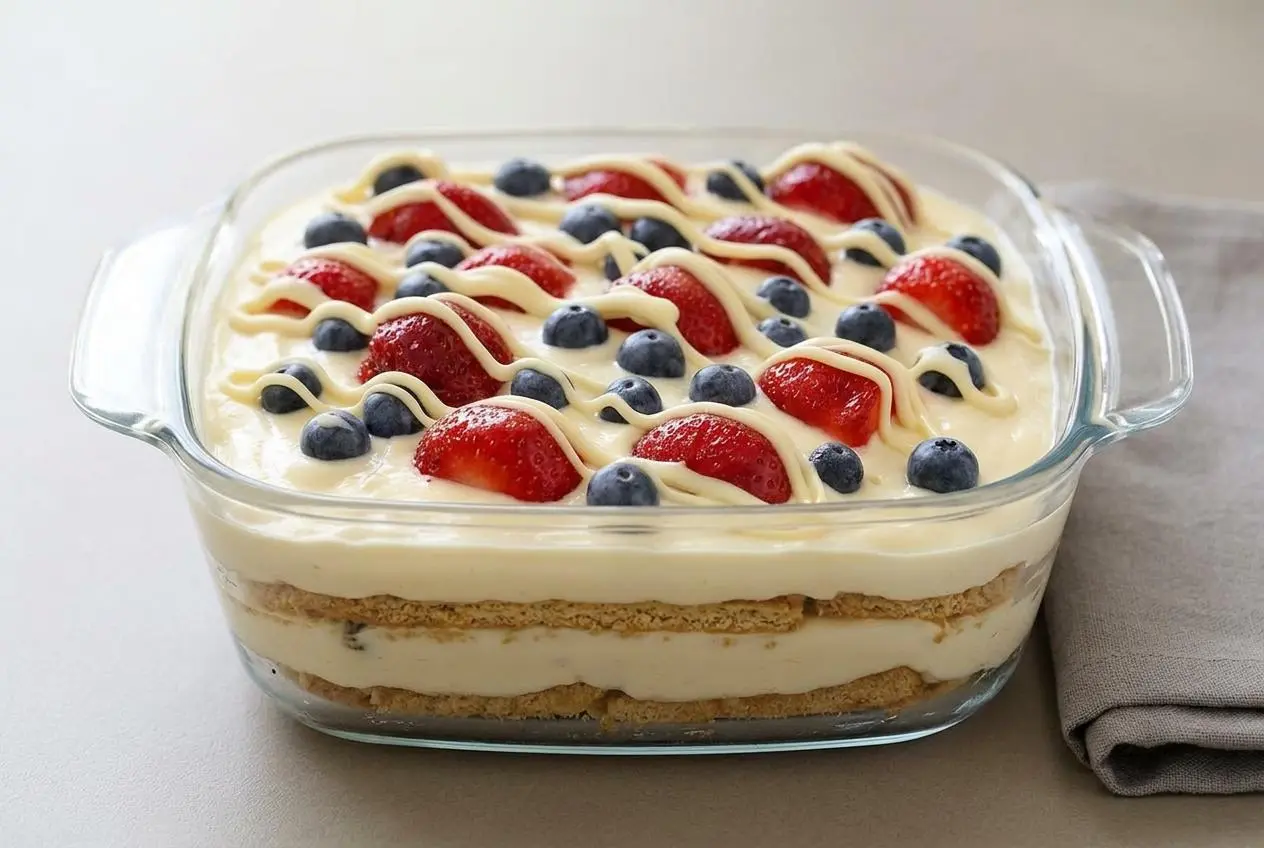
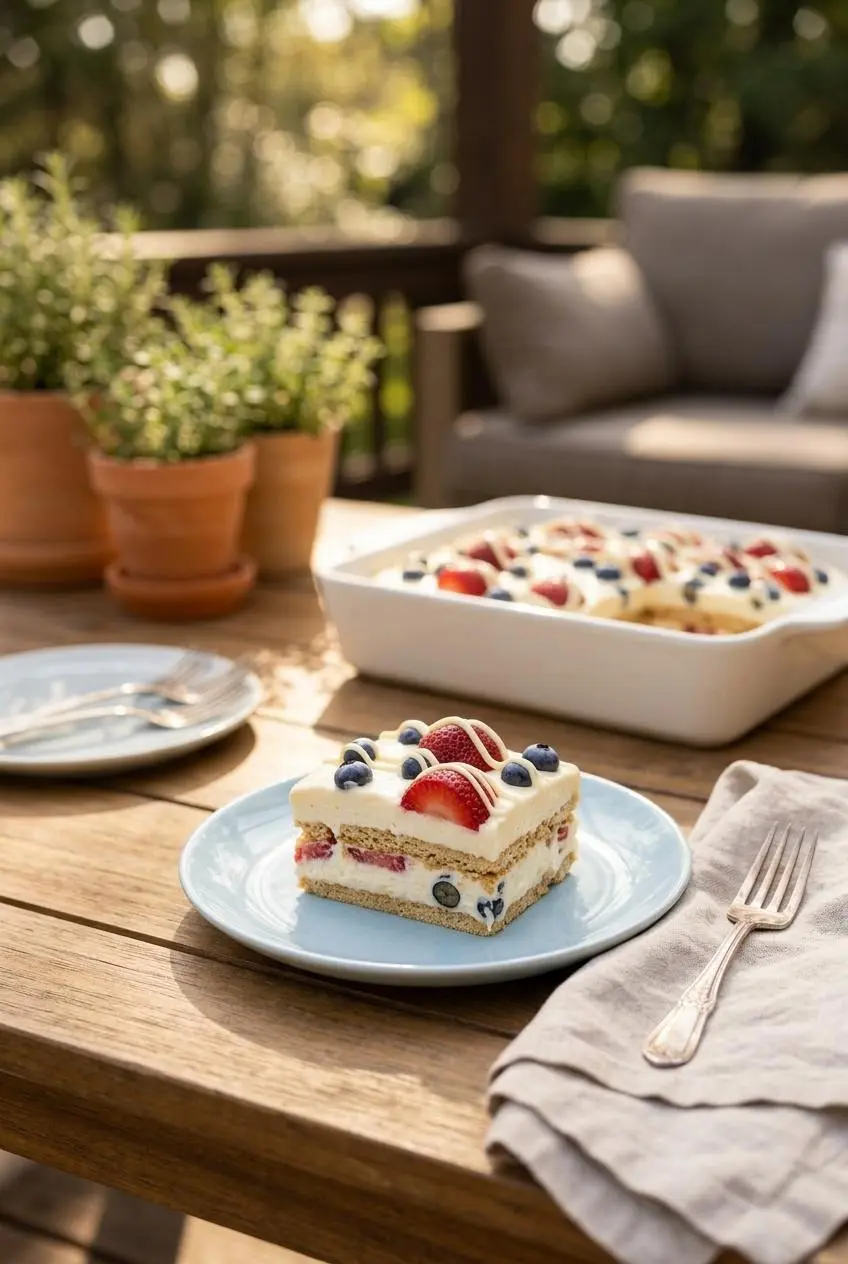
No Bake Summer Berry Icebox Cake is a chilled dessert made with layers of graham crackers, creamy pudding filling, and fresh berries that soften together in the refrigerator until it slices like cake.
On a hot afternoon, this is the kind of dessert that feels extra smart. No Bake Summer Berry Icebox Cake gives you cool creaminess, bright berries, and that soft refrigerator cake texture without turning on the oven.
It’s especially handy for cookouts, summer birthdays, and red white and blue holiday tables because it looks festive and holds its shape well once fully chilled. The cracker-softening trick is the whole magic.
Dry the berries very well before you start so the cream layers stay bright, thick, and neatly defined.
Why This No Bake Summer Berry Icebox Cake Works
This dessert works because each layer does a clear job. The graham crackers act like the future cake layers, the cream cheese and vanilla pudding create a stable filling, and the berries add freshness, color, and a little juicy contrast.
The flavor lands in a sweet spot too. You get mellow vanilla, tangy cream cheese, soft crackers, and pops of fresh strawberries and blueberries. If you like chilled cream cheese desserts, a no-bake cherry cheesecake hits the same easy summer mood.
It also travels well from fridge to table, which matters when dessert needs to wait for burgers, fireworks, or one last round of watermelon.
Ingredients for This Icebox Cake
Each ingredient pulls its weight here, building structure, creamy body, berry flavor, and the soft layered texture that makes an icebox cake feel like an actual cake.
- 19 oz graham crackers
- 8 oz cream cheese, softened
- 2 3.4 oz packages Vanilla Instant Pudding
- 2-1/2 cups cold milk
- 12 oz Cool whip or homemade whipped cream
- 3 cups fresh strawberries, sliced
- 1-1/2 cups fresh blueberries
- 2 oz white chocolate chips
The cream cheese is the anchor in the filling. It adds tang and helps the mixture stay thick enough to spread instead of sliding around the pan. The vanilla instant pudding sets the filling further, so the layers hold together after chilling. Graham crackers start dry and firm, then absorb moisture from the cream and berries until they become tender and cake-like. Fresh strawberries and blueberries bring color and brightness, while the white chocolate drizzle adds a sweet finish over the top.
I always look for berries with dry surfaces and no soft spots, because even a little extra moisture can streak the filling and make the layers looser than you want.
How to Prepare a Summer Berry Icebox Cake
- Beat the softened cream cheese with the dry pudding mixes in a large bowl until the mixture looks completely smooth and unified.
The base should lose any cream cheese lumps before the milk goes in, which makes the final filling much silkier. - Pour in the cold milk a little at a time while mixing until a thick pudding mixture forms.
By the end, it should look creamy and cohesive rather than grainy or separated. - Fold in the Cool whip or homemade whipped cream, keeping back 1/2 cup for the pan and finish.
The mixture should turn light, fluffy, and spreadable, with enough body to sit in soft mounds on a spatula. - Use part of the reserved 1/2 cup to spread a very thin layer across the bottom of a 9×13 pan.
This light coat helps the first graham cracker layer stay in place instead of sliding around. - Arrange 5 graham crackers across the center of the pan, then fit 2 more around the top and bottom edges, breaking them as needed.
The goal is a mostly even first layer with only small gaps, so the finished slices stay tidy. - Spread part of the pudding mixture over the crackers, then scatter on a layer of blueberries and sliced strawberries.
The filling should cover the crackers fully, and the berries should sit in an even layer rather than clumped in one corner. - Add another layer of graham crackers over the berries, then repeat with more pudding mixture and more berries.
Press very lightly only if needed so the crackers settle without squeezing out the filling. - Repeat the graham cracker, pudding, and berry layering one more time for 3 total rounds, finishing near the top of the pan.
The pan should look evenly filled, with the layers stacked level from edge to edge. - Refrigerate the cake for at least 4 hours or until the graham crackers have softened completely.
When fully chilled, a gentle finger press should meet little resistance instead of a dry cracker snap. - Melt the white chocolate chips as directed on the package when you are ready to serve.
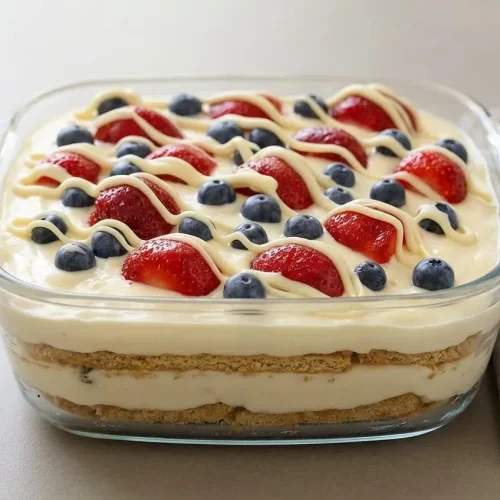
The chocolate should be smooth enough to fall in thin ribbons, not thick clumps. - Drizzle the melted white chocolate over the top with a spoon or transfer it to a small zip-top bag and snip a corner for neater lines.
The finish should look loose and light, so it decorates the berries without burying them.
The Science of the Perfect Icebox Cake Texture
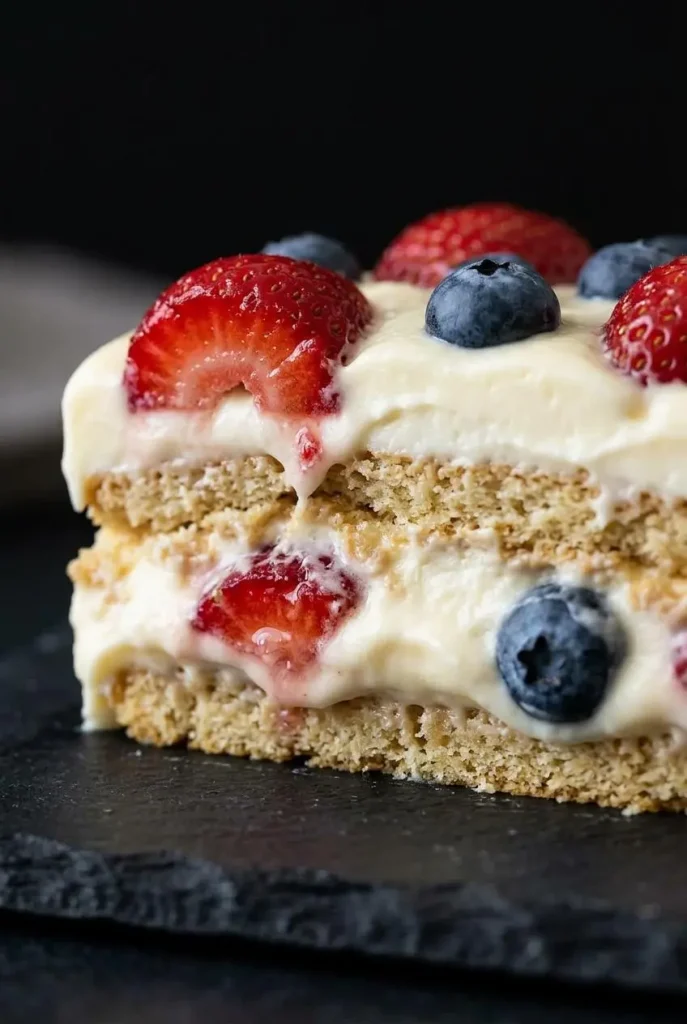
The texture is the whole point of this dessert. Icebox cake works because the graham crackers slowly pull moisture from the creamy filling and berries around them.
At about 1 hour, the crackers are still fairly crunchy. Around 2 hours, they start to bend and soften at the edges. At 4 hours and beyond, they become tender enough to mimic cake layers, which is why the minimum chill matters so much.
If you cut too early, the filling may look set but the crackers will still taste dry and stiff. Give the refrigerator time to do the heavy lifting. That slow moisture transfer is what turns stacked crackers and cream into a true refrigerator cake.
Once the cake is ready, the layers should slice cleanly with just a little give. You want soft resistance, not crunch.
Berry Selection and Prep Checklist
Fresh berries make or break this cake because they affect both flavor and structure. A little prep here prevents watery streaks and soggy layers later.
- Wash the berries gently, then dry them completely before assembly. Damp berries can tint the cream and loosen the filling.
- Slice the strawberries evenly so they lie flat between layers. Thick uneven pieces can create bumps that make the cake harder to cut.
- Keep the blueberries whole unless any are split or very soft. Intact berries release less juice into the cream.
- Do not use frozen berries here. As they thaw, they release too much liquid and can leave the filling runny and the graham crackers overly soggy.
- Handle fresh produce carefully from rinsing through assembly, since proper washing and handling of berries helps reduce food safety risks with fresh fruit. The FDA has guidance on safe washing and handling practices for fresh fruits and vegetables.
Step-by-Step Assembly Guide With Structural Success Cues
Assembly goes more smoothly when you watch for texture clues instead of just following the order. This filling needs to be thick enough to spread, but still airy enough to soften the crackers properly.
Start by beating the cream cheese smooth before the milk goes in. That one move prevents tiny lumps from hiding in the filling. After the pudding and milk are mixed, the texture should be thick and creamy. Once you fold in the whipped topping, it should feel lighter and fluffier, yet still firm enough to hold soft ridges when you drag a spatula through it.
That bottom skim of reserved cream matters more than it looks. It grips the first cracker layer so you can build straight, even rows instead of watching the crackers skate around the pan.
When you fold in the whipped topping, use broad, gentle strokes from the bottom of the bowl up through the center. Stop as soon as the mixture looks uniform. Overmixing can knock out the air and make the filling denser than it needs to be.
As you layer, keep an eye on how much filling is left and divide it as evenly as possible across the three rounds. Breaking crackers to fit the edges is part of the job, not a mistake. A snug cracker layer gives the finished cake better support and cleaner corners.
Classic Convenience vs. From-Scratch Fillings
Both styles can work well, but they behave a little differently. The version here leans on convenience ingredients for dependable structure, while a scratch-made filling gives a lighter homemade feel.
The Sturdy Pudding and Cool Whip Base
This is the easiest route for a dependable slice. Instant pudding thickens quickly, cream cheese adds body, and whipped topping keeps the filling airy instead of heavy.
It is especially useful when you want neat layers for a party tray or patriotic holiday dessert. To keep the cake level, spread the filling evenly and mentally divide it into three similar portions before you start layering.
Homemade Stabilized Whipped Cream Base
If you want to skip pudding mix, you can make a scratch-style filling with whipped heavy cream, powdered sugar, and cream cheese. Beat the cream cheese until smooth first, then fold it into the whipped cream gently so the mixture stays fluffy but still has enough body to layer.
Look for medium to firm peaks before folding. The cream should stand up with a soft curl at the tip instead of collapsing back into the bowl. That gives you a lighter result than the pudding version, though usually a slightly softer slice.
Citrus Zest Infused Berry Cake
For a brighter variation, stir fresh lemon zest into the cream mixture before layering. The aroma is fresh and clean, and it sharpens the sweetness of the berries in a really pleasant way.
You can also swap the graham crackers for cinnamon graham crackers if you want a warmer spiced note. If you love lemon and berries together, this lemon blueberry mousse cake is a natural next dessert to try.
How to Scale This Recipe for Different Pan Sizes
A 9×13 pan is the intended size for the full recipe. If you want a smaller cake for a quieter gathering, an 8×8 pan works best with about half of each ingredient.
That means using roughly half the crackers, half the filling components, half the berries, and half the drizzle. Keep the layering pattern the same, just with fewer crackers per row and the same three-layer approach if your pan depth allows.
If you scale down, watch the height of the layers rather than forcing exact cracker counts. The goal is still even coverage, steady structure, and enough filling between cracker layers to soften them properly.
Troubleshooting Common Icebox Cake Mistakes
Most problems come down to moisture, mixing, or patience. The good news is that nearly all of them are fixable before the cake goes into the refrigerator.
How to Fix a Runny Filling
- If the filling looks loose right after mixing, the milk may have gone in too quickly or the cream cheese may not have blended fully first. Chill the bowl briefly so the mixture can firm up before you spread it.
- If the filling looks thin after folding, the whipped topping may have been stirred too aggressively. Fold more gently next time to keep the airy structure intact.
- If you see lumps from the cream cheese, beat the cream cheese alone until completely smooth before adding the pudding mix. Small lumps rarely disappear once the milk is in.
- If the cake turns soggy later, the usual cause is wet berries or frozen fruit. Dry fresh berries well and skip frozen ones for this recipe.
How to Cut Perfect, Clean Slices
For sharp slices, use a chef knife dipped in hot water, then wipe it dry before cutting. After each cut, wipe the blade clean and warm it again if needed.
This keeps the cream from dragging and helps the berry layers stay defined. A fully chilled cake also cuts much better than one that was rushed to the table.
Gluten-Free and Allergen Swaps
This dessert is easy to adapt, as long as the swaps stay in the optional lane and you keep the layering logic the same.
Gluten-Free Icebox Cake Swap
Use gluten-free graham cracker sheets in place of standard graham crackers when needed. They usually soften a little faster, so keeping the berry moisture under control becomes even more important.
If graham crackers are not available, digestive biscuits, Biscoff cookies, or vanilla wafers can also work as alternative cookie layers. The texture changes slightly, but the same chilled cake effect still comes through.
How to Prevent Whipped Cream From Weeping
Weeping usually shows up when a cream layer is under-stabilized or overhandled. In this recipe, the cream cheese helps the filling stay thicker and less prone to loosening in the refrigerator, while the pudding mix adds extra structure.
If you use the scratch-made version, powdered sugar and cream cheese both help the whipped cream hold a steadier shape. Stop whipping once you reach medium to firm peaks, and fold instead of beating the final mixture together.
Keep the cake covered and chilled until serving. Perishable ingredients like milk and cream cheese hold best when refrigerated cold, and the FDA advises storing dairy foods in a refrigerator kept at or below 40°F for safer storage of perishable foods.
If you enjoy airy cream cheese desserts, strawberry cheesecake mousse uses that same creamy, stable balance in a spoonable form.
Conclusion
This icebox cake earns its place every summer because it is cool, creamy, colorful, and genuinely easy to assemble. Dry berries, smooth filling, and even layers are the main things that set you up for success.
Give it the full chill so the graham crackers can soften into true cake-like layers, then slice with a warm clean knife. It’s the kind of dessert that quietly disappears fast.
Frequently Asked Questions
Can I use frozen berries in this icebox cake?
No. Frozen berries release too much liquid as they thaw. That extra moisture can make the filling runny and the cracker layers too soggy. Fresh berries are the better choice for clean layers and better texture.
How long does the icebox cake need to chill before slicing?
It needs at least 4 hours in the refrigerator before slicing. That is the minimum time for the graham crackers to soften properly. If you want the most cake-like texture, a longer chill works even better. The key is waiting until the crackers feel fully softened.
What is a good substitute for graham crackers?
Digestive biscuits, Biscoff cookies, vanilla wafers, and gluten-free graham crackers are all solid options. Use them in the same kind of layered pattern rather than worrying about an exact piece count. Each one changes the flavor a little. Biscoff adds spice, vanilla wafers make the cake sweeter, and digestive biscuits keep things fairly close to the original texture.
Can I make this recipe completely from scratch without pudding mix?
Yes. Use a homemade whipped cream filling stabilized with cream cheese and powdered sugar instead of the pudding mixture. Whip the cream until medium to firm peaks form, beat the cream cheese smooth separately, then fold them together gently. You will get a lighter, more homemade feel with a slightly softer set.
No Bake Summer Berry Icebox Cake

Equipment
- 9×13 inch baking pan
- Hand or stand mixer
- Large Mixing Bowl
- Spatula
- Small zip-top bag
Ingredients
- 19 oz graham crackers
- 8 oz cream cheese softened
- 2 3.4 oz packages Vanilla Instant Pudding
- 2-1/2 cups cold milk
- 12 oz Cool whip or homemade whipped cream
- 3 cups fresh strawberries sliced
- 1-1/2 cups fresh blueberries
- 2 oz white chocolate chips
Instructions
- Beat the softened cream cheese with the dry pudding mixes in a large bowl until the mixture looks completely smooth and unified. The base should lose any cream cheese lumps before the milk goes in, which makes the final filling much silkier.
- Pour in the cold milk a little at a time while mixing until a thick pudding mixture forms. By the end, it should look creamy and cohesive rather than grainy or separated.
- Fold in the Cool whip or homemade whipped cream, keeping back 1/2 cup for the pan and finish. The mixture should turn light, fluffy, and spreadable, with enough body to sit in soft mounds on a spatula.
- Use part of the reserved 1/2 cup to spread a very thin layer across the bottom of a 9×13 pan. This light coat helps the first graham cracker layer stay in place instead of sliding around.
- Arrange 5 graham crackers across the center of the pan, then fit 2 more around the top and bottom edges, breaking them as needed. The goal is a mostly even first layer with only small gaps, so the finished slices stay tidy.
- Spread part of the pudding mixture over the crackers, then scatter on a layer of blueberries and sliced strawberries. The filling should cover the crackers fully, and the berries should sit in an even layer rather than clumped in one corner.
- Add another layer of graham crackers over the berries, then repeat with more pudding mixture and more berries. Press very lightly only if needed so the crackers settle without squeezing out the filling.
- Repeat the graham cracker, pudding, and berry layering one more time for 3 total rounds, finishing near the top of the pan. The pan should look evenly filled, with the layers stacked level from edge to edge.
- Refrigerate the cake for at least 4 hours or until the graham crackers have softened completely. When fully chilled, a gentle finger press should meet little resistance instead of a dry cracker snap.
- Melt the white chocolate chips as directed on the package when you are ready to serve. The chocolate should be smooth enough to fall in thin ribbons, not thick clumps.
- Drizzle the melted white chocolate over the top with a spoon or transfer it to a small zip-top bag and snip a corner for neater lines. The finish should look loose and light, so it decorates the berries without burying them.