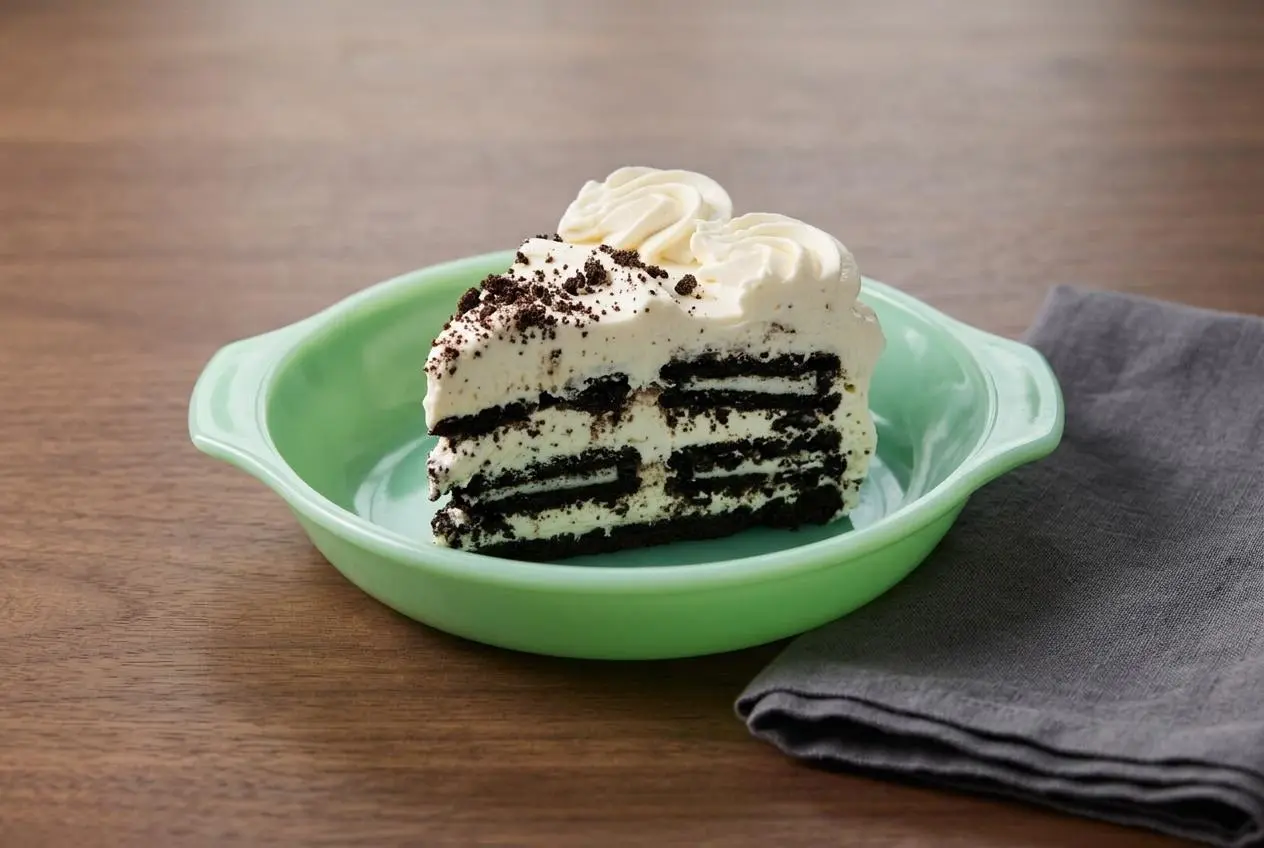
Cookies and Cream Icebox Cake is a no-bake dessert made by layering chocolate sandwich cookies with sweetened whipped cream, then chilling it until the cookies soften into tender, cake-like layers.
Cookies and Cream Icebox Cake lands right in the sweet spot between effortless and impressive. You get cold, creamy filling, deep chocolate cookie flavor, and that magic sliceable texture that happens while the cake rests in the fridge.
It’s especially handy for parties because the work happens early and the dessert finishes itself while chilling. The trick is getting the cream texture and pan setup right.
Start with fully room temperature cream cheese so the filling turns silky instead of speckled with little lumps.
Why This Cookies and Cream Icebox Cake Works
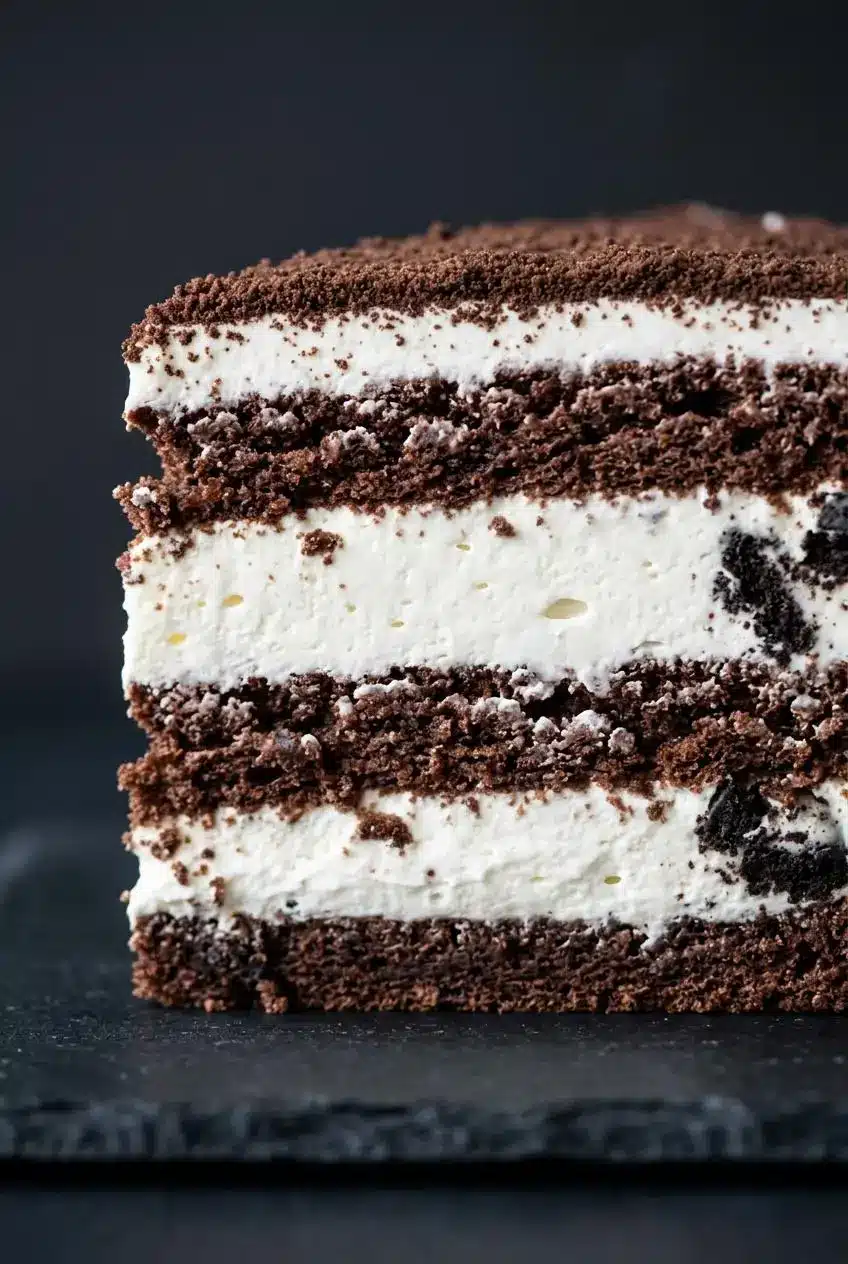
This dessert works because the cookies and cream help each other out while the cake chills. The stabilized whipped filling slowly transfers moisture to the chocolate sandwich cookies, so they soften from crisp to cake-like without turning mushy.
The cream cheese matters here. It gives the whipped cream more structure, so the filling stays fluffy enough to layer neatly and sturdy enough to hold its shape after chilling. That makes this version especially reliable for gatherings, since it scoops or slices more cleanly than an unstabilized whipped cream cake.
You also get great flavor with very little fuss. The vanilla and cream cheese together smell lightly tangy and sweet before the cookies even go in, and that cold, rich filling balances the dark cookie crumbs beautifully.
Essential Ingredients and Why They Matter
Each ingredient pulls real weight here, building the cake’s cold richness, soft structure, chocolate flavor, and clean sliceable finish.
- 1 (8-ounce/226-gram) block cream cheese, at room temperature
- 1 to 3 tablespoons granulated sugar, to taste
- 3 cups/720 milliliters heavy cream
- 1 tablespoon vanilla extract
- 40 chocolate sandwich cookies (such as Oreos), from 1 (18-ounce) package
Cream cheese gives the filling body and a gentle tang that keeps the dessert from tasting flat or overly sweet. Sugar sweetens the cream without making it cloying, and the flexible amount lets you decide how dessert-like you want the final cake to taste.
Heavy cream is essential because it has the fat needed to whip up with volume and hold soft peaks. Light cream or half-and-half will not build the same structure, so the layers can turn loose and slump instead of setting up with that plush, cloudlike texture.
Vanilla rounds out the filling and makes the cream cheese aroma warmer and softer. The chocolate sandwich cookies do the structural work on the other side, absorbing moisture as they chill until they become tender enough to cut with a spoon or knife.
I like to choose crisp, fresh chocolate cookies with a deep cocoa flavor, because stale ones soften unevenly and never taste quite as good in the finished cake.
Stabilized Whipped Cream vs Traditional Cream
If you have ever had an icebox cake turn weepy or collapse after sitting, this is the fix. Cream cheese stabilizes whipped cream by adding more solids and fat, so the filling holds air better and stays thicker for longer.
Traditional whipped cream is delicious, but it is more delicate. In an icebox cake, that can mean the layers relax too much as the cookies soften. With cream cheese in the mix, the filling stays smoother, slices cleaner, and supports the cookie layers without feeling heavy.
When the mixture is ready, it should look glossy, airy, and thick enough to mound softly on a spoon. If it starts looking grainy or chunky, it has gone too far.
Selecting the Perfect Cookies
Regular chocolate sandwich cookies are the best fit here. They absorb moisture at a better pace, so the cake softens evenly and keeps a balanced cookie-to-cream ratio.
Double Stuf cookies can work, but they push the dessert sweeter and slightly softer because of the extra filling. They also stack a little less neatly. If you want the cleanest texture and the most classic cookies and cream flavor, stick with regular cookies.
How to Make Cookies and Cream Icebox Cake
- Beat the cream cheese and sugar in a large bowl with an electric mixer, or in a stand mixer with the paddle attachment, on medium speed for about 3 minutes, then scrape the bowl and mix 30 seconds more.
The mixture should look completely smooth and creamy, with no visible lumps clinging to the sides or paddle. - If using a stand mixer, switch to the whisk attachment and slowly add about 1/2 cup of the cream while mixing on medium-low, then stop and scrape the bowl before mixing again.
This step loosens the cream cheese base so it turns light and silky instead of dense. - Pour in the remaining cream and add the vanilla extract, then beat on medium-high for about 4 minutes until fluffy soft peaks form.
The cream should hold a soft curl that bends over at the tip and look thick enough to spread easily without running. - Spread 1 1/4 cups of the cream mixture in a 2-quart baking dish, such as an 8-by-8-inch square pan or 9-inch round cake pan, then cover it with a single layer of cookies.
That base layer keeps the first cookies from sliding and helps the cake set up evenly from bottom to top. - Spoon about 2 1/2 cups of the cream mixture over the cookies and smooth it out, then add another layer of cookies and finish with the remaining cream.
Try to cover the cookies fully so they soften at the same rate and the top stays neat. - Cover the pan and chill for at least 8 hours, then crush the remaining cookies and sprinkle them over the top before serving chilled.
Once ready, a knife should slide in with light resistance, more like a tender sheet cake than a stack of crisp cookies.
Step-by-Step Assembly Guide
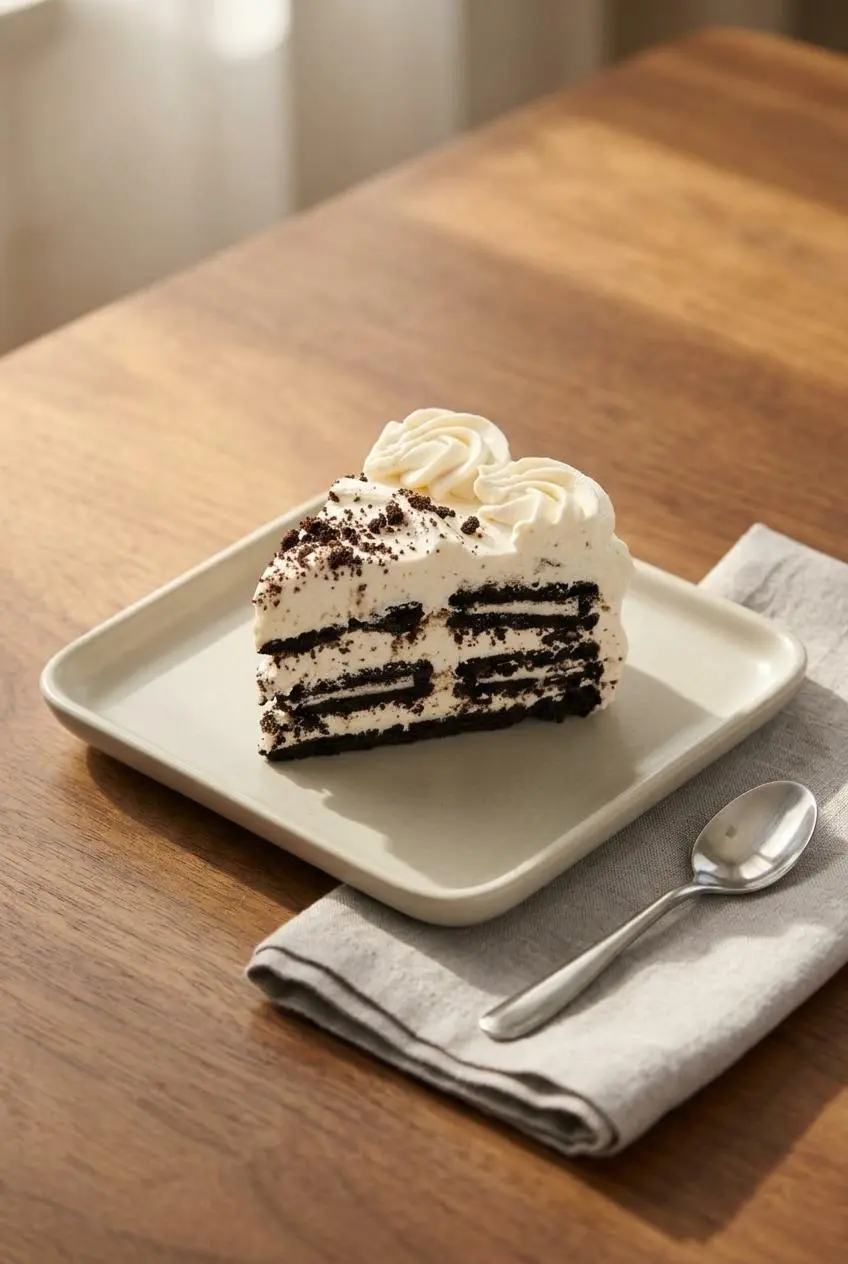
This is the part that keeps the cake sturdy instead of slippery. Start with cream on the bottom, then cookies, then more cream, then cookies, then the last of the cream. That sequence anchors the layers and makes sure every cookie gets enough moisture to soften evenly.
If you are using an 8-by-8-inch pan, spread the filling all the way to the corners and keep the cookie layers as level as possible. For a 2-quart dish, the same idea applies. Small gaps are fine, but avoid big empty spaces or thick piles in one spot, since those can make the texture uneven when you scoop or cut it.
The Loaf Pan Method with Easy Release
A loaf pan gives you the neatest unmolded shape. Line the pan with plastic wrap before you start, leaving enough overhang on the long sides so you can lift the whole cake out after chilling.
Press the plastic wrap into the corners so the layers sit flat, then build the cake the same way you would in a baking dish. When fully chilled, use the overhang to lift it onto a platter, peel back the wrap, and slice. This is the best choice if you want clean, bakery-style pieces.
If you love this kind of chilled layered dessert but want something even more casual for a cookout, an ice cream sandwich cake hits a similar easygoing note.
Using a Springform Pan for Elegant Slices
A springform pan works well when you want a taller, round presentation for a party. Since the sides are higher and straight, the cake looks more like a classic layer cake once you remove the ring.
Spread the cream carefully to the edge so the outside looks smooth when unmolded. You may need to break a few cookies to fit the round shape neatly, and that is completely fine. Chill the cake thoroughly before releasing the ring, and for the sharpest wedges, give it a brief stint in the freezer right before slicing.
Troubleshooting and Success Tips
Most problems with this cake come down to cream texture or cookie moisture. A few small adjustments make a big difference.
- If the filling looks lumpy, the cream cheese was probably too cold. Let it come fully to room temperature before mixing so it blends into a smooth base.
- If the whipped filling starts looking thick, grainy, or curdled, it has likely been over-whipped. Gently fold in a small splash of liquid heavy cream to loosen it back up.
- If the cake turns too soggy, the cookies likely got extra moisture somewhere they did not need it. Do not dip the cookies in milk when using fresh whipped cream.
- If the layers slide when assembling, the cream may be too loose. Stop whipping at soft peaks that are fluffy and spreadable, not runny.
- If slicing feels messy, the chill was too short. The cookies need that full rest so the texture changes from crunchy to soft and cake-like.
Chilling and Storage Guidelines
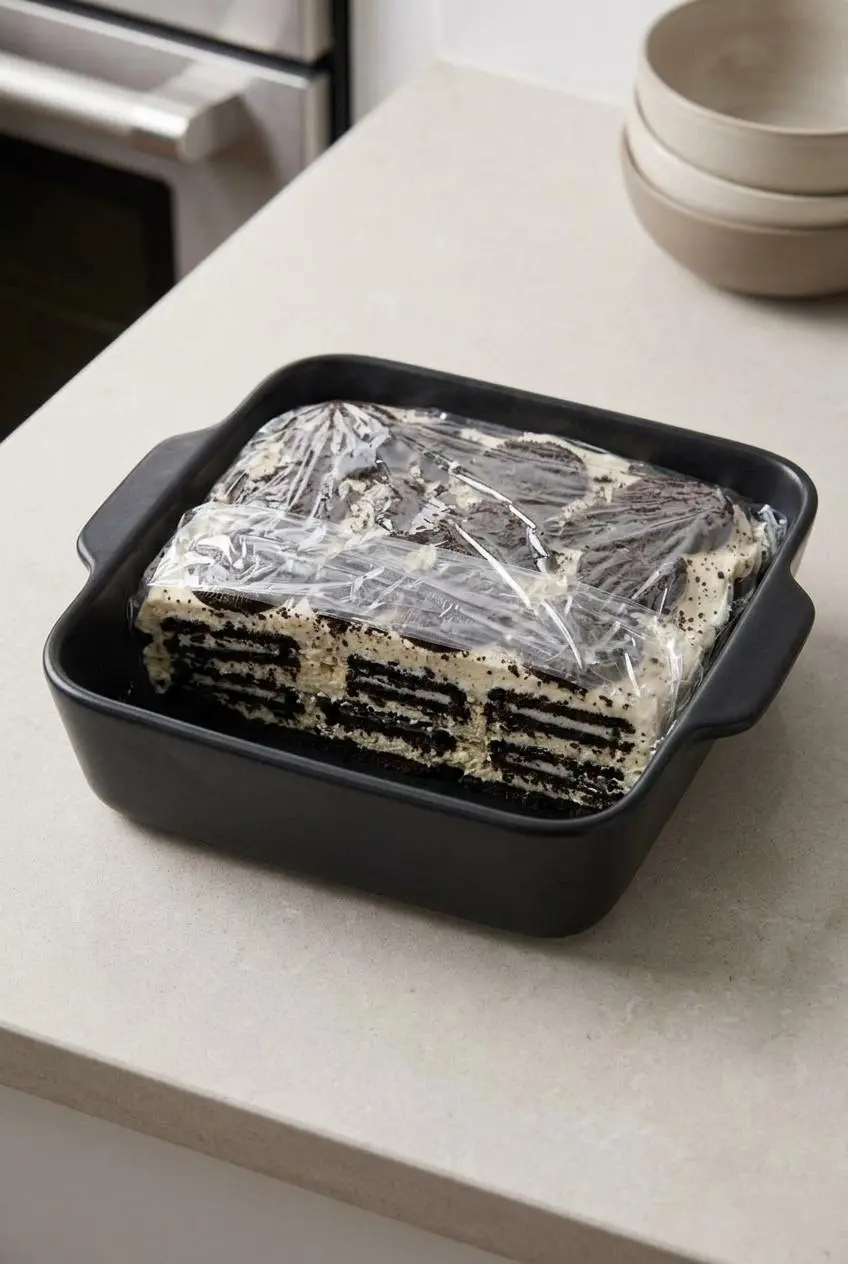
The chill is not optional here. The cake needs at least 8 hours in the refrigerator so the cookies can absorb moisture and soften properly. Before that point, the layers still taste good, but the texture will be more crunchy than cake-like.
For especially clean slices, place the finished cake in the freezer for 30 minutes just before serving. That short chill firms the cream enough to cut tidy wedges without turning the dessert into a frozen block.
Store leftovers covered in the refrigerator and keep the dessert well chilled, since it is made with perishable dairy. For general dairy storage, the refrigerator should stay at or below 40°F for perishable dairy foods.
If you want to freeze the assembled cake, wrap it well so the surface stays protected from frost and off flavors. A fully wrapped cake can be frozen for up to one month. Thaw it in the refrigerator before serving, and expect the cookies to soften a bit more after thawing.
Simple Variations and Dietary Swaps
The core version is classic for a reason, but a few optional changes can take it in different directions without changing the basic method.
Gluten-Free Cookies and Cream
To make it gluten-free, swap in certified gluten-free chocolate sandwich cookies. The layering method stays the same, but cookie brands can vary in thickness and sweetness, so keep an eye on how snugly they fit in your pan.
Some gluten-free cookies soften a little faster, while others stay firmer a bit longer. Either way, the stabilized filling helps keep the structure solid. If you enjoy the same flavor profile in individual portions, this cookies and cream mousse is another fun option.
Sophisticated Mocha Flavor Upgrade
For a mocha version, add a little espresso flavor to the cream and use chocolate chip cookies instead of sandwich cookies if you want a more grown-up twist. If you choose a coffee liqueur route, keep it as an optional variation rather than part of the main recipe.
The idea is to add a gentle coffee bitterness that trims the sweetness and deepens the chocolate flavor. It turns the dessert from playful to dinner-party friendly very quickly.
Texture Upgrades with Sweet and Salty Swirls
Want more contrast? Try one of these optional add-ins:
- A drizzle of warm chocolate fudge over the top adds richer chocolate flavor and a softer finish.
- Toffee bits bring extra crunch and a buttery candy note.
- Crushed salty pretzels add welcome contrast if you find cookies and cream desserts a touch too sweet.
- Fresh raspberries or strawberries on top brighten the whole dessert and cut through the richness.
Conclusion
This cake earns its place with very little effort and a very big payoff. Once the cream is whipped properly and the layers are built evenly, the refrigerator does the rest.
Give it the full chill, and the cookies turn into soft, sliceable layers that feel surprisingly polished for a no-bake dessert. Patience really is the best ingredient here.
Frequently Asked Questions
Can I Use Cool Whip Instead of Heavy Cream?
Yes, you can. Cool Whip has less moisture than fresh whipped cream, so the cookies usually need a very light dip in milk first to soften properly. The texture and flavor will be a little different, but it is a workable shortcut.
Does Cookies and Cream Icebox Cake Go in the Fridge or Freezer?
It belongs in the refrigerator for the main chill. That cold, steady chill is what softens the cookies into a cake-like texture. You can place it in the freezer for 30 minutes right before serving if you want cleaner slices.
Can I Use Double Stuf Oreos?
Yes, but regular cookies are the better choice here. Double Stuf cookies make the dessert sweeter and a little less tidy structurally because there is more filling and less cookie. Regular sandwich cookies soften more evenly and give a better balance of cream to chocolate.
How Long Does Icebox Cake Last in the Refrigerator?
When tightly covered, it keeps well in the refrigerator for 3 to 4 days. The texture keeps changing as it sits, so the cookies become softer over time. Keep it well chilled and serve straight from the fridge for the best texture.
Cookies and Cream Icebox Cake

Equipment
- large bowl
- electric mixer or stand mixer
- Paddle attachment
- whisk attachment
- 2-quart baking dish or 8-inch square pan
Ingredients
- 1 8-ounce/226-gram block cream cheese at room temperature
- 1 to 3 tablespoons granulated sugar to taste
- 3 cups/720 milliliters heavy cream
- 1 tablespoon vanilla extract
- 40 chocolate sandwich cookies (such as Oreos) from 1 (18-ounce) package
Instructions
- Beat the cream cheese and sugar in a large bowl with an electric mixer, or in a stand mixer with the paddle attachment, on medium speed for about 3 minutes, then scrape the bowl and mix 30 seconds more. The mixture should look completely smooth and creamy, with no visible lumps clinging to the sides or paddle.
- If using a stand mixer, switch to the whisk attachment and slowly add about 1/2 cup of the cream while mixing on medium-low, then stop and scrape the bowl before mixing again. This step loosens the cream cheese base so it turns light and silky instead of dense.
- Pour in the remaining cream and add the vanilla extract, then beat on medium-high for about 4 minutes until fluffy soft peaks form. The cream should hold a soft curl that bends over at the tip and look thick enough to spread easily without running.
- Spread 1 1/4 cups of the cream mixture in a 2-quart baking dish, such as an 8-by-8-inch square pan or 9-inch round cake pan, then cover it with a single layer of cookies. That base layer keeps the first cookies from sliding and helps the cake set up evenly from bottom to top.
- Spoon about 2 1/2 cups of the cream mixture over the cookies and smooth it out, then add another layer of cookies and finish with the remaining cream. Try to cover the cookies fully so they soften at the same rate and the top stays neat.
- Cover the pan and chill for at least 8 hours, then crush the remaining cookies and sprinkle them over the top before serving chilled. Once ready, a knife should slide in with light resistance, more like a tender sheet cake than a stack of crisp cookies.