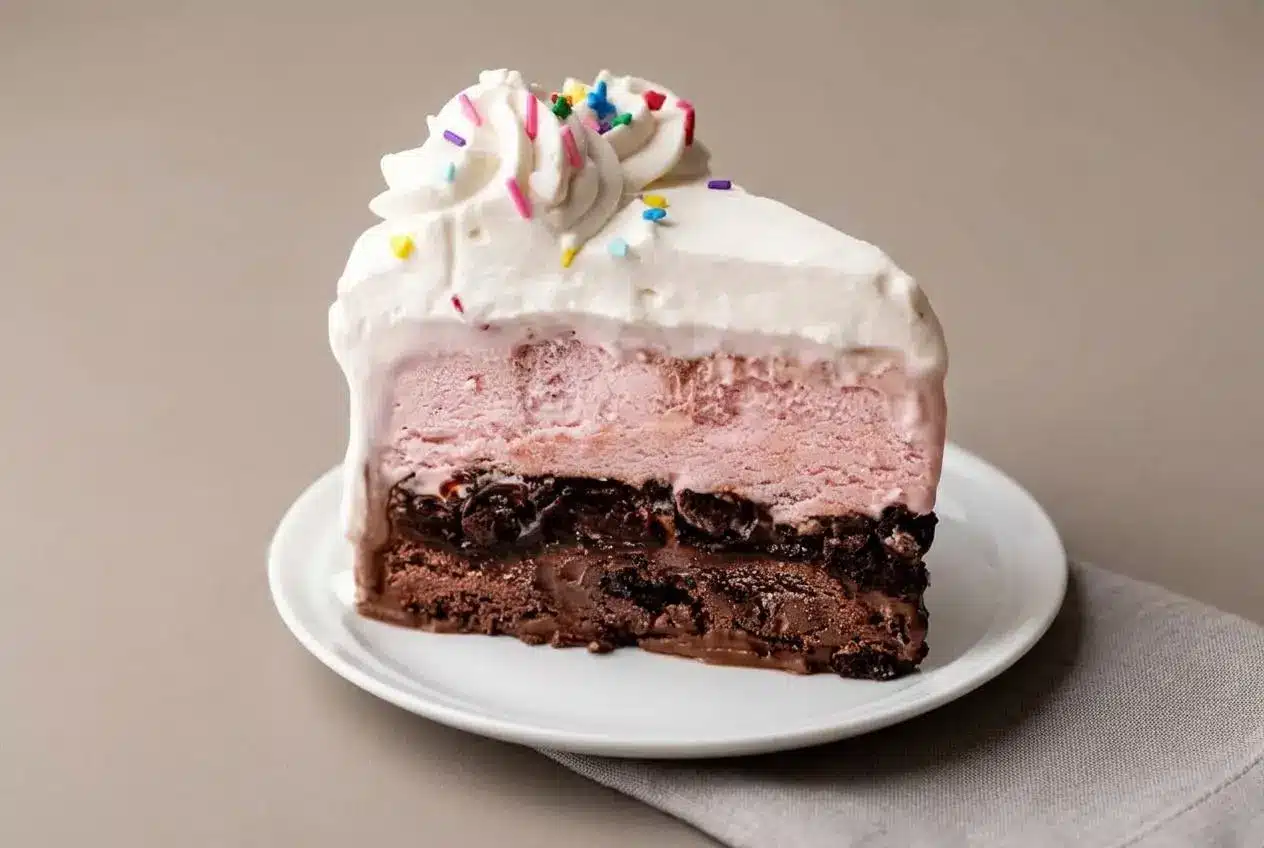
Build this classic frozen cake by layering softened ice cream, hot fudge, buttery cookie crumbs, and a second ice cream flavor in a lined springform pan. Freeze between layers, then cover the fully firm cake with whipped cream frosting.
This ice cream cake recipe delivers the familiar contrast everyone wants: creamy chocolate and strawberry ice cream, rich fudge, and crunchy chocolate cookie crumbs tucked through the center.
It takes patience more than tricky technique, and each chill gives you sharper layers instead of a swirled puddle. The fudge crunch center is the payoff.
Clear a freezer shelf before you start so the pan can go straight back into the cold after every layer.
Essential Ingredients for Homemade Ice Cream Cake
Each ingredient contributes to the cake’s structure and texture, from creamy ice cream layers and crisp cookie crumbs to firm fudge and a light whipped topping that stays pleasant to slice.
Cake
- 10 Oreo cookies (110g)
- 2 Tablespoons (28g) unsalted butter, melted
- 1.5 quarts (48 ounces/3 pints/1.42L) chocolate ice cream, softened (or other flavor)
- 1 cup (8 ounces/227g) homemade hot fudge (or use store-bought), divided
- 1.5 quarts (48 ounces/3 pints/1.42L) strawberry ice cream, softened (or other flavor)
Topping
- 2 cups (480g/ml) heavy cream, cold
- 1/3 cup (40g) confectioners’ sugar
- 1 and 1/2 teaspoons pure vanilla extract
- optional for garnish: sprinkles
Choose ice cream with a rich, full-fat texture when possible. It softens into a spreadable layer and refreezes with less iciness than airy, low-fat styles. The chocolate and strawberry pairing gives the cake a classic nostalgic look, while cookies and cream also works beautifully with chocolate.
Hot fudge is the structural ingredient in the crunch layer. Use it at room temperature so it spreads without melting the ice cream, then firms in the cold to hold the crumbs in place. Thin chocolate syrup stays loose and can seep through the layers, so it will not create the same stable center.
The cold heavy cream whips into a soft-looking but sturdy coating. Confectioners’ sugar sweetens it and helps the frosting hold its shape, while vanilla keeps the flavor from tasting flat.
I take the hot fudge out of the refrigerator before assembling so it can spread smoothly without being warm enough to soften the cake below it.
Choosing the Best Ice Cream Flavors
Use flavors that taste good together but still look distinct when sliced. Chocolate and strawberry create clear bands around the fudge crunch center. Mint chocolate chip with fudge is another strong choice, especially when the green layer contrasts with dark cookie crumbs.
For a softer, more cohesive slice, let each container sit out for the stated 10 minutes only. The ice cream should resemble soft serve: pliable enough to press with the back of a spoon, but still cold and moundable. If it looks shiny, loose, or drippy around the edges, return it to the freezer briefly before spreading.
The Secret to the Fudgy Crunch Layer
The cookie layer needs two protections: butter and thick fudge. Melted butter coats the coarse Oreo crumbs, slowing moisture from soaking into them. Leave a few larger pieces for a crunch that remains noticeable against the creamy ice cream.
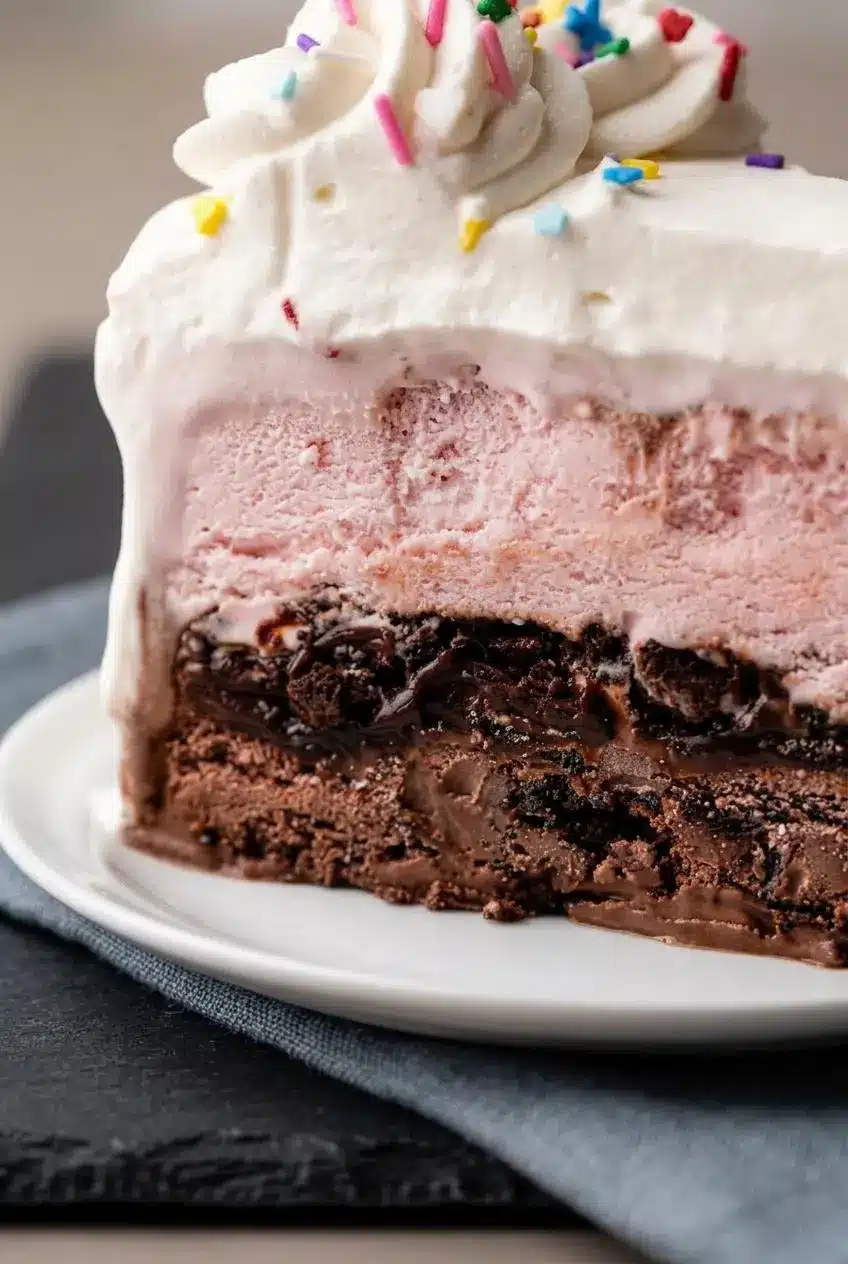
Spread room-temperature hot fudge over a thoroughly chilled ice cream layer, then add the buttered crumbs. Once it sets, the fudge changes from glossy to more matte and creates a firm chocolatey grip around the crumbs. That is what gives this cake its signature fudgy, crunchy middle.
Why Whipped Cream Outperforms Buttercream
Whipped cream frosting stays light and easy to cut straight from the freezer. Buttercream can become dense and waxy when very cold, while whipped cream keeps the outside of the cake airy and less heavy beside the rich ice cream.
If you enjoy chocolate cookies with a softer cream topping in other chilled desserts, a cookies and cream icebox is another good direction to explore.
How to Make Homemade Ice Cream Cake
Work quickly at the counter, but do not rush the freezer rests. Every firm layer supports the next one and keeps the finished slices clean.
- Pulse the Oreos, including their filling, in a food processor or blender until they form coarse crumbs, leaving some larger bits if desired; stir in the melted butter.
The mixture should look evenly moistened with visible cookie pieces rather than a fine, sandy powder. - Let the chocolate ice cream stand at room temperature for 10 minutes while lining a 9×3-inch or 10×3-inch springform pan with overlapping plastic wrap.
Leave enough plastic wrap hanging over the rim to create handles for lifting the frozen cake later. - Spread the softened chocolate ice cream evenly across the lined pan with the back of a large spoon, then place the pan in the freezer for 30 minutes.
The surface should feel firm when lightly touched through the plastic wrap, with no soft pool around the edges. - Bring the hot fudge to a room-temperature, spreadable consistency, then spread 1/2 cup over the firm chocolate layer and scatter the Oreo mixture evenly over it.
The fudge should glide across the ice cream without steaming or turning the bottom layer soft. - Return the pan to the freezer for 30 minutes, and after 20 minutes set out the strawberry ice cream for 10 minutes.
The cookie layer should become firm enough that crumbs stay in place when the next layer is added. - Drizzle the remaining 1/2 cup hot fudge over the cookie layer, then quickly spread the softened strawberry ice cream into an even top layer.
Use gentle strokes so the strawberry ice cream stays distinct instead of pulling crumbs into the top layer. - Cover the pan with plastic wrap or aluminum foil and freeze for at least 12 hours and up to 2 days.
The cake should be fully solid before removing the springform ring or applying frosting. - If transferring the cake from the springform base, place the serving plate, cake stand, or cutting board in the freezer for at least 30 minutes.
A cold surface prevents the bottom ice cream layer from softening as soon as it touches the platter. - Beat the cold heavy cream, confectioners’ sugar, and vanilla with a handheld mixer or stand mixer on medium-high speed for about 4 minutes.
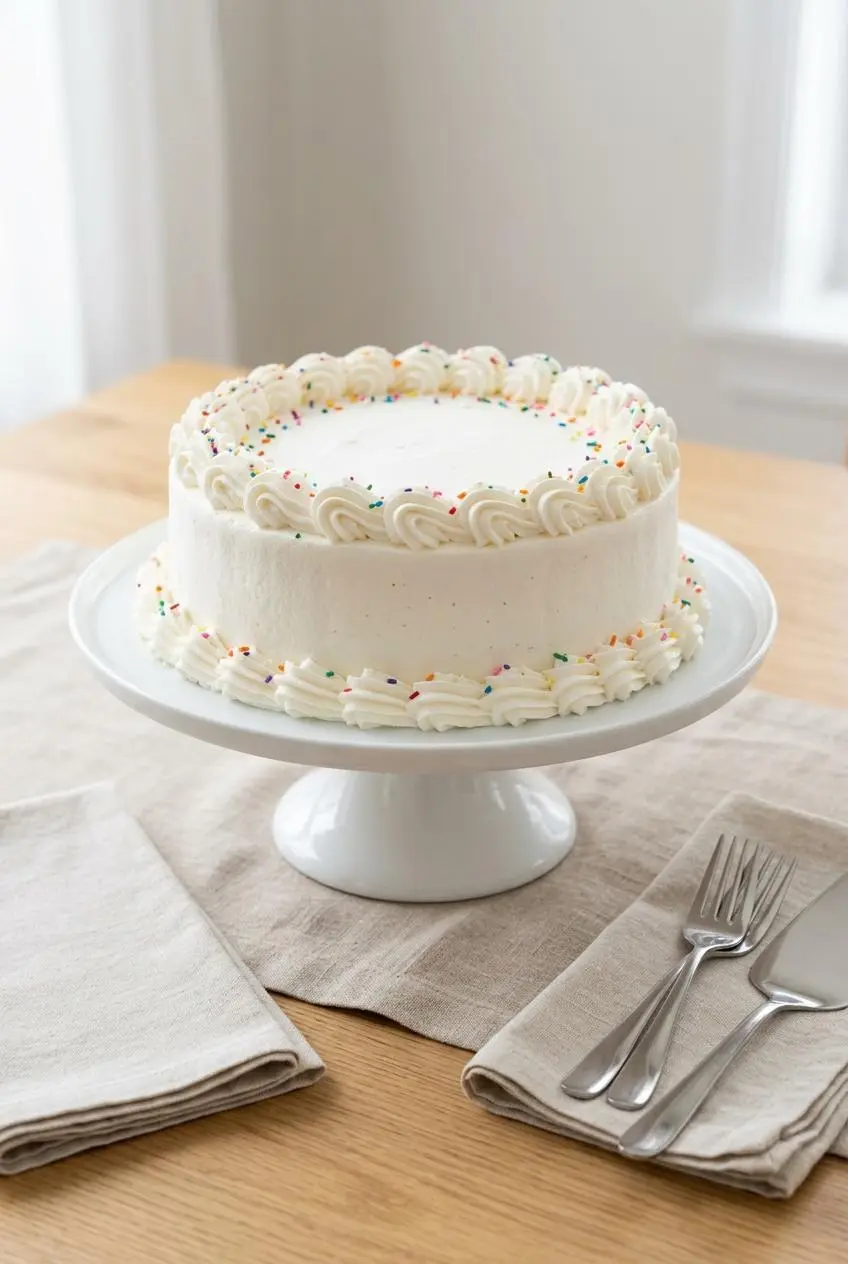
Stop when the cream forms stiff peaks that stand upright without folding over. - Remove the pan rim, lift the cake with the plastic-wrap overhang, peel away the plastic, and set the cake on its springform base or chilled serving surface before frosting the top and sides.
Keep the coating smooth or pipe a border, then add sprinkles if desired while the frosting is still soft. - Serve immediately, or freeze the frosted cake for up to 1 hour before serving, using a sharp knife warmed in hot water between cuts.
Wipe the blade dry before each straight downward cut, then keep leftover cake covered in the freezer.
Troubleshooting Melting, Soggy Crumbs, and Sticking
Frozen desserts reward preparation. If a layer becomes too soft, pause and let the freezer restore its structure before continuing.
Temperature Control and Pre-Chilled Equipment
- The ice cream is melting while you spread it: The room may be warm or the ice cream may have softened too long. Chill the springform pan, mixer bowl, and serving platter for 30 minutes before assembly, and return the cake to the freezer whenever the edges begin to slump.
- The frosting looks wet or slides down: The cake was not firm enough before frosting. Freeze the assembled cake for the full 12-hour minimum, then frost in quick, deliberate strokes.
- The bottom starts melting on the cake stand: A room-temperature stand pulls heat into the ice cream. Use the chilled plate or keep the cake on the springform base.
Preventing Soggy Cookie Crunch Centers
- The crumbs lose their crunch: Cookie crumbs need their melted-butter coating before they meet the fudge. Mix until every crumb looks lightly coated, including the larger pieces.
- The cake layers slide apart: Thin syrup remains runny and cannot anchor the cookie layer. Use thick hot fudge at room temperature, then allow the 30-minute rest to firm it before adding the top ice cream.
- Crumbs streak through the strawberry layer: The bottom layers were not cold enough. Wait until the fudge and crumbs feel firm, then spread the top ice cream with a light hand.
Foolproof Springform Pan Release
The plastic-wrap overhang acts as a sling, giving you a controlled way to lift the cake after removing the ring. Peel the wrap away gradually rather than tugging it off in one pull, which can tear the outer edge.
If the springform ring resists, wrap a warm, damp kitchen towel around the outside of the rim briefly. The gentle warmth loosens the edge without turning the cake soft. Remove the ring, then return the cake to the freezer if the sides need to firm up before frosting.
Make-Ahead Timeline, Storage, and Slicing Tips
The cake can be assembled before the event, which makes it especially useful for birthdays and summer gatherings. Keep it protected from freezer air so the surface stays smooth and the frosting does not pick up stray freezer odors.
Freezing Schedule and Long-Term Storage
Freeze each ice cream layer for 30 minutes during assembly, then freeze the covered assembled cake for at least 12 hours and up to 2 days before frosting. Once frosted, the method calls for serving right away or returning the cake to the freezer for up to 1 hour before serving.
For leftovers, cover the cake securely and keep it in the freezer. Press plastic wrap gently against exposed cut sides, then add an outer layer of foil if needed to protect the creamy layers from drying out. Avoid leaving dairy-based frosting at room temperature while preparing other party foods.
The Hot-Water Knife Slicing Technique
Let the cake sit on the counter for 5 to 10 minutes so the knife can move through the layers without crushing the cookie center. Dip a large sharp chef’s knife into hot water, dry it completely, and press straight down instead of sawing back and forth.
Wipe away any fudge or ice cream on the blade, warm it again, and repeat for every slice. The cleanest cut has smooth ice cream bands, a defined dark crunch center, and edges that do not drag frosting across the plate.
Creative Flavor Combinations and Pan Variations
Once you understand the layering rhythm, you can change the flavor profile or pan shape while keeping the crunchy center and whipped topping as optional building blocks.
Adding a Baked Cake Bottom Layer
For a hybrid dessert, replace the bottom ice cream layer with a fully cooled 8-inch chocolate or vanilla cake round. An oil-based cake stays softer when chilled than an all-butter cake, so it is easier to slice alongside the ice cream layers.
Build the fudge crunch and top ice cream layer over the cold cake, treating the baked layer as an optional format rather than changing the main method above. A classic yellow cake makes a mellow vanilla base for strawberry ice cream and chocolate fudge.
Making an Ice Cream Sheet Cake for Large Crowds
Use a 9×13-inch pan when you want easy party serving without unmolding a round cake. Line the dish with plastic wrap if you want to lift the cake out, or build and serve it directly from the pan for the least fussy option.
Spread the layers in the same order: bottom ice cream, hot fudge, buttered cookie crumbs, more fudge, then the top ice cream. Keep the layers level, chill between additions, and use the hot-water knife method for tidy squares.
Custom Flavor and Allergen Swaps
- Mint chocolate chip and fudge: The minty top layer makes the dark fudge center taste especially bold and gives the slices a festive look.
- Cookies and cream with chocolate fudge: This creates a deeper chocolate-cookie profile while keeping the same crunchy center.
- Neapolitan style: Use chocolate and strawberry ice cream as written, then finish with vanilla whipped cream for a three-flavor celebration cake.
- Gluten-free option: Choose certified gluten-free chocolate sandwich cookies and confirm that the ice cream and hot fudge suit your dietary needs.
- Fruity alternative: A strawberry ice cream cake is a bright choice when you want a berry-forward frozen dessert instead of a fudge-heavy one.
Conclusion
A homemade ice cream cake feels special because every slice has a little contrast: creamy ice cream, firm fudge, crisp cookies, and soft whipped frosting. The key is giving each layer enough freezer time to hold its place.
Keep the knife hot and dry, choose flavors that make you happy, and enjoy those clean, colorful slices while they are at their best.
Frequently Asked Questions
How Far in Advance Can I Make an Ice Cream Cake?
Assemble the unfrosted cake up to 2 days ahead, then keep it covered in the freezer until it is fully firm. Frost it close to serving time, or return the finished cake to the freezer for up to 1 hour before serving. Keep leftovers securely covered to protect the texture of the ice cream and whipped topping.
Why Did My Ice Cream Cake Layers Melt Together During Assembly?
Ice cream layers blend when the ice cream softens past a thick soft-serve texture or when warm fudge lands on an unfrozen layer. Use room-temperature hot fudge and freeze each stage for 30 minutes before moving on. If the pan edges look loose or glossy, pause and return the cake to the freezer before adding anything else.
Can I Use Chocolate Syrup Instead of Hot Fudge for the Crunch Layer?
No. Chocolate syrup stays too loose in the cold and can seep into the ice cream, making the layers slide. Thick hot fudge sets firmly around the buttered cookie crumbs, creating the distinct fudgy crunch center.
How Do You Slice a Frozen Ice Cream Cake Cleanly?
Let the cake sit out for 5 to 10 minutes, then warm a sharp chef’s knife in hot water and dry it completely. Press straight down through the cake rather than sawing. Wipe, rewarm, and dry the blade between every cut for neat bakery-style slices.
Ice Cream Cake Recipe

Equipment
- 9×3-inch Springform Pan
- Food processor
- Electric Mixer
- Piping bag
- Wilton 1M Piping Tip
Ingredients
Cake
- 10 Oreo cookies (110g)
- 2 Tablespoons unsalted butter, melted 28g
- 1.5 quarts chocolate ice cream, softened (or other flavor) 48 ounces/3 pints/1.42L
- 1 cup homemade hot fudge (or use store-bought), divided 8 ounces/227g
- 1.5 quarts strawberry ice cream, softened (or other flavor) 48 ounces/3 pints/1.42L
Topping
- 2 cups heavy cream, cold 480g/ml
- 1/3 cup confectioners’ sugar 40g
- 1 and 1/2 teaspoons pure vanilla extract
- sprinkles optional for garnish
Instructions
- Pulse the Oreos, including their filling, in a food processor or blender until they form coarse crumbs, leaving some larger bits if desired; stir in the melted butter. The mixture should look evenly moistened with visible cookie pieces rather than a fine, sandy powder.
- Let the chocolate ice cream stand at room temperature for 10 minutes while lining a 9×3-inch or 10×3-inch springform pan with overlapping plastic wrap. Leave enough plastic wrap hanging over the rim to create handles for lifting the frozen cake later.
- Spread the softened chocolate ice cream evenly across the lined pan with the back of a large spoon, then place the pan in the freezer for 30 minutes. The surface should feel firm when lightly touched through the plastic wrap, with no soft pool around the edges.
- Bring the hot fudge to a room-temperature, spreadable consistency, then spread 1/2 cup over the firm chocolate layer and scatter the Oreo mixture evenly over it. The fudge should glide across the ice cream without steaming or turning the bottom layer soft.
- Return the pan to the freezer for 30 minutes, and after 20 minutes set out the strawberry ice cream for 10 minutes. The cookie layer should become firm enough that crumbs stay in place when the next layer is added.
- Drizzle the remaining 1/2 cup hot fudge over the cookie layer, then quickly spread the softened strawberry ice cream into an even top layer. Use gentle strokes so the strawberry ice cream stays distinct instead of pulling crumbs into the top layer.
- Cover the pan with plastic wrap or aluminum foil and freeze for at least 12 hours and up to 2 days. The cake should be fully solid before removing the springform ring or applying frosting.
- If transferring the cake from the springform base, place the serving plate, cake stand, or cutting board in the freezer for at least 30 minutes. A cold surface prevents the bottom ice cream layer from softening as soon as it touches the platter.
- Beat the cold heavy cream, confectioners’ sugar, and vanilla with a handheld mixer or stand mixer on medium-high speed for about 4 minutes. Stop when the cream forms stiff peaks that stand upright without folding over.
- Remove the pan rim, lift the cake with the plastic-wrap overhang, peel away the plastic, and set the cake on its springform base or chilled serving surface before frosting the top and sides. Keep the coating smooth or pipe a border, then add sprinkles if desired while the frosting is still soft.
- Serve immediately, or freeze the frosted cake for up to 1 hour before serving, using a sharp knife warmed in hot water between cuts. Wipe the blade dry before each straight downward cut, then keep leftover cake covered in the freezer.