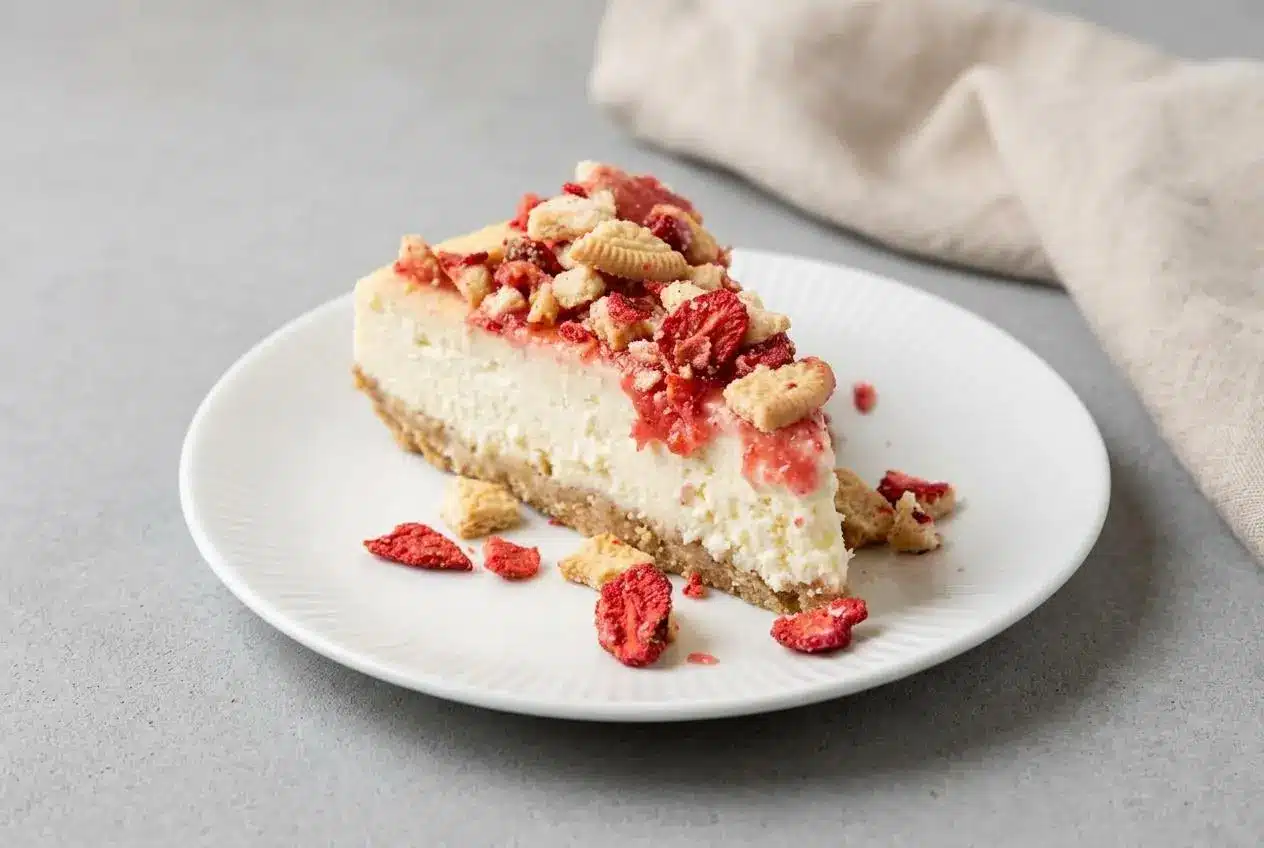
Bake a smooth vanilla cheesecake in a water bath, chill it well, then top it with fresh strawberry sauce and a buttery Golden Oreo and freeze-dried strawberry crunch for the cleanest slices and best texture.
Berrylicious Strawberry Crunch Cheese Cake is a baked vanilla cheesecake with a graham cracker base, a creamy center, a bright strawberry layer, and a crisp berry cookie topping. It hits that bakery-style mix of cool, silky, fruity, and crunchy in every bite.
If you want a cheesecake that looks impressive but still makes sense in a home kitchen, this one delivers. The buttery crust smells lightly toasted, the center bakes up lush, and the final crunch keeps it lively. The topping trick is worth it.
Set the cream cheese out early, and press a finger into the wrapper side before mixing. It should give easily without feeling greasy or cold in the middle.
Why This Berrylicious Strawberry Crunch Recipe Works
This dessert works because every layer does a different job. The graham cracker crust stays firm and toasty, the cream cheese filling bakes into a dense but silky center, the strawberry sauce adds brightness, and the crunchy topping gives that sweet cookie snap you expect from a celebration cheesecake.
The texture contrast matters most. A rich baked filling can feel heavy if the top is soft too, so the crushed Golden Oreos and freeze-dried strawberries bring crispness that cuts through the creamy middle. If you already love the crumb contrast in strawberry shortcake cheesecake, this version leans even harder into that creamy-meets-crunchy payoff.
Freeze-dried strawberries are especially useful here because they bring concentrated berry flavor without extra liquid. Fresh berries would soften the crumb mixture too quickly, but freeze-dried fruit stays dry enough to keep the topping sandy and crisp while still tasting like real strawberries instead of candy.
The thin strawberry sauce layer also has a second job beyond flavor. Used lightly, it helps the crunch adhere to the top without being stirred into the crumbs. That separation slows down sogginess. If you want to go one step further, a very thin swipe of white chocolate or cream cheese frosting under the sauce can act as an optional moisture barrier, but the cheesecake works beautifully without it.
I always reach for freeze-dried strawberries here because they give a cleaner berry flavor and hold their crunch longer than gelatin-based mixes.
Essential Ingredients for the Ultimate Crunch Cake
Each ingredient pulls its weight here, from the sturdy crust to the silky filling and bright topping, so the finished cheesecake has structure, richness, berry flavor, and the right kind of crunch.
Official Recipe Ingredients
Homemade Graham Cracker Crust
- 9 graham cracker sheets (finely crushed)
- 5 tablespoons (71 grams) unsalted butter (melted)
- 4 tablespoons (50 grams) granulated sugar
- 1/4 teaspoon salt
Vanilla Cheesecake Filling
- 4 blocks (908 grams) cream cheese (room temperature)
- 1 1/2 cups (300 grams) granulated sugar
- 4 large eggs (room temperature )
- 2/3 cup (150 grams) heavy cream (room temperature)
- 2 tablespoon vanilla extract
Strawberry Sauce
- 1 cup (167 grams) strawberries (fresh or frozen)
- 1 tablespoon (11 grams) granulated sugar
Strawberry Crunch
- 10 golden Oreos (roughly crushed)
- 1 1/2 cups freeze-dried strawberries (roughly crushed)
- 3 tablespoons (42 grams) unsalted butter (melted)
Full-fat block cream cheese is the backbone of the filling. It sets with a richer, more stable texture than whipped or tub-style cream cheese, and it beats up smoother when properly softened. Heavy cream softens that density just enough, so the center tastes plush instead of tight.
The weight measurements in grams are especially helpful with cheesecake because they keep the texture consistent. If you bake often, using the gram amounts for the crust butter, sugar, cream cheese, cream, and strawberries makes the whole process more predictable.
The crust ingredients have a clear purpose too. Melted butter binds the crumbs, sugar helps the crust toast and set, and salt keeps the base from tasting flat under the sweet filling.
Press the buttery crumbs firmly into the pan to build a sturdy foundation that holds up under the weight of the rich filling.
The Crackers and Cookies
Graham crackers and Golden Oreos may seem similar, but they do different jobs. Graham crackers make a drier, firmer bottom crust that slices neatly and tastes a little more buttery and toasty after baking.
Golden Oreos are better on top because they stay chunkier and more playful. Their cookie cream helps the melted butter cling to the crushed pieces, so the strawberry crunch holds together instead of falling into dusty crumbs.
Real Berries vs. Gelatin Mixes
Freeze-dried strawberries bring a bright, slightly tart berry flavor that balances the sweet filling better than flavored gelatin mix. They also keep the topping dry, which is the big win for texture.
If freeze-dried strawberries are hard to find, dry strawberry gelatin mix can stand in for the berry powder in the topping. It gives a sweeter, more nostalgic bakery flavor and a stronger pink color, but it will taste less fresh and noticeably sweeter.
Baking the Perfect Vanilla Cheesecake
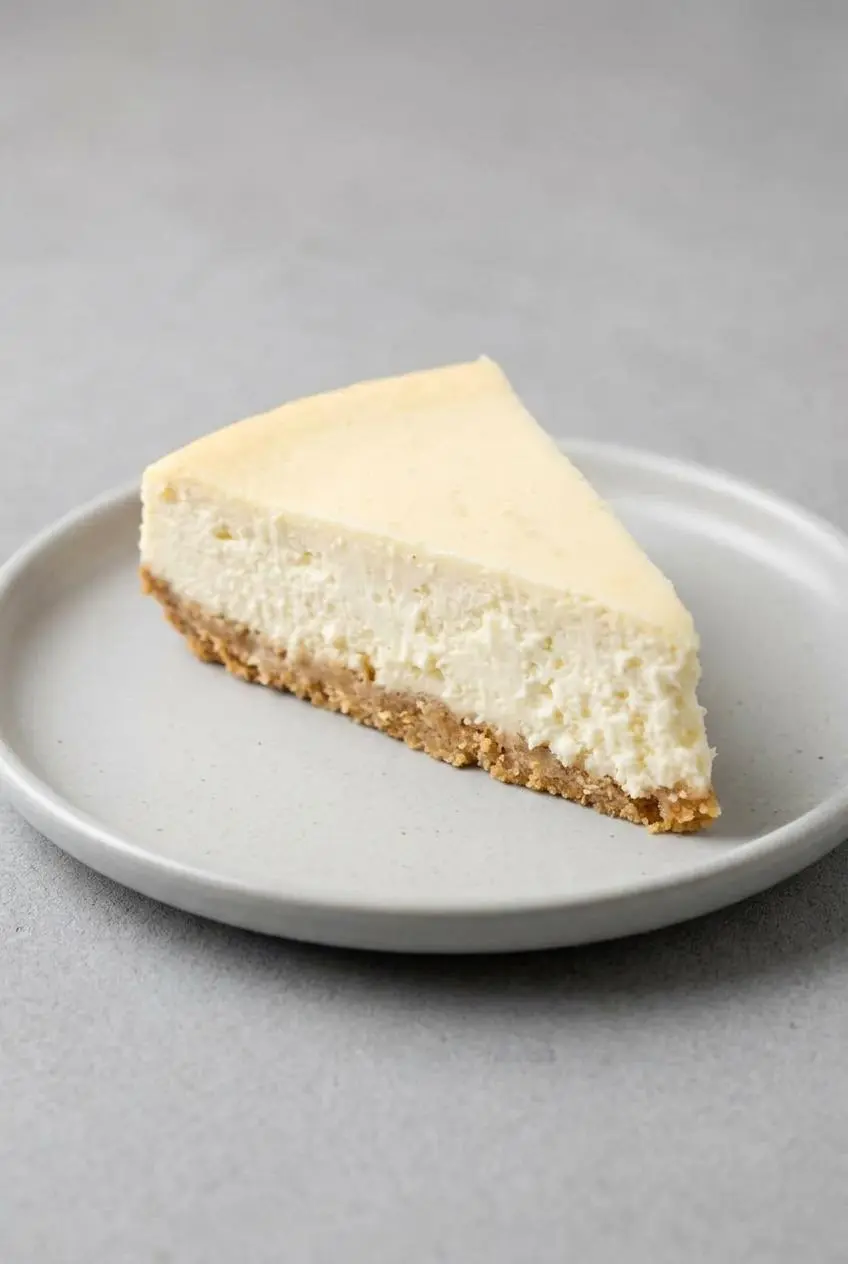
This method is straightforward once you know what to watch for. Keep the mixer on low, use room temperature ingredients, and trust the gentle center wobble more than the clock.
Official Cooking Steps
Homemade Graham Cracker Crust
- Heat the oven to 325 °F and wrap the outside bottom of a 9-inch springform pan with foil.
The foil helps protect the crust during the water bath, and the crust mixture should come together like damp sand. - Stir the graham cracker crumbs, melted butter, sugar, and salt in a medium bowl until evenly moistened.
When you squeeze a little in your hand, it should hold its shape instead of crumbling apart immediately. - Press the crumb mixture firmly into the bottom of the prepared pan with the bottom of a clean cup.
A compact, even layer gives the cheesecake a sturdier base and helps each slice lift cleanly. - Bake the crust for 8 to 10 minutes, then cool it completely out of the oven.
It should look lightly golden and smell buttery with a faint toasted sugar aroma.
Vanilla Cheesecake Filling
- Bring a large pot of water to a boil while you begin mixing the filling.
Having the hot water ready keeps the baking process smooth once the cheesecake is assembled. - Beat the cream cheese and sugar on low speed in a stand mixer bowl or large mixing bowl until smooth.
The mixture should look thick, glossy, and free of visible lumps before anything else goes in. - Add the eggs one at a time, scraping the bowl between additions and mixing each egg in well.
This steady pace helps the batter stay smooth and keeps you from trapping too much air. - Mix in the heavy cream and vanilla until the filling is fully combined.
The batter should pour thickly and look silky, not foamy. - Pour the filling over the cooled crust, set the springform pan inside a large roasting pan or deep baking dish, and add the hot water until it reaches about 1/3 to 1/2 of the way up the cheesecake pan.
The water bath should sit around the pan rather than splash into it. - Bake for 55 to 70 minutes, then turn off the oven and leave the cheesecake inside for 30 minutes.
The edges should look set while the center still has a small wobble like soft gelatin when the pan is nudged. - Crack the oven door and leave the cheesecake inside until it cools to room temperature, then transfer it to the fridge until ready to serve.
Slow cooling helps the top stay smoother and reduces the chance of cracks from a sudden temperature drop.
Strawberry Sauce
- Blend the strawberries and sugar until completely smooth.
The sauce should be pourable and evenly pink with no large fruit pieces left behind.
Strawberry Crunch
- Mix the crushed Golden Oreos, crushed freeze-dried strawberries, and melted butter in a small bowl until evenly coated.
The texture should feel crumbly and buttery, with larger pieces still visible for crunch.
Strawberry Crunch Cheesecake Assembly
- Spread the strawberry sauce over the chilled cheesecake.
Use a thin, even layer so the topping has something to cling to without turning soggy. - Scatter the strawberry crunch over the sauce just before serving.
The top should look loose and craggy rather than packed down, which keeps the bite crisp.
The biggest visual cue is the center wobble. When the outer ring is set and the middle still trembles slightly, the cheesecake is done. If the whole top sloshes, it needs more time. If the center is completely rigid in the oven, it has likely baked too long.
For clean slices, chill the cheesecake thoroughly before adding the topping and cutting into it. A warm dry knife, wiped between slices, makes a huge difference.
Mastering the Strawberry Crunch Toppings
The topping is where this cheesecake gets its personality. The strawberry sauce adds shine and fruit flavor, while the cookie crumble brings the sweet crackle that makes each bite feel finished.
Blend the strawberry sauce until fully smooth so it spreads in a thin, even layer. A thick or chunky sauce can slide around on the cheesecake and make the topping pile unevenly. If you enjoy working with fruit layers in other desserts, this quick guide to strawberry cake filling is useful for understanding the texture you want.
Keep the crunch loose rather than pressing it into the sauce. That airy layer stays crisp longer than a compact topping, and it looks better too. The melted butter should just coat the crushed Oreos and freeze-dried berries, not turn them into a paste.
Water Bath vs. No Water Bath: Which Method Wins?
If you want the smoothest top and creamiest interior, the water bath wins. It gives the cheesecake gentler heat, helps the filling bake more evenly, and lowers the chance of big cracks or dry edges.
If you skip the water bath, you can still make a good cheesecake at 325 °F, but you need to watch it closely and cool it very slowly in the turned-off oven. Expect a higher chance of cracks and a slightly firmer outer texture.
- Choose the water bath if appearance matters, especially for holidays or parties.
- Choose the no-water-bath route if you want less setup and do not mind covering the top with sauce and crunch.
- For a middle-ground option, bake the cheesecake on one rack with a shallow pan of hot water on a lower rack to soften the oven heat a bit.
Troubleshooting Common Cheesecake Mistakes
Cheesecake is more forgiving than it looks, and most problems have a fix. The key is catching the cause early so the final texture still turns out creamy instead of dense, cracked, or waterlogged.
- Lumpy batter: Cold cream cheese is usually the culprit. Let the bowl sit briefly over warm water or warm the outside of the mixing bowl gently, then keep mixing on low until the batter smooths out.
- Too much air in the filling: Mixing fast whips in bubbles, which can rise and crack the surface. Stick with low speed and stop as soon as the batter looks smooth.
- Soggy crust: Water likely seeped into the springform pan during the bath. Wrap the pan well and avoid tearing the foil on the pan edges.
- Soft slices: The cheesecake needs more chilling before topping and cutting. A fully chilled center holds the sauce and crunch much better.
- Crunch topping losing texture: It sat on the sauce too long. Store the crumble separately and add it right before serving when possible.
Preventing Water Bath Leaks
A leaky water bath is annoying, but it is avoidable. Start with a springform pan that closes tightly, then wrap the outside bottom with wide heavy-duty foil. Use enough foil to cover the base completely and come well up the sides.
If your foil is narrow, use two overlapping sheets in opposite directions so there are no exposed seams on the bottom. For extra insurance, some bakers place the foil-wrapped pan inside an oven-safe roasting bag or slow-cooker liner before setting it in the water bath. The goal is simple: keep the hot water around the cheesecake, not inside the crust.
How to Fix Surface Cracks Easily
Cracks usually come from overbaking, overmixing, or cooling the cheesecake too quickly. The good news is that they are usually cosmetic, not a sign the cheesecake is ruined.
You can cover a cracked top neatly with the strawberry sauce and a generous layer of crunch. A thin layer of sour cream or cream cheese frosting also works if you want a smoother finish before adding the topping.
Creative Flavor Twists and Swaps
Once you have the main version down, these optional variations are easy ways to shift the flavor without changing the core recipe above.
- No-Bake Strawberry Crunch Cheesecake: For a cooler summer-style dessert, use a whipped cream and cream cheese filling that sets in the refrigerator instead of the oven. If you want an easy oven-free direction, a strawberry icebox cake gives a similar fruity, creamy feel.
- Chocolate Covered Strawberry Crunch: Swap the graham crust for a chocolate cookie crust and finish the top with a dark chocolate drizzle for a richer, candy-shop style flavor.
- Gelatin-style crunch topping: Replace the freeze-dried strawberries with dry strawberry gelatin mix if you want a sweeter, more nostalgic pink crumb.
- Gluten-free direction: Use gluten-free graham-style crumbs for the crust and a gluten-free vanilla sandwich cookie for the topping if needed.
- Dairy-free direction: This recipe is built around cream cheese and heavy cream, so a dairy-free version needs a different filling structure. It is better treated as a separate adaptation than a straight one-for-one swap.
Storage, Freezing, and Make-Ahead Tips
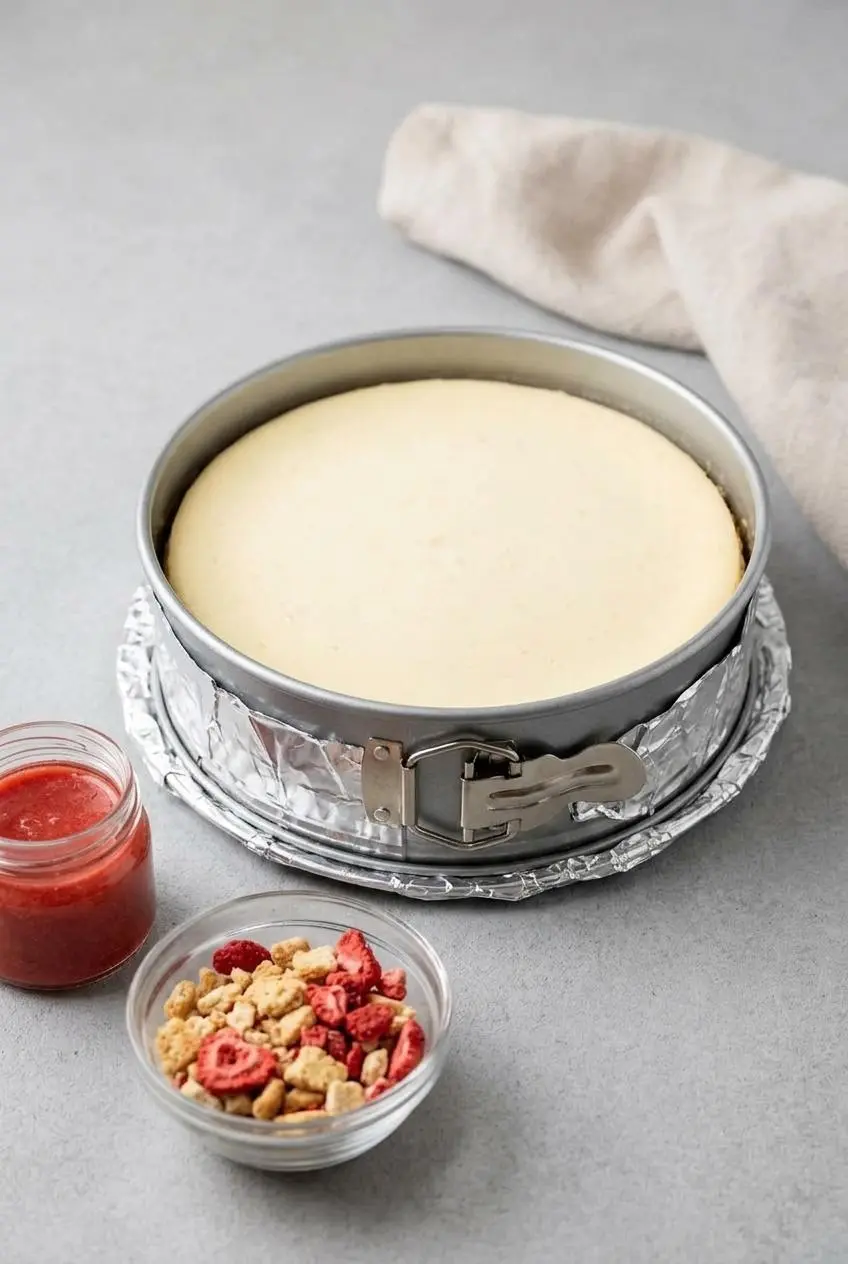
The cheesecake texture is best when the baked base is thoroughly chilled before you add sauce or cut slices. The official timing for the recipe includes resting time, and that patient chill is what helps the center set properly.
For leftovers, keep the cheesecake covered in the refrigerator. If maintaining crunch matters most, store extra topping separately and sprinkle it on just before serving instead of leaving it on the cake for long stretches.
The plain baked cheesecake base can be frozen for up to two months before topping. Wrap it tightly in plastic wrap and aluminum foil, then thaw it in the refrigerator before adding the strawberry sauce and crunch.
If you are making it ahead for a party, bake and chill the cheesecake first, then hold the sauce and crunch separately until close to serving time. That way the top stays crisp and the slices stay neat.
Once the cheesecake is topped, do not leave it sitting out for extended periods. Since it is rich with dairy and eggs, it is better returned to the refrigerator after serving.
Conclusion
This cheesecake stands out because it balances a creamy vanilla filling with a bright strawberry layer and a topping that actually crunches. Room temperature ingredients, low-speed mixing, and slow cooling do most of the hard work for you.
Take your time with the chill and add the crunch near serving, and the payoff is a dessert that slices beautifully and tastes even better. It is the kind of cheesecake that makes the dessert table go quiet for a minute.
Frequently Asked Questions
Can I make this strawberry crunch cheesecake without a water bath?
Yes, you can bake it without a water bath at 325 °F. The trade-off is a higher chance of cracks and a slightly drier edge. Cool it very slowly in the turned-off oven to help protect the surface. A shallow pan of hot water on a lower oven rack can help soften the heat if you want a simpler setup.
How do I prevent my golden Oreo strawberry crunch topping from getting soggy?
Keep the topping separate until close to serving time whenever possible. Store the crumble in an airtight container at room temperature. Spread the strawberry sauce in a thin layer, not a thick blanket. Sprinkle the crunch on just before serving for the best crisp texture.
Can I use regular strawberry Jell-O instead of freeze-dried strawberries?
Yes, dry strawberry gelatin mix can work in the crunch topping. It gives a sweeter, more retro flavor and a brighter pink color. Freeze-dried strawberries taste fruitier and less artificial. If you make the swap, keep it in the topping only and do not add extra liquid.
How long can this crunch cheesecake be stored in the freezer?
The plain baked cheesecake can be frozen for up to two months. Wrap it tightly before freezing so the surface stays protected. Thaw it in the refrigerator before adding the strawberry sauce and crunch topping. Do not freeze it fully assembled if you want the topping to stay crisp.
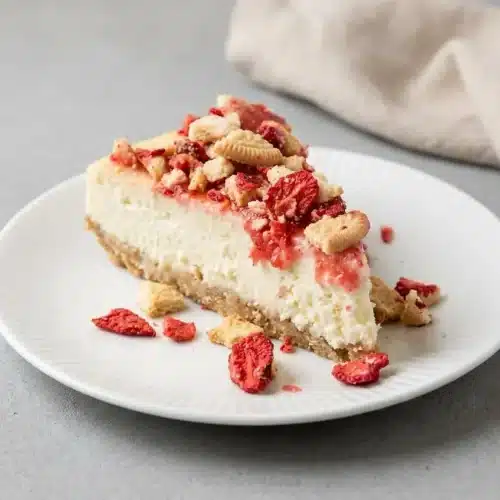
Berrylicious Strawberry Crunch Cheese Cake

Equipment
- 9-inch Springform Pan
- Stand mixer
- Roasting pan
- Blender
Ingredients
Homemade Graham Cracker Crust
- 9 sheets graham cracker sheets finely crushed
- 5 tablespoons unsalted butter 71 grams, melted
- 4 tablespoons granulated sugar 50 grams
- 1/4 teaspoon salt
Vanilla Cheesecake Filling
- 4 blocks cream cheese 908 grams, room temperature
- 1 1/2 cups granulated sugar 300 grams
- 4 large eggs room temperature
- 2/3 cup heavy cream 150 grams, room temperature
- 2 tablespoon vanilla extract
Strawberry Sauce
- 1 cup strawberries 167 grams, fresh or frozen
- 1 tablespoon granulated sugar 11 grams
Strawberry Crunch
- 10 golden Oreos roughly crushed
- 1 1/2 cups freeze-dried strawberries roughly crushed
- 3 tablespoons unsalted butter 42 grams, melted
Instructions
Homemade Graham Cracker Crust
- Heat the oven to 325 °F and wrap the outside bottom of a 9-inch springform pan with foil. The foil helps protect the crust during the water bath, and the crust mixture should come together like damp sand.
- Stir the graham cracker crumbs, melted butter, sugar, and salt in a medium bowl until evenly moistened. When you squeeze a little in your hand, it should hold its shape instead of crumbling apart immediately.
- Press the crumb mixture firmly into the bottom of the prepared pan with the bottom of a clean cup. A compact, even layer gives the cheesecake a sturdier base and helps each slice lift cleanly.
- Bake the crust for 8 to 10 minutes, then cool it completely out of the oven. It should look lightly golden and smell buttery with a faint toasted sugar aroma.
Vanilla Cheesecake Filling
- Bring a large pot of water to a boil while you begin mixing the filling. Having the hot water ready keeps the baking process smooth once the cheesecake is assembled.
- Beat the cream cheese and sugar on low speed in a stand mixer bowl or large mixing bowl until smooth. The mixture should look thick, glossy, and free of visible lumps before anything else goes in.
- Add the eggs one at a time, scraping the bowl between additions and mixing each egg in well. This steady pace helps the batter stay smooth and keeps you from trapping too much air.
- Mix in the heavy cream and vanilla until the filling is fully combined. The batter should pour thickly and look silky, not foamy.
- Pour the filling over the cooled crust, set the springform pan inside a large roasting pan or deep baking dish, and add the hot water until it reaches about 1/3 to 1/2 of the way up the cheesecake pan. The water bath should sit around the pan rather than splash into it.
- Bake for 55 to 70 minutes, then turn off the oven and leave the cheesecake inside for 30 minutes. The edges should look set while the center still has a small wobble like soft gelatin when the pan is nudged.
- Crack the oven door and leave the cheesecake inside until it cools to room temperature, then transfer it to the fridge until ready to serve. Slow cooling helps the top stay smoother and reduces the chance of cracks from a sudden temperature drop.
Strawberry Sauce
- Blend the strawberries and sugar until completely smooth. The sauce should be pourable and evenly pink with no large fruit pieces left behind.
Strawberry Crunch
- Mix the crushed Golden Oreos, crushed freeze-dried strawberries, and melted butter in a small bowl until evenly coated. The texture should feel crumbly and buttery, with larger pieces still visible for crunch.
Strawberry Crunch Cheesecake Assembly
- Spread the strawberry sauce over the chilled cheesecake. Use a thin, even layer so the topping has something to cling to without turning soggy.
- Scatter the strawberry crunch over the sauce just before serving. The top should look loose and craggy rather than packed down, which keeps the bite crisp.