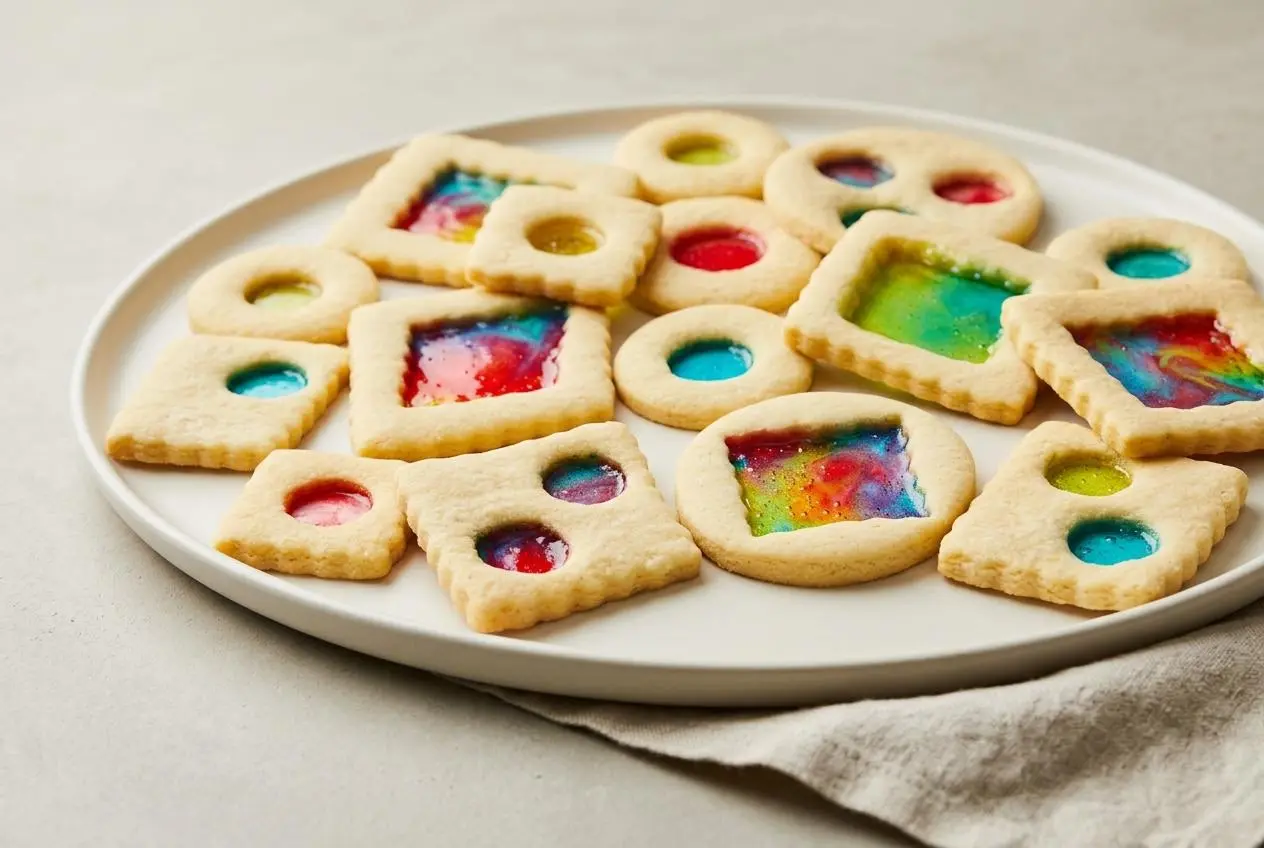
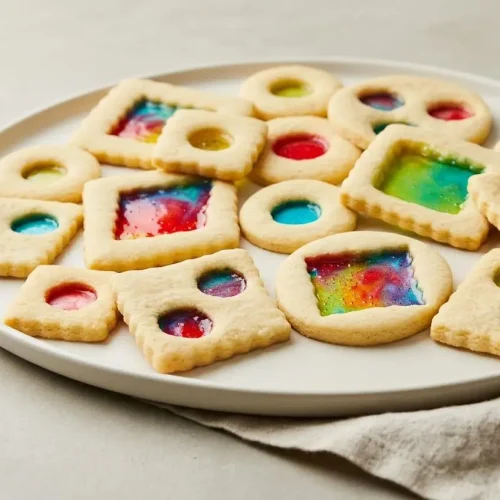
Stained glass cookies are cutout sugar cookies with translucent centers made from crushed hard candy. During baking, candies such as Jolly Ranchers or Life Savers melt into colorful panes surrounded by tender, buttery cookie frames.
Hold one up to the light and the jewel-colored center glows. These stained glass cookies pair a rich vanilla crumb with a glossy candy crunch, making them as enjoyable to eat as they are to arrange on a holiday platter.
The dough needs chilling, but shaping the windows is manageable once you know when to cut them. Keeping the frames cold and the candy filling level makes all the difference. The clearest windows start before baking.
Set out parchment paper and a smaller cookie cutter before rolling so you can cut the windows directly on the baking sheets.
Key Ingredients and Best Candies to Use
Butter and vanilla give the frames richness and aroma, sugars shape their texture, and flour and eggs provide structure. Salt balances the fruity candy sweetness, while baking powder adds a little lift and crushed hard candy supplies the colorful crunch.
- ½ cup/113 grams unsalted butter, softened
- ½ cup/100 grams granulated sugar
- ¼ cup/30 grams powdered sugar
- ¾ teaspoon kosher salt (such as Diamond Crystal)
- 1 large egg, plus 1 egg yolk
- 1 tablespoon vanilla extract
- ½ teaspoon baking powder
- 2 cups/260 grams all-purpose flour, plus more as needed for rolling
- ½ cup crushed hard candies (such as Jolly Ranchers)
Cookie Dough Ingredients Explained
Granulated sugar gives the cookies sweetness and a lightly crisp edge. Powdered sugar contributes a finer, more tender crumb, while the extra egg yolk adds richness without another whole egg’s worth of moisture. Together, they create a frame that feels delicate when eaten but substantial enough to support its candy window.
They don’t make the dough immune to spreading. Chilling, gentle handling, and an even ¼-inch rolling thickness do the heavy lifting when it comes to keeping shapes tidy. Stop mixing once the flour disappears so the cookies stay tender rather than tough.
Use softened butter that yields to gentle pressure but isn’t greasy or melted. Unsalted butter lets the measured kosher salt control the balance, and vanilla rounds out the contrast between the buttery frame and bright fruit candy. Keep the listed salt brand in mind, since kosher salts differ in crystal size.
I’d sort the hard candies by color into separate resealable bags before crushing them, so each window keeps its intended shade.
Best Candies for Translucent Windows
Choose translucent hard candies for the clearest, crispest centers; softer fillings produce a different cookie.
- Jolly Ranchers: A good choice for bold jewel tones and bright fruit flavor, with a smooth, transparent finish when melted evenly.
- Life Savers: Translucent fruit varieties offer classic colors and crush readily into pieces that melt into an even window.
- Gummy bears: These melt differently from hard candy and generally make thicker, chewier, less transparent centers rather than brittle panes.
- Fruit jam: Thick, strained or seedless jam gives a soft, jewel-colored filling, not a clear candy window, for anyone who prefers less crunch.
Crush hard candies with a rolling pin or mallet while they’re enclosed in their bags. Aim for small pieces rather than a bag of powder, and keep the colors separate until you fill the cutouts.
How to Make Stained Glass Cookies Step by Step
This dough makes about 30 cookies, depending on your cutters. Allow at least 2 hours for chilling, and use the pale golden edges rather than dark browning as your baking cue.
- Beat the softened butter, both sugars, and salt in a large bowl with an electric mixer on medium-high for about 3 minutes.
Look for a pale, creamy mixture with a noticeably lighter texture. - Mix in the whole egg, extra yolk, and vanilla just until blended, then incorporate the baking powder followed by the flour, scraping the bowl’s sides and bottom as you work.
Stop when no dry flour remains and the dough looks soft and thick. - Press the dough into a round approximately ½ inch thick, enclose it in plastic wrap, and refrigerate for at least 2 hours or up to overnight.
The chilled round should feel firm enough to roll without smearing or sticking excessively. - Set the oven to 350°F, position racks in its upper and lower thirds, and cover 2 large rimmed baking sheets with parchment paper.
The parchment should cover the areas beneath every cookie and candy window. - Leave half the dough wrapped in the refrigerator while rolling the other half on a lightly floured surface to ¼-inch thickness.
An even sheet of dough gives the frames consistent strength and helps them bake uniformly. - Stamp out the outer shapes, lift them onto the prepared sheets with a thin spatula, leave 1 inch between them, and only then cut their windows with a smaller cutter.
If the dough becomes floppy or difficult to handle, return it to the refrigerator for a few minutes before continuing. - Press the first scraps into a ½-inch-thick round, wrap and chill it while shaping the second dough half, then combine all remaining scraps for one final rolling and cutting, chilling briefly if needed and discarding the last scraps.
The dough should stay firm enough that the cut edges remain distinct rather than stretching. - Distribute the crushed candy among the windows without heaping it above the dough, then bake for 12 to 14 minutes, turning the sheets and exchanging their rack positions halfway through.
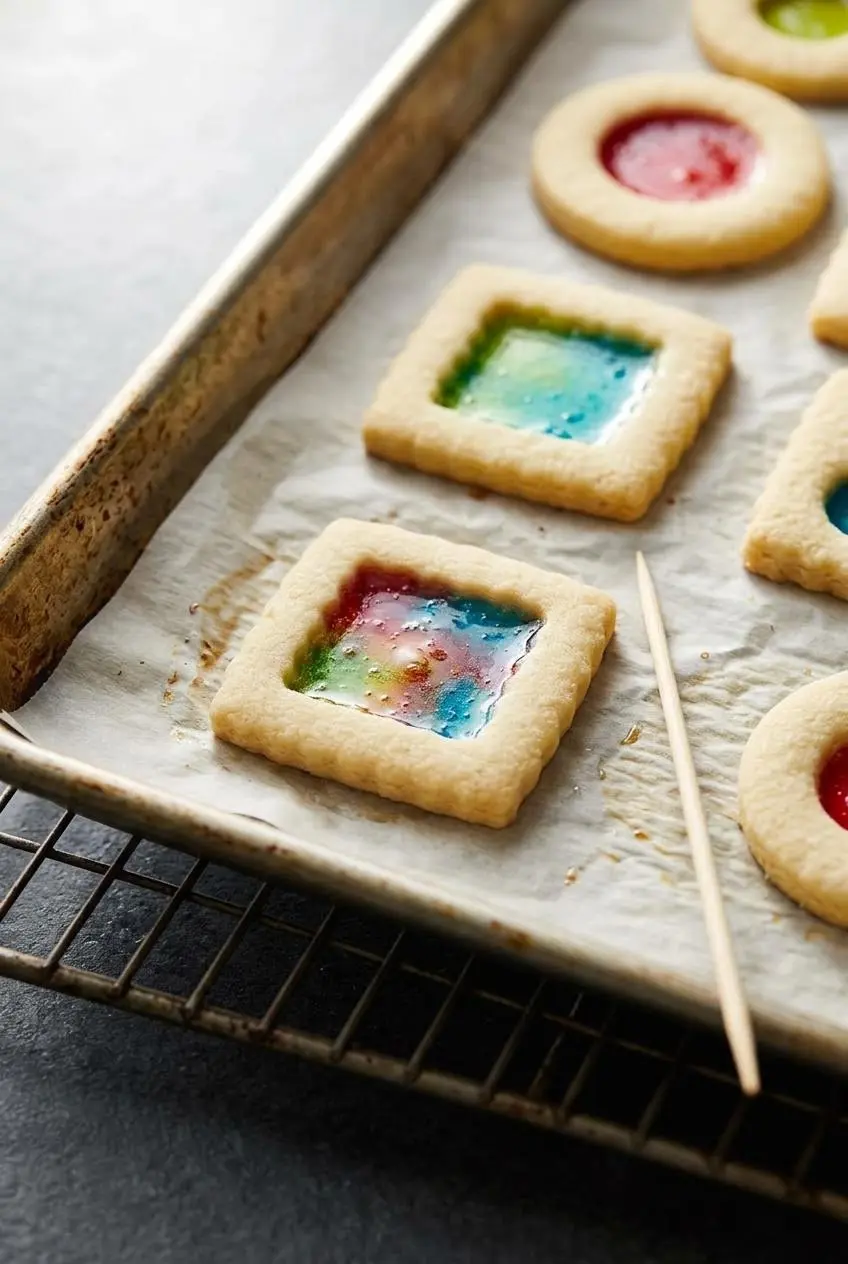
The cookies are ready when their edges turn light golden and the candy has melted across the openings. - Carefully ease a wooden skewer through any large bubbles immediately after removing the sheets, keeping bare fingers away from the molten sugar.
A gentle motion helps the bubbles settle without dragging candy over the frames. - Set the baking sheets on wire racks and leave the cookies on their parchment until completely cool.
The centers must become firm panes before you lift the cookies, or they can stretch, tear, or crack.
Expert Tips and Troubleshooting for Clear Candy Windows
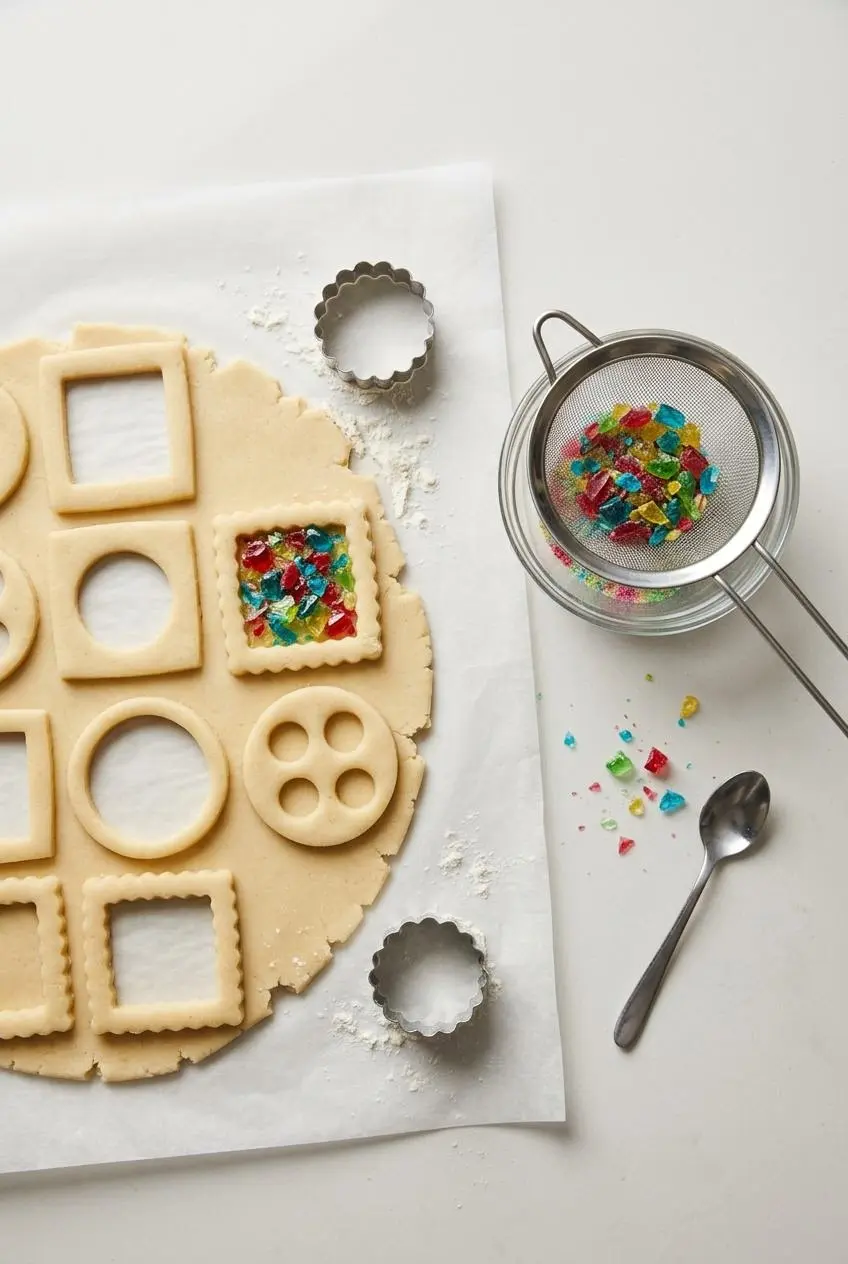
For clearer windows, shake the crushed hard candy gently in a fine-mesh strainer over a bowl. Removing the powdery dust can reduce cloudiness and leave cleaner-looking colors. Keep the small candy pieces for filling the windows.
Always line the sheets. Melted candy can adhere firmly to bare metal, making removal difficult without breaking the centers. Parchment also lets you leave the cookies undisturbed while the sugar sets.
- Candy spilling over the frames: Too much filling can spread onto the dough as it melts. Fill the opening evenly, no higher than the surrounding frame, and brush stray pieces away before baking.
- Stretched or crooked frames: Warm dough bends during transfer. Move the solid outer shapes first, cut the windows on the parchment, and chill the dough briefly whenever it loses firmness.
- Large bubbles: Work gently with a skewer while the candy is still molten, immediately after baking. Avoid vigorous stirring, which can pull candy onto the cookie edges.
- Cracked or torn windows: Lifting cookies before the centers set puts pressure on soft sugar. Wait until both the frames and windows have cooled completely.
- Sticky centers: Humid air can soften hard candy. Once the cookies are cool, protect them in an airtight container and separate stacked layers with parchment.
Keep the inner opening comfortably inside the outer shape rather than leaving a thread-thin dough border. A sturdy frame is easier to move and less likely to break when someone picks up a finished cookie. If a cutter leaves an especially narrow point, handle that area with extra care.
Creative Variations and Easy Shortcuts
For an optional flavor change, add finely grated orange zest or a touch of almond extract to the dough. Orange brings a fragrant citrus contrast; almond gives the buttery frame a more pronounced bakery-style aroma. Keep either addition restrained so it doesn’t overwhelm the candy.
Stained Glass Shaker Cookies With Sprinkles Inside
Make matching pairs of candy-window cookies and let them cool completely. Lay one cookie with its flattest side facing up, then pipe a raised border of stiff royal icing or melted chocolate around the dough frame, leaving the window clear.
Add small sprinkles inside the border and cap it with the matching cookie. The border needs enough height to leave space between the candy panes; otherwise, the sprinkles will be trapped rather than able to move. Let the seal set before gently shaking.
Choose broad frames for this project because they give the seal more room to grip. If you’d rather skip the assembly, festive sprinkle cookies offer another colorful baking option.
Using Jam, Gummy Bears, or Cookie Mix
- Multicolor windows: Place complementary crushed candy colors side by side in a cutout for a mottled effect; excessive mixing can muddy the colors.
- Sparkling frames: Brush the cooled dough edges lightly with piping gel, then add sanding sugar while keeping the clear windows uncovered.
- Jam or gummy bear centers: Try thick, seedless jam or chopped gummy bears in a test cookie first; expect softer jam centers or chewy gummy centers, and watch closely because their baking behavior differs from hard candy.
- Refrigerated dough or cookie mix: Choose a product intended for cutouts, prepare it as directed, and roll it to ¼ inch; follow any package guidance for added flour rather than guessing, since formulas vary.
How to Store and Serve as Holiday Ornaments
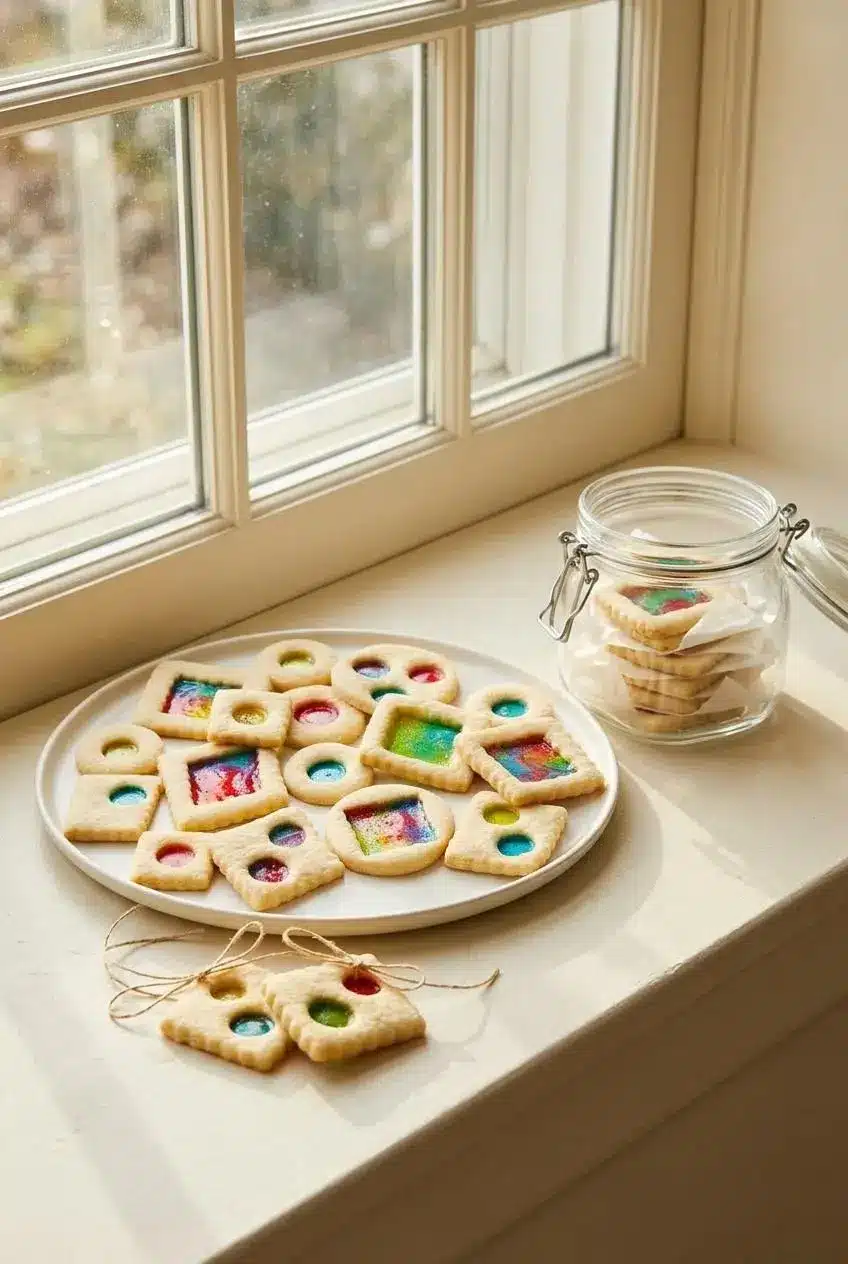
Complete cooling matters as much for packing as it does for lifting. Warm cookies can trap moisture in a closed container, and hard candy windows are particularly sensitive to damp conditions.
Store fully cooled cookies in an airtight container at room temperature. Place parchment or wax paper between layers, keep the container away from stove steam and humid air, and avoid refrigerating the finished cookies, where condensation can make the candy tacky. Layering prevents direct contact but cannot make the centers humidity-proof.
For make-ahead preparation, use the dough’s chilling stage: wrap the shaped round and refrigerate it as directed in the method. Keep the candy colors separate and fill the cutouts when you’re ready to bake.
To make ornaments, punch a small hole near the top of each unbaked frame with a drinking straw or skewer. Leave enough dough around the hole to support the cookie, and check that the opening remains visible after baking. Once everything has cooled, thread ribbon through without pulling tightly against the frame.
Arrange the cookies on a white platter near natural light so the colored windows stand out. For a holiday exchange, package them in clear cellophane with wax paper separating any overlapping cookies. On a dessert platter, pair them with spiced eggnog cookies for a contrast to the fruity candy crunch.
Conclusion
These buttery cutouts reward a little patience with glowing candy centers and a satisfying contrast of tender crumb and crisp sugar. Sift away fine candy dust, and cut the windows after the shapes reach the parchment-lined sheet.
Try orange zest for a fragrant variation or turn matching pairs into sprinkle shakers. Give the windows time to set, then enjoy the color and crunch.
Frequently Asked Questions
What Is the Best Candy to Use for Stained Glass Cookies?
Translucent fruit-flavored hard candies such as Jolly Ranchers and Life Savers are strong choices. They melt into colorful windows with a crisp finish. Avoid filled or opaque candies when you want a clear pane.
Are Stained Glass Cookies Hard to Eat?
The centers are crunchy, but a level filling creates a thinner pane than a whole hard candy. It breaks alongside the tender frame, though it still has a firm candy bite. Avoid heaping the filling if you prefer a lighter crunch.
Do Stained Glass Cookies Taste Good?
Yes, especially if you enjoy buttery vanilla cookies and fruity hard candy. The frame provides richness and a little salt, while the center adds brighter sweetness and crunch. Choose candy flavors you already like.
Can You Make Stained Glass Cookies With Gummy Bears?
Yes, as an optional variation, but expect chewy, somewhat opaque centers rather than clear, crisp windows. Try a test cookie before filling the whole batch, and watch closely because gummies don’t bake like hard candy.
How Do You Keep Stained Glass Cookies From Getting Sticky?
Cool them completely before packing, then use an airtight container at room temperature with parchment between layers. Keep them away from steam and humid air, and avoid refrigeration. Damp conditions can still soften the candy despite careful packing.
Stained Glass Cookies

Equipment
- Electric Mixer
- Plastic wrap
- 2 Large rimmed baking sheets
- Parchment Paper
- cookie cutters
- thin spatula
- Skewer
- Wire rack
- resealable plastic bags
- mallet or rolling pin
Ingredients
- ½ cup/113 grams unsalted butter softened
- ½ cup/100 grams granulated sugar
- ¼ cup/30 grams powdered sugar
- ¾ teaspoon kosher salt (such as Diamond Crystal)
- 1 large egg plus 1 egg yolk
- 1 tablespoon vanilla extract
- ½ teaspoon baking powder
- 2 cups/260 grams all-purpose flour plus more as needed for rolling
- ½ cup crushed hard candies (such as Jolly Ranchers)
Instructions
- Beat the softened butter, both sugars, and salt in a large bowl with an electric mixer on medium-high for about 3 minutes. Look for a pale, creamy mixture with a noticeably lighter texture.
- Mix in the whole egg, extra yolk, and vanilla just until blended, then incorporate the baking powder followed by the flour, scraping the bowl’s sides and bottom as you work. Stop when no dry flour remains and the dough looks soft and thick.
- Press the dough into a round approximately ½ inch thick, enclose it in plastic wrap, and refrigerate for at least 2 hours or up to overnight. The chilled round should feel firm enough to roll without smearing or sticking excessively.
- Set the oven to 350°F, position racks in its upper and lower thirds, and cover 2 large rimmed baking sheets with parchment paper. The parchment should cover the areas beneath every cookie and candy window.
- Leave half the dough wrapped in the refrigerator while rolling the other half on a lightly floured surface to ¼-inch thickness. An even sheet of dough gives the frames consistent strength and helps them bake uniformly.
- Stamp out the outer shapes, lift them onto the prepared sheets with a thin spatula, leave 1 inch between them, and only then cut their windows with a smaller cutter. If the dough becomes floppy or difficult to handle, return it to the refrigerator for a few minutes before continuing.
- Press the first scraps into a ½-inch-thick round, wrap and chill it while shaping the second dough half, then combine all remaining scraps for one final rolling and cutting, chilling briefly if needed and discarding the last scraps. The dough should stay firm enough that the cut edges remain distinct rather than stretching.
- Distribute the crushed candy among the windows without heaping it above the dough, then bake for 12 to 14 minutes, turning the sheets and exchanging their rack positions halfway through. The cookies are ready when their edges turn light golden and the candy has melted across the openings.
- Carefully ease a wooden skewer through any large bubbles immediately after removing the sheets, keeping bare fingers away from the molten sugar. A gentle motion helps the bubbles settle without dragging candy over the frames.
- Set the baking sheets on wire racks and leave the cookies on their parchment until completely cool. The centers must become firm panes before you lift the cookies, or they can stretch, tear, or crack.