Every summer, mint chocolate chip ice cream meant sticky fingers, a sun-warm cone, and that first cool, chocolatey bite that somehow felt like air conditioning for your mouth. In my kitchen, I wanted that same nostalgia, but with a grown-up edge, deeper flavor, and a bakery-style texture.
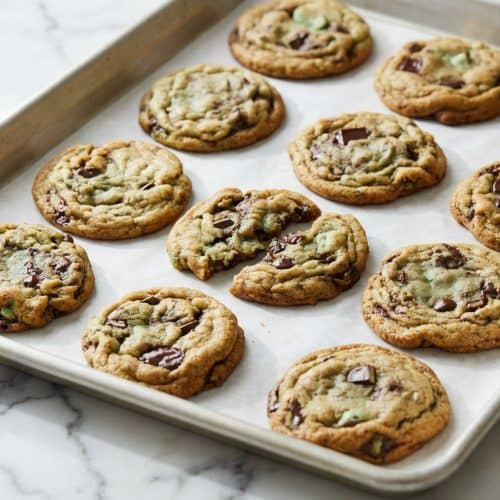
These mint chocolate chip cookies deliver exactly that, buttery and soft in the center with crisp edges, studded with melty chocolate and little Andes Mints sparks. If you want a reliable, repeatable way to nail that “cool and chocolatey” balance in cookie form, this is the batch I keep coming back to.
Why You’ll Love This Recipe
Brown butter magic: I started browning the butter, and the whole dough changed, it turns nutty and toasty, like a warm hazelnut aroma that keeps the sweetness in check.
Gourmet chocolate pockets: Those bittersweet, molten bites hit with the same richness you’d crave in chocolate cheesecake, and they play beautifully against the cool peppermint extract.
Texture that feels intentional: The creaming method gives you that pale, fluffy base, so you get crisp edges and a fudgy center instead of a dry, cakey crumb.
That signature cooling finish: Peppermint lingers in the best way, clean, refreshing, and unmistakably mint chip, especially when the Andes Mints melt into little streaks.
Ingredients and Substitutions

Simple pantry staples, plus peppermint and Andes Mints, do the heavy lifting here. The butter and sugar build the structure, and the chocolate brings those gooey pockets that make each bite feel like mint chip ice cream.
Ingredients
- 1 cup granulated sugar
- 3/4 cup unsalted butter softened
- 1 large egg
- 1 tsp peppermint extract
- 2 cups all-purpose flour
- 1/2 tsp baking soda
- 1/2 tsp baking powder
- 1/4 tsp kosher salt
- 6 drops green food coloring
- 3/4 cup finely chopped Andes Mints
- 1/2 cup semisweet or bittersweet chocolate chips
- Extra granulated sugar for sprinkling
Ingredient Notes & Substitutions
Peppermint extract: Peppermint tastes sharper and cooler than “mint,” which can lean more herbal like spearmint. If you enjoy nerdy details, the difference between ‘Mint’ and ‘Peppermint’ extracts comes down to the essential oil makeup, and you can taste it in baked goods.
Unsalted butter: The twist is browning it first for beurre noisette flavor, then chilling it back to a soft, scoopable texture so the creaming method still works. If it’s greasy or melted, your dough can spread fast.
Green food coloring: Gel food coloring is more concentrated than liquid, so you typically need less to avoid neon dough. If you want a natural vibe, a tiny pinch of matcha or spinach powder can tint the dough, just know it may read more “earthy green” than bright mint.
Chocolate chips: Semisweet or bittersweet both work, but I love darker chocolate here because it keeps the Andes Mints from making the whole cookie taste overly sweet. If you have 70% chunks, they create those dramatic molten pockets.
Gluten-free and dairy-free swaps: A 1:1 gluten-free baking blend generally behaves well with this style of dough, just watch the texture and avoid over-mixing. Vegan butter sticks plus a flax egg can work too, though the flavor won’t be quite as caramelized as browned dairy butter.
How to make mint chocolate chip cookies
Brown the butter, then bring it back to “softened”
- Start by browning the butter in a small pan over medium heat, stirring as it melts and foams. When you smell a deep, nutty perfume and see golden-brown flecks, pull it off the heat right away so it doesn’t tip into burnt.
- Chill the browned butter until it returns to a softened consistency, not hard-cold, not melted. When you press it, it should give like room-temperature butter, because that’s what lets the creaming method trap air.
Prep, cream, and color the dough
- Arrange racks in the upper and lower thirds of the oven, then preheat to 350°. This rack setup helps the cookies bake evenly once you rotate the pans.
- In a large bowl, beat the sugar and softened browned butter with a handheld mixer on medium-high speed until the mixture looks noticeably paler and feels fluffy. You should catch that toasted, nutty aroma rising up as you mix.
- Beat in the egg and peppermint extract until the batter looks smooth and cohesive, with no slick streaks. This is your emulsifying moment, and it’s what keeps the dough from feeling greasy.
- Add the all-purpose flour, baking soda, baking powder, kosher salt, and green food coloring, then mix just until the last dry pockets disappear. Stop as soon as the color looks right, overworking here is how cookies turn bready.
Fold, scoop, and sugar the tops
- Fold in the finely chopped Andes Mints and chocolate chips by hand so you don’t crush them into dust. The dough should look generously dotted, like mint chip ice cream in scoop form.
- Scoop 1 1/2 tablespoon portions and roll into balls, then set them on two large parchment-lined baking sheets about 2 inches apart. A small scoop keeps the sizing consistent, which keeps the bake consistent.
- Sprinkle each mound with extra granulated sugar for that crackly, crystalline finish. It’s a tiny step that reads “bakery” once they cool.
Bake, rotate, and cool like a pro
- Bake for 10 to 12 minutes, rotating the sheets top to bottom halfway through. Pull them when they look puffed and set at the edges, but still slightly underdone in the center, they’ll finish as they sit.
- Let the cookies cool on the baking sheet for 10 minutes so they firm up without drying out. Then transfer to a wire cooling rack and let cool completely for the cleanest texture.
The Science of Perfect Mint Cookies

Understanding menthol: Peppermint feels “cold” because menthol interacts with your mouth’s cold-sensing receptors, even though the cookie is warm. That’s why a modest amount of peppermint extract can taste bright and refreshing, not sugary.
The secret to no-spread: Butter temperature is everything, too warm and the dough slumps before it sets, too cold and it won’t cream properly. I think of the dough’s structure like shortbread cookies, where controlled fat and flour create a sturdy bite instead of a flat puddle.
Maillard reaction vs. green color: Brown butter brings flavor, but it also deepens the dough’s base color, which can muddy your green if you go heavy-handed. A light touch with coloring, plus pulling the cookies at “just set,” keeps them looking minty instead of tan.
Pro Tips & Troubleshooting
Pro Tips
- Refrigerating the dough for 4 to 24 hours deepens flavor and bakes up thicker, with a fudgier center.
- If using gel food coloring, start with less, it’s far more potent than liquid drops.
- Fresh mint leaf infusion is lovely, steep a handful in warm browned butter, then strain before chilling back to softened.
- Rotate the baking sheets halfway through so both pans color evenly and set at the same rate.
Common Mistakes to Avoid
- Too much peppermint extract can taste medicinal, keep it measured and clean.
- Over-mixing after the flour goes in develops gluten and makes the cookies tough instead of soft.
- Using cold butter prevents proper aeration, so you lose lift and end up dense.
- Over-baking is the fastest way to dry cookies, they should look slightly underdone when removed.
Serving & Storage

Serving Ideas
For the full mint chip moment, sandwich mint chocolate chip ice cream between two fully cooled cookies. The contrast of cold ice cream and soft cookie is the kind of dessert that disappears fast.
A pretty finish can be as simple as a mint sprig and a whisper of powdered sugar. For a party table, the crumbled cookies add minty crunch over a chocolate trifle without overpowering the chocolate layers.
Storage and Make-Ahead
To keep them chewy for days, store completely cooled cookies in an airtight container at room temperature. Texture stays softer when humidity is trapped gently, and using an airtight container to maintain moisture is a smart habit for cookies and bars alike.
For bake-on-demand, flash freeze the dough balls on a parchment-lined tray until solid, then move to a freezer bag. Michigan State’s guide to freezing individual dough balls matches what I do at home, it helps prevent freezer burn and keeps the flavor clean.
Soft Mint Chocolate Chip Cookies

Equipment
- Small pan
- large bowl
- Handheld mixer
- Parchment-lined baking sheets
- Wire cooling rack
Ingredients
- 1 cup granulated sugar
- 3/4 cup unsalted butter softened
- 1 large egg
- 1 tsp peppermint extract
- 2 cups all-purpose flour
- 1/2 tsp baking soda
- 1/2 tsp baking powder
- 1/4 tsp kosher salt
- 6 drops green food coloring
- 3/4 cup finely chopped Andes Mints
- 1/2 cup semisweet or bittersweet chocolate chips
- Extra granulated sugar for sprinkling
Instructions
Brown the butter, then bring it back to softened
- Start by browning the butter in a small pan over medium heat, stirring as it melts and foams. When you smell a deep, nutty perfume and see golden-brown flecks, pull it off the heat right away.
- Chill the browned butter until it returns to a softened consistency. It should be pliable like room-temperature butter, not hard-cold or melted, to allow for proper creaming.
Prep, cream, and color the dough
- Arrange racks in the upper and lower thirds of the oven, then preheat to 350°F to ensure even baking.
- In a large bowl, beat the sugar and softened browned butter with a handheld mixer on medium-high speed until the mixture looks pale and feels fluffy.
- Beat in the egg and peppermint extract until the batter looks smooth and cohesive with no slick streaks.
- Add the flour, baking soda, baking powder, salt, and green food coloring. Mix just until the last dry pockets disappear to avoid making the cookies tough.
Fold, scoop, and sugar the tops
- Gently fold in the finely chopped Andes Mints and chocolate chips by hand so they remain intact.
- Scoop 1 1/2 tablespoon portions and roll them into balls. Place them on two large parchment-lined baking sheets about 2 inches apart.
- Sprinkle each mound with extra granulated sugar for a crackly, crystalline bakery finish.
Bake, rotate, and cool like a pro
- Bake for 10 to 12 minutes, rotating the sheets top to bottom halfway through. Remove when they are puffed and set at the edges but still slightly underdone in the center.
- Let the cookies cool on the baking sheet for 10 minutes to firm up, then transfer them to a wire cooling rack to cool completely.
Notes
Nutrition
Conclusion
These cookies start with that toasted brown-butter aroma, then land on melty chocolate and a cool peppermint finish that feels exactly like mint chip ice cream, only richer. Play with the chocolate intensity, keep the centers slightly underdone, and you’ll have a batch that feels both nostalgic and a little gourmet.
If you love the mint and chocolate combo, a dessert lineup with something extra-chocolatey alongside these always feels right, and that’s when I lean into my favorite chocolate cheesecake for contrast.