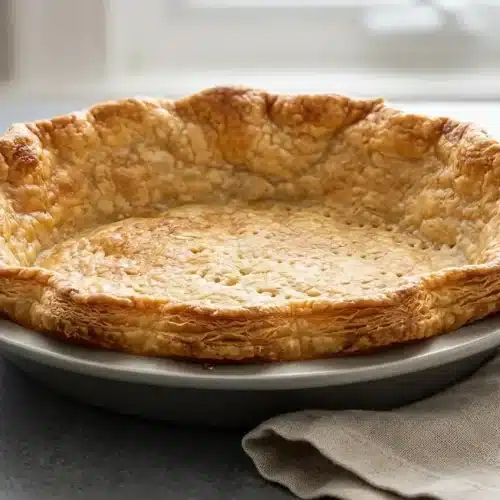
Gluten Free Pie Crust

Bake a tender, flaky gluten free pie crust using cold butter shards, sour cream, and quick lamination folds for crisp pastry that holds any filling.
Equipment
- Rolling Pin
- Pie Weights
Ingredients
- 1 1/2 cups all purpose gluten free flour blend, plus more for sprinkling ( 210 g )
- 3/4 teaspoon xanthan gum omit if your blend already contains it
- 1/4 teaspoon baking powder
- 1/2 teaspoon kosher salt
- 6 tablespoons unsalted butter, roughly chopped and chilled ( 84 g )
- 1/2 cup sour cream, full fat, preferably, chilled ( 120 g )
- Ice water by the teaspoonful, as necessary
- Egg white, for brushing (optional)
Instructions
Make the pie crust dough
- Whisk together the gluten-free flour blend, xanthan gum, baking powder, and kosher salt in a large mixing bowl. Ensure the dry ingredients are uniformly combined and free of clumps.
- Add the cold chopped butter cubes to the bowl and stir gently with a spoon. Every piece of butter should be lightly dusted with the seasoned flour mixture.
- Flatten each butter chunk firmly between your thumb and forefinger into thin sheets. The butter should form visible flat leaves coated in dry flour rather than small round beads.
- Form a well in the center of the flour mixture, pour in the chilled sour cream, and stir to hydrate the ingredients. The dough will look shaggy, rough, and slightly crumbly at this stage.
- Isolate any remaining dry flour patches in the bottom of the bowl and drizzle ice water over those specific areas by the teaspoon. Moisten only the dry spots so the rest of the dough avoids becoming sticky.
- Add extra droplets of ice water only if required, then gently knead the mixture by hand until it consolidates. The dough should hold together as a cohesive mass when pressed firmly.
- Turn the rough dough out onto plastic wrap and press it into a smooth, flat disk. The wrapped disk should feel solid and hold its shape around the edges.
- Transfer the wrapped pastry disk to the refrigerator to chill for 30 minutes. The butter will firm up completely, making the pastry ready to laminate or store.
- Preheat the oven to 375°F and grease a 9-inch or 10-inch pie dish generously. A light layer of butter or oil helps the baked bottom release cleanly.
Roll out the chilled dough
- Unwrap the chilled dough onto a lightly floured work surface and dust the top with extra flour. A light flour coating keeps the rolling pin from grabbing the surface.
- Roll the dough out evenly into a rough rectangle approximately 1 inch in thickness. Keep the dough mobile by shifting it frequently to avoid surface sticking.
Laminate the dough
- Fold one third of the dough rectangle over the center, then fold the opposite third on top like a standard letter. This single folding turn creates the first set of internal butter strata.
- Dust the surface lightly with flour and roll the folded dough back out into a 1-inch thick rectangle. Visible streaks of marbled butter will begin to spread across the dough slab.
- Fold the dough into thirds again, roll it out into a 1-inch rectangle, and complete a third and final letter fold. Three quick turns establish dozens of flaky layers without overworking the starch.
- Fold the outer edges inward to form a square packet, then press and shape the dough into a rounded disk. The final disk should be compact, smooth, and free of deep structural cracks.
- Place the pastry disk back in the refrigerator if the butter feels soft or sticky at any point. Chilling restores the firm texture needed for rolling out the final crust.
Shape the dough in the pie plate
- Roll the dough into a wide circle roughly 2 inches larger than your pie dish, keeping the thickness between 1/4 inch and 3/8 inch. Pinch together any small fissures that appear along the outer perimeter.
- Drape the dough circle loosely around your rolling pin and gently unroll it across the prepared pie plate. Centering the pastry sheet over the dish prevents overhanging edges from tearing.
- Trim ragged edges with kitchen shears, then lift and settle the pastry gently into the base and corners of the dish. Allowing slack in the dough keeps the crust from pulling tight and shrinking.
- Fold the overhanging perimeter under itself to form a raised border, then crimp the rim with your fingers. A neat fluted edge gives the finished pie a decorative, professional finish.
- Cover the shaped crust loosely with plastic wrap and chill in the refrigerator for at least 30 minutes. A thorough final chill sets the crimped shape before baking.
Parbake the crust
- Take the chilled crust from the refrigerator, unwrap it, and prick the bottom and sides with the tines of a fork. These small vent holes release trapped steam during the initial bake.
- Line the raw pastry shell with a sheet of parchment paper and fill it completely with pie weights or dry beans. The weight keeps the base flat and prevents the side walls from slumping downward.
- Bake the weighted crust in the center of the preheated 375°F oven for 10 minutes. The exposed outer edges will turn very light golden brown when ready for unweighting.
- Lift out the parchment and weights, brush the bottom lightly with optional egg white if the surface looks shiny, and bake for an additional 2 to 4 minutes. The base should appear matte, dry, and lightly set without deep browning.
- Set the parbaked shell on a wire rack to cool completely before adding your filling. Cooling stabilizes the bottom pastry structure before the pie is loaded.
Notes
Temperature tip: Keep butter and sour cream thoroughly chilled. If the dough starts to soften or stick during rolling, place it in the refrigerator for 10 to 15 minutes before proceeding.
Handling tip: Roll the pastry between sheets of parchment paper to prevent sticking without incorporating excess flour that can make the baked crust tough.
Storage: Raw dough disks wrapped tightly in plastic wrap can be stored in the refrigerator for up to 3 days or frozen for up to 2 months.
Nutrition information is an estimate based on common ingredients and serving sizes. Values may vary depending on brands, portions, and substitutions.