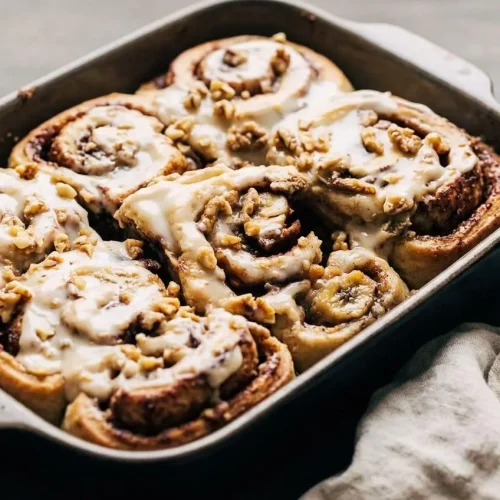
Banana Bread Cinnamon Rolls

Soft banana bread cinnamon rolls feature a banana-infused yeast dough filled with brown sugar, cinnamon, sliced bananas, and walnuts, then finished with warm maple cream cheese icing.
Equipment
- Large Mixing Bowl
- Wooden Spoon
- Rolling Pin
- unflavored dental floss
- 9x13 dish
- Whisk
Ingredients
Cinnamon Roll Dough
- 4 1/2 - 5 cups all purpose flour
- 1/4 cup granulated sugar (50g)
- 2 packets rapid rise or instant yeast (4 1/2 tsp)
- 1 tsp salt
- 3/4 cup water (180ml)
- 6 tbsp unsalted butter (or vegan butter)
- 3/4 cup mashed ripe bananas (200g) (about 2 bananas, but don't forget to measure)
Filling
- 1/4 cup unsalted butter (55g) room temp (or vegan butter)
- 1/2 cup light brown sugar (100g) packed
- 1 tbsp cinnamon
- 3 yellow or ripe bananas sliced
- 1/2 cup walnuts finely chopped
Icing
- 4 oz cream cheese room temp (or vegan cream cheese)
- 1/4 cup unsalted butter (55g) room temp (or vegan butter)
- 1 cup powdered sugar (120g)
- 2 tbsp maple syrup
- 1/4 cup walnuts finely chopped (optional)
Instructions
Cinnamon Roll Dough
- Measure 2 cups of flour into a large bowl and whisk in the granulated sugar, yeast, and salt. Even distribution helps the dough rise and season consistently.
- Cut the dough butter into tablespoon-size pieces and microwave it with the water in a heat-safe bowl for 30 to 45 seconds. The liquid should feel warm rather than hot, with some butter still unmelted.
- Stir the mashed banana and warmed butter-water mixture into the flour mixture with a wooden spoon. At this stage, expect a loose, wet mixture rather than a kneadable dough.
- Work another 2 cups of flour into the bowl with the spoon. The mixture will become substantially thicker and sticky as the flour absorbs moisture.
- Incorporate another 1/2 cup of flour, then switch from the spoon to your hands when stirring becomes difficult. The dough should look shaggy and uneven before kneading brings it together.
- Knead in another 1/4 cup of flour by hand. The rough dough should gradually become soft and smooth, with a slight tackiness.
- Press a clean, dry finger into the dough, kneading in the final 1/4 cup of flour only if dough clings to your finger. A clean release tells you to stop adding flour.
- Shape the dough into a ball and leave it uncovered for 10 minutes. After resting, it should look noticeably puffier without doubling in size.
- Pat the dough into a rectangle on a lightly floured work surface, then roll it to 10 by 15 inches. An even thickness helps the finished rolls bake consistently.
- Cover the rectangle with a thin layer of softened filling butter, keeping a 1/2-inch border clear around the edges. The uncovered border gives the dough edges room to meet without a slippery butter layer.
- Distribute the brown sugar over the butter with your hand, then scatter the cinnamon over it. A level coating gives each swirl a similar balance of sweetness and spice.
- Arrange the banana slices across the filling and scatter the chopped walnuts over them. Keep the fruit in an even layer so bulky spots don’t stretch the dough.
- Roll inward from a 15-inch edge, then gently press the ends of the finished log toward its center. This brings an elongated log back into a compact shape without flattening the layers.
- Choose unflavored dental floss or thin sewing thread for slicing, or use a sharp knife with a gentle sawing motion. Avoid downward pressure, which flattens the soft dough and pushes out filling.
- Pass the floss beneath the log, cross its ends over the top, and pull to trim away the two uneven ends. The thread cuts through the layers while keeping the round shape intact.
- Divide the trimmed log into halves, halve those sections again, and cut each of the four sections into three rolls. This produces 12 portions with more consistent thickness.
- Arrange the rolls in a greased 9x13-inch baking dish, or divide them between two greased 9-inch round pans with six rolls in each. The rolls need space to expand rather than starting tightly compressed.
- Cover the dish with a towel and let the rolls rise in a warm spot for 1 hour, using an oven warmed at its lowest setting and then switched off if needed. The dough should expand into rounded, puffy swirls in the gentle warmth.
- Remove any proofing rolls from the oven, then preheat it to 350°F. By baking time, the rolls should have nearly doubled in size.
- Bake for 25 to 30 minutes, then begin the icing while the rolls cool slightly. Look for light golden tops and set dough between the center swirls.
Cream Cheese Icing
- Use a fork to blend the softened cream cheese and softened butter in a bowl. Both should yield easily under the fork so firm pieces don’t remain in the icing.
- Work in the powdered sugar and maple syrup with the fork, then whisk once the mixture loosens. The finished icing should look smooth and spread without dragging.
- Coat the warm rolls with icing and scatter the optional chopped walnuts over the top if desired. The warmth softens the icing so it settles into the cinnamon swirls.
Notes
Ingredient tip: Use heavily speckled bananas for the mashed dough portion and firmer ripe yellow bananas cut into roughly 1/8-inch slices for the filling so the log rolls cleanly without excess moisture.
Texture tip: Spoon and level the flour, and test the kneaded dough with a clean, dry finger. Stop adding flour once the dough releases cleanly while still feeling soft and slightly tacky.
Slicing tip: Slide unflavored dental floss or thin sewing thread under the log and cross the ends over the top to slice without squishing the soft layers.
Storage and reheating: Let steam escape before covering and refrigerating leftovers at 40°F or below, limiting room-temperature time to two hours. Warm individual rolls briefly in the microwave just until the center feels warm.
Nutrition information is an estimate based on common ingredients and serving sizes. Values may vary depending on brands, portions, and substitutions.