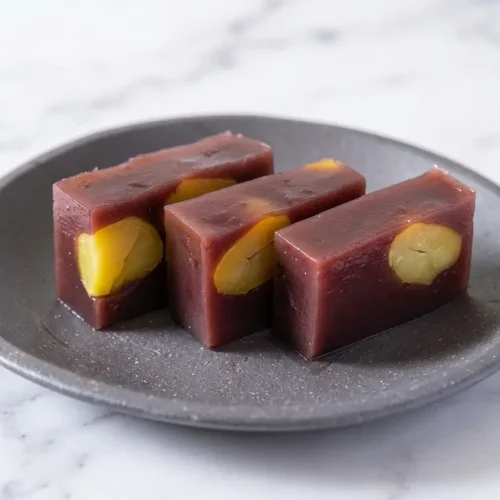
Authentic Yokan Jelly Recipe

Create a beautifully layered, traditional Yokan Jelly at home. This classic Japanese Wagashi pairs earthy sweet red bean paste with roasted hojicha and golden chestnuts for an elegant dessert.
Equipment
- Nagashikan mold or square baking pan
- Small saucepan
- Silicone spatula
Ingredients
- 14 oz sweet red bean paste (anko)
- 1.5 cups water
- 4 g kanten powder
- 1/8 tsp kosher salt
- 7 oz kuri kanroni (chestnuts in heavy syrup)
Instructions
Prepare the mold and ingredients
- Set everything out before you start, because kanten moves quickly once the mixture begins cooling. Prepare a nagashikan, 6 x 5 x 2 inches, or line a regular mold with plastic wrap, then lightly wet the inside with a little water so the finished jelly slides out more easily later.
Make the hojicha-infused bean base
- Pour the 1.5 cups water into a small saucepan. Steep a high-quality hojicha tea bag or loose leaves in the water until it turns a deep golden brown and smells warmly roasted, then remove the tea and whisk in the 4 g kanten powder.
- Bring the pan to a boil, then lower the heat. Keep whisking and cook for a full 2 minutes so the powdered kanten dissolves completely, because this sustained heat is what activates its setting power.
- Add the 14 oz sweet red bean paste (anko) and switch to a silicone spatula to blend it in smoothly. Stir until the mixture looks glossy and uniform, with no thick streaks of paste left behind.
- Once the red bean paste is fully dissolved, stir in the 1/8 tsp kosher salt and a tiny pinch of flaky sea salt to sharpen the hojicha's roasted notes. Take the pan off the heat and let it cool for about 2 to 3 minutes, just enough so it is still fluid but not piping hot.
Layer the chestnuts and chill
- Pour enough of the red bean mixture into the mold to make a base layer about 1/4 inch, 0.6 cm, deep. Leave it at room temperature for about 10 minutes, until the surface looks set and feels firm to a light touch.
- Arrange the chestnuts from the 7 oz kuri kanroni evenly over that first layer. Work efficiently here, because kanten starts thickening fast as it cools on the counter.
- Pour the remaining red bean mixture over the chestnuts so they are completely covered. Let the mold rest on the counter for 15 minutes to set further, then wrap it and refrigerate for about 2 hours until fully chilled and firm.
Unmold and slice
- Take the yokan from the refrigerator and run a knife around the edges of the mold. If you are using a nagashikan, lift the inner tray and gently slide the jelly onto a cutting board.
- Cut the slab into 3 rectangular bars, then slice each bar into pieces 1/2 to 1 inch, 1.3 to 2.5 cm, thick. Serve it chilled, when the texture is at its cleanest and most refreshing.
Notes
Boil the Kanten Fully: You must maintain a continuous boil for a full 2 minutes to properly activate the setting agent. Skipping this will result in a watery dessert that refuses to set.
Prevent Scorching: Once the sweet red bean paste is incorporated, the mixture becomes heavy. Stir continuously to prevent the bottom from burning and ruining the delicate hojicha notes.
Prep Everything First: Because kanten begins to set quickly at room temperature, it is crucial to have your wetted mold and drained chestnuts prepared before the cooking process begins to avoid uneven layers.
Fixing Unset Yokan: If your jelly fails to firm up, all is not lost. Gently remelt it on the stove, ensure it reaches a full boil to properly cook the kanten, and then repour it into your mold.
Nutrition information is estimated based on common ingredients and serving sizes and may vary.