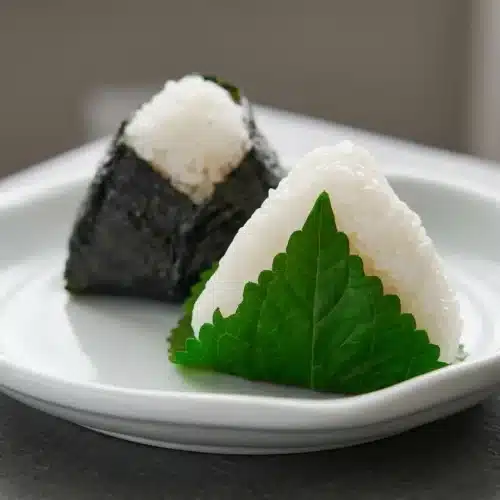
Tuna Mayo Onigiri

Fluffy Japanese short-grain rice surrounds a creamy, savory filling of drained canned tuna, Japanese mayonnaise, and soy sauce. Shaped gently with salted hands and wrapped in leaves, it is ready in 30 minutes.
Equipment
- 2 Small Glass Bowl
- 1 Medium Glass Bowl
- 1 Large Glass Bowl
- 1 Spoonula
- 1 rice paddle
Ingredients
- 1 1/2 cups Japanese short-grain rice 2 rice cooker cups
- 1 2/3 cups cold water
- 85 grams chunk tuna in oil 1 small US can
- 3 tablespoons Japanese mayonnaise such as Kewpie
- 1 teaspoon soy sauce
- 6 wild sesame leaves green shiso or nori will work too
- Salt
Instructions
- Rinse the 1 1/2 cups Japanese short-grain rice in several changes of water, drain thoroughly, then cook it with 1 2/3 cups cold water using your rice cooker’s white-rice setting. The rinse water should become less cloudy, and the cooked grains should feel tender and cling together without a hard center.
- During the rice cooking cycle, drain the 85 grams tuna thoroughly and blend it in a bowl with 3 tablespoons Japanese mayonnaise and 1 teaspoon soy sauce, breaking up the chunks as you mix. A cohesive filling holds together on the spoon with no loose liquid collecting beneath it.
- Arrange a bowl of water and a separate small bowl of salt beside the shaping area. This setup lets you moisten and season your palms without leaving the warm rice uncovered for long.
- Lift and turn the cooked rice gently with a paddle, move it into a bowl, and drape a damp towel over the top as it cools slightly. The grains should look fluffy, while the towel keeps their exposed surfaces from drying.
- Once the rice feels comfortably hot rather than painful to touch, dampen your hands and spread a fingertip dab of salt over both palms. Your hands should feel moist and lightly salted, with no water dripping from them.
- Place one-sixth of the rice in your non-dominant palm and press a shallow hollow into its center without lingering. Leave enough rice underneath and around the hollow to enclose the filling.
- Place about 2 teaspoons of tuna filling in the hollow, then bring the surrounding rice over it to close the opening. The creamy center should disappear beneath a continuous covering of rice.
- Curve your supporting palm into a trough and use two or three fingers of the other hand to gently define a triangular outline. The sides should hold together while individual grains remain visible.
- Turn the rice ball onto a different side and repeat the light shaping motions until the triangle looks even. Aim for three roughly equal sides rather than sharply compressed corners.
- Fold one wild sesame leaf around the shaped rice ball, then moisten and salt your hands again before filling, shaping, and wrapping the remaining portions with the remaining leaves. The completed batch should contain six rice balls with enclosed centers and gently formed edges.
Notes
Ingredient tip: Drain the canned tuna thoroughly so the mixture forms a thick paste with no excess oil or liquid pooling in the bowl.
Texture tip: Shape the rice while it is still comfortably hot and use gentle pressure, similar to holding a ripe peach, so the center stays tender rather than dense.
Serving tip: If you use roasted nori instead of leaves, keep the seaweed dry and separate until right before eating so it stays crisp.
Storage: Wrap leftover rice balls individually, place them in a closed container, and refrigerate promptly rather than leaving them out at room temperature.
Nutrition information is an estimate based on common ingredients and serving sizes. Values may vary depending on brands, portions, and substitutions.