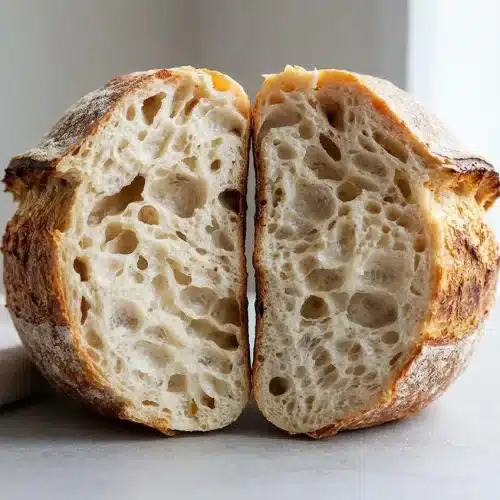
Sourdough Bread

Bake an artisan sourdough bread loaf featuring a blistered, golden crust and a soft, airy crumb using simple stretch and folds and a preheated Dutch oven.
Equipment
- Dutch oven
- Digital kitchen scale
- 8-inch proofing basket or bowl
- Flour sack towel
- Bench scraper
- Bread lame or razor blade
- Parchment Paper
Ingredients
- 50-100 g bubbly, active starter (1/4 - 1/2 cup)
- 375 g warm water (1 1/2 cups plus 1 tbsp)
- 500 g bread flour (4 cups plus 2 tbsp)
- 9-12 g fine sea salt (1.5 - 2.5 teaspoons)
Instructions
Make the Dough
- Whisk the active starter and warm water together in a large mixing bowl until fully dispersed and milky. The liquid will turn evenly cloudy with a frothy, aerated surface.
- Add the bread flour and fine sea salt, mixing thoroughly with a spatula or your hands until no dry flour patches remain. A rough, shaggy mass forms with no loose powder left at the bottom of the bowl.
- Cover the bowl securely with a damp kitchen towel and let the mixture rest undisturbed for 30 minutes. The flour hydrates fully while the gluten begins relaxing into a cohesive dough.
Stretch and Fold
- Wet your clean hands with cool water, reach under one edge of the dough, pull it upward, and fold it across the center. The dough stretches smoothly without tearing while offering gentle resistance.
- Rotate the bowl a quarter turn and repeat the lifting and folding motion four to five times around the perimeter. A smoother, firmer round forms in the center of the bowl.
- Cover the bowl and rest the dough for 30 minutes between cycles, completing four total sets over a two-hour window. The dough transforms from a lumpy, fragile mass into a silky, elastic, and structured ball.
Bulk Fermentation
- Seal the bowl with an airtight lid or damp towel to trap internal humidity during the primary rise. The dough surface remains supple and protected from developing a dry, leathery skin.
- Let the dough ferment at ambient room temperature until it expands noticeably and develops visible bubbles. The mass increases by 50% to 75% in volume, showing domed edges and scattered surface aeration.
Shape and Rest
- Tip the fermented dough gently onto a lightly floured work surface and pull the edges into the center to create a loose round. The dough releases cleanly from the bowl while retaining its delicate internal aeration.
- Use a bench scraper to roll and cup the dough against the counter surface to generate exterior skin tension. A taut, smooth outer surface develops across the top of the round.
- Allow the round to rest seam side up on the counter for 30 minutes to relax the gluten network. The dough settles slightly without losing its upright, domed posture.
- Dust a cloth-lined proofing basket generously with white rice flour before the final shaping. The flour coating provides a barrier that prevents sticking during the cold rest.
- Perform a final envelope fold to tighten the round and transfer it seam side up into the prepared basket. The dough sits neatly centered with a firm, taut base facing upward.
Cold Proof
- Cover the proofing basket securely with a reusable shower cap or clean towel. The protective wrap prevents surface evaporation in the refrigerator.
- Refrigerate the basket for 1 hour or up to 48 hours for extended cold retardation. The dough firms up significantly while developing deep, lactic acid tang and complex flavor.
Score and Bake
- Place your heavy Dutch oven with its lid inside the oven and preheat thoroughly to 550°F (290°C). The cast iron accumulates intense radiant heat necessary for explosive oven spring.
- Invert the chilled dough onto a sheet of parchment paper and score the top with a sharp razor blade at a shallow angle. A clean, decisive incision opens across the taut skin without snagging.
- Lower the dough using the parchment corners into the preheated Dutch oven, seal the lid, and reduce oven heat to 450°F (230°C). Trapped internal steam keeps the exterior soft, allowing the loaf to expand rapidly.
- Bake covered for 30 minutes, then remove the lid, reduce heat to 400°F (200°C), and bake 10 to 15 minutes more. The crust turns a deep golden brown with blistered micro-bubbles and a crisp texture.
- Transfer the loaf to a wire cooling rack and leave it undisturbed for at least 1 hour before slicing. Internal steam settles into the crumb structure, preventing gumminess upon slicing.
- Keep the cooled loaf in an airtight container at room temperature for up to 3 days or slice and freeze for longer storage. The bread retains its moist interior crumb and toasts evenly from frozen.
Notes
Dough handling: Moisten hands with cool water before each stretch and fold sequence to prevent the wet dough from sticking without adding extra flour.
Bulk fermentation cue: Look for a 50% to 75% increase in dough volume, domed edges, and a gentle wobble rather than letting the dough double entirely.
Cooling: Allow the baked loaf to rest on a wire rack for at least 1 hour before slicing so internal starches set fully and avoid a gummy crumb.
Storage: Keep the loaf at room temperature cut-side down in a breathable paper bag for several days, or freeze pre-cut slices with parchment paper between them.
Nutrition information is an estimate based on common ingredients and serving sizes. Values may vary depending on brands, portions, and substitutions.
Nutrition
Calories: 1850kcalCarbohydrates: 370gProtein: 60gFat: 5gSaturated Fat: 1gSodium: 3800mgPotassium: 650mgFiber: 18gSugar: 5gCalcium: 150mgIron: 22mg
Tried this recipe?Let us know how it was!