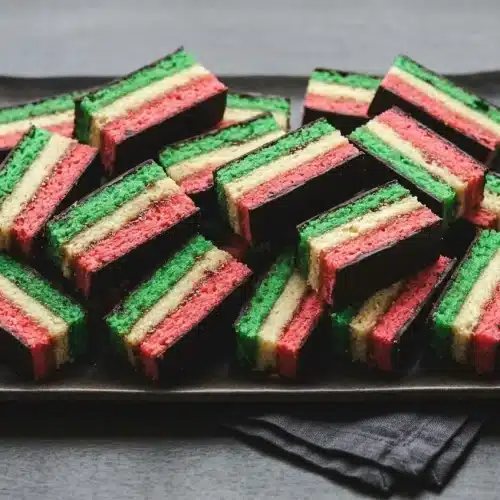
Italian Rainbow Cookies

Soft almond sponge layers, thin tart preserves, and bittersweet chocolate coatings come together in these compact, moist Italian rainbow cookies after an overnight weighted chill.
Equipment
- 3 jelly roll pans
- 1 food scale
Ingredients
- 4 large eggs separated
- 1 cup sugar
- 1 8-oz can almond paste
- 2½ sticks 1 ¼ cups margarine (or butter) softened (10 oz or 285 grams total of butter)
- 1 teaspoon almond extract
- 2 cups all-purpose flour
- ½ teaspoon salt
- 25 drops red food coloring
- 25 drops green food coloring
- 1 12-oz jar apricot or raspberry preserves heated and strained
- 7 oz fine-quality bittersweet chocolate not unsweetened, chopped
Instructions
Whip the Meringue and Cream the Almond Batter
- Heat the oven to 350°F with a rack in the center, then butter a 13-by-9-inch pan, line it with oven-rated parchment extending 2 inches beyond two opposite ends, and butter the liner. The overhang should remain accessible for lifting the fragile cake.
- Whisk the egg whites at medium-high speed to stiff peaks, gradually beat in ¼ cup sugar at high speed, and transfer to another bowl. The finished peaks should stand upright with a slight gloss.
- With the paddle attachment, blend almond paste and the remaining ¾ cup sugar for about 3 minutes, beat in softened margarine or butter for about 3 minutes, then mix in yolks and extract for about 2 minutes before incorporating flour and salt on low speed. Look for a pale, fluffy mixture before the yolks go in, and stop mixing once the flour disappears.
- Use a spatula to incorporate half the whipped whites, then gently fold in the rest. The batter should look evenly blended without pockets of white, while retaining the air from whipping.
Divide, Tint, and Bake the Three Sponge Layers
- Weigh the batter in grams, divide that total by three, and portion it into three bowls; leave one plain, tint another with the red coloring and the third with green, then cover and refrigerate the plain and green portions while spreading the red batter in the pan. An offset spatula should produce an even layer about ¼ inch thick, including the corners.
- Bake the red cake for 8 to 10 minutes, checking for a set surface and a clean tester. The cake can look pale and less baked than a conventional cake, but it should not contain wet batter.
- Lift the cake onto a rack using the liner and cool for about 15 minutes, then clean, reline, and butter the pan for the white layer; bake it to the same doneness, bring the green batter to room temperature while it bakes, and repeat the pan preparation and baking for green. Keep each cooled layer supported by its paper to reduce tearing during handling.
Layer With Warm Preserves and Weight Overnight
- Once the cakes have cooled, turn the green layer onto a large baking sheet lined with parchment or wax paper and peel away its baking liner. The exposed cake surface should lie flat and be ready for filling.
- Warm the heated, strained preserves in a microwave-safe bowl or saucepan for 1 minute, then spread half over the green cake. Keep this single application very thin, with no thick pools that could make the stack slide.
- Turn the white cake onto the green cake, remove its paper, spread with the remaining preserves, and finish with the red cake, peeling away its liner. The stack should run green, white, then red from bottom to top, with two thin fruit fillings.
- Wrap the stack in plastic, set a large baking sheet over it, add cookbooks as weights, and refrigerate for at least 8 hours. The broad, even pressure helps close gaps and creates a compact slab.
- Take off the weights, baking sheet, and plastic wrap, then let the layered cake reach room temperature. The slab should remain compressed and level before coating.
Coat Both Sides in Chocolate and Slice Cleanly
- Stir the chocolate in a double boiler or metal bowl over barely simmering water until melted, then take the pan off the heat while keeping the bowl over the warm water. The chocolate should flow smoothly; alternatively, melt about 3.5 ounces for each coating stage to limit firming between applications.
- Square off the cake edges with a long serrated knife, spread half the chocolate thinly across the top, and refrigerate uncovered for about 15 minutes. The coating should feel firm before you attempt the flip.
- Lay parchment or wax paper over the chocolate, place another baking sheet on top, invert the supported slab, remove the exposed paper, and spread the remaining chocolate over the second side. Refrigerate for about 30 minutes, until this coating has firmed.
- Cut the cold slab into rows and then rectangles about 1 ½ inches by ¾ inch, wiping the serrated knife with a wet towel after every slice. If the chocolate starts softening or smearing, refrigerate the slab again; an optional brief freeze before cutting can firm it further.
Notes
Ingredient tip: Break the firm almond paste into small pieces before mixing so you can spot and blend out lumps before adding the flour.
Texture tip: Warm and strain the preserves, then apply them in a very thin coat so the stacked cake layers stay aligned without sliding.
Doneness: Check the thin sponge layers at 8 to 10 minutes; they will appear pale, but a clean tester means they are set without being overbaked.
Serving tip: Warm a long serrated knife under hot water, dry it, and wipe the blade with a damp towel after every cut to slice cold chocolate cleanly.
Storage: Keep finished cookies in an airtight container in the refrigerator with parchment or wax paper between stacked layers.
Nutrition information is an estimate based on common ingredients and serving sizes. Values may vary depending on brands, portions, and substitutions.