Skip to content
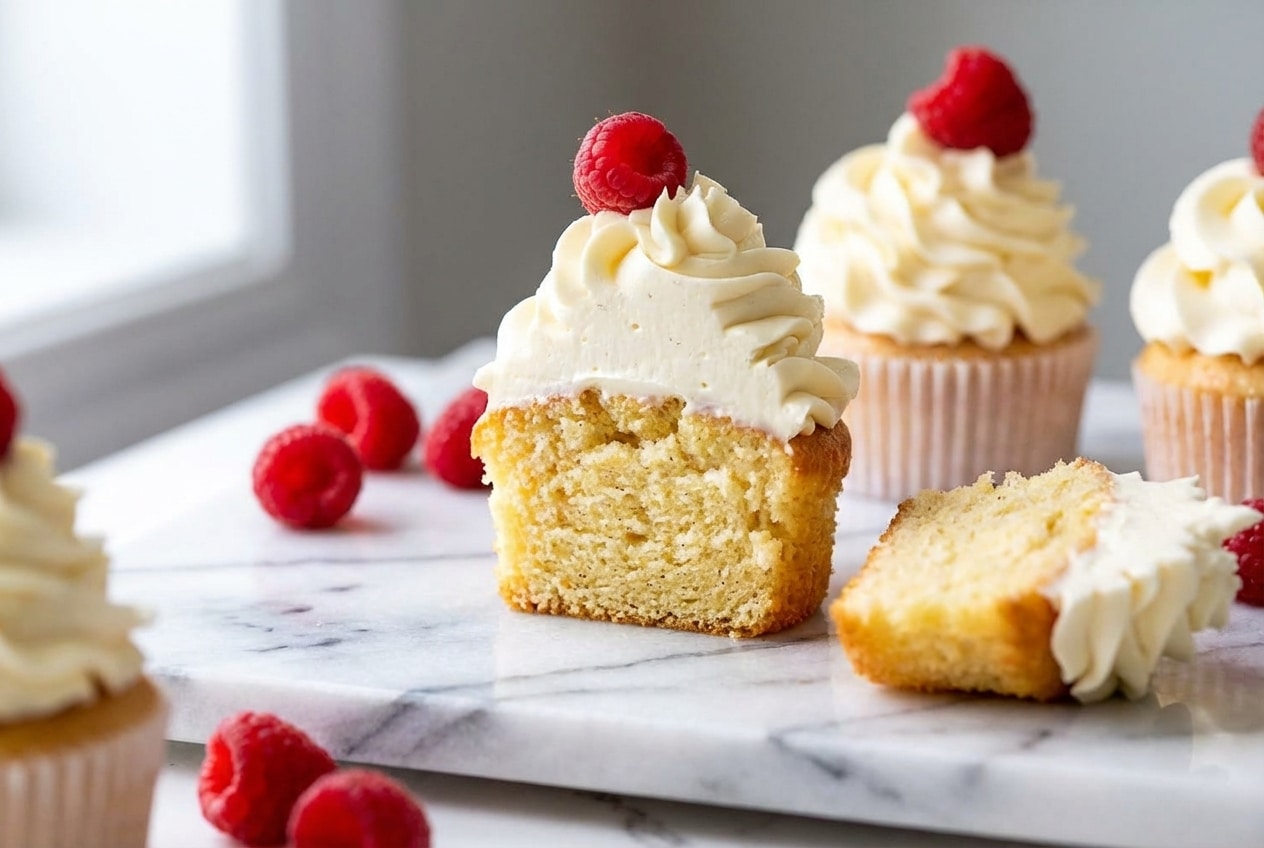
I spent years chasing that ideal vanilla cupcake, the kind that feels plush and bakery-made, not dry or bready by day two. This vanilla cupcake recipe is the one I bake when I need guaranteed height, a velvety crumb, and true vanilla aroma that hits before you even peel the liner.
It’s built on the Hot Milk Method for a stable, moist sponge, then upgraded with a secret brown butter and vanilla bean infusion that makes the flavor taste professionally finished. If you love classic cupcakes but want them to eat like a fancy pastry case version, you are in the right place.
Why You’ll Love This Recipe (The Beurre Noisette Twist)
Bakery-level vanilla flavor: Infusing butter with a split vanilla bean, then browning it as beurre noisette, adds depth that plain extract alone cannot match.
Nutty complexity without tasting “nutty”: The Maillard reaction in browned butter creates toasted aroma compounds that read as richer vanilla, not like a different dessert.
Plush, velvety crumb structure: The Hot Milk Method plus proper emulsification gives a fine, even crumb that stays soft, not crumbly.
Reliable rise and lightness: When I commit to the full 6-minute aeration step, the batter holds bubbles beautifully and bakes up golden with a gentle dome.
Ingredients and Substitutions

These ingredients are simple, but each one has a job, from structure-building flour to moisture-preserving oil. Measure carefully, and you will get consistent, bakery-style cupcakes every time.
Ingredients
- 1 cup plain / all purpose flour (cake flour OK too)
- 1 1/4 tsp baking powder (NOT baking soda)
- 1/8 tsp salt
- 2 large eggs (50 – 55g / 2 oz each), at room temp
- 3/4 cup caster / superfine sugar (granulated/regular ok too)
- 60g / 1/4 cup unsalted butter, cut into 1.5cm / 1/2” cubes
- 1/2 cup milk, full fat
- 2 tsp vanilla extract, the best you can afford
- 1 1/2 tsp vegetable or canola oil
Ingredient Notes & Substitutions
Flour choice: If you want the most delicate crumb structure, bleached cake flour is the easiest path because its lower protein content limits gluten development and keeps the cupcakes tender and pale.
Sugar: Caster sugar dissolves faster, which helps aeration during the long egg whip and makes a smoother batter, but regular granulated works if that’s what you have.
Vanilla: Extract is great here, but pairing it with real vanilla bean during the butter infusion takes it from “good” to “bakery.” A DIY vanilla bean paste adds speckles and deeper aroma.
Butter plus oil: Butter brings flavor, while the small amount of vegetable oil is my day-two insurance policy because it stays liquid and keeps the crumb moist longer.
Buttermilk variation: For a tangier, slightly more complex bite, a quick buttermilk swap works nicely, use milk plus a little lemon juice and let it sit briefly before baking.
How to Make vanilla cupcake recipe
Prep the Pan and Dry Mix
- Preheat oven to 180°C/350°F (160°C fan) for 20 minutes before starting the batter. Keep the shelf in the middle so heat circulates evenly.
- Line a standard muffin tin with cupcake liners.
- Whisk flour, baking powder, and salt in a large bowl until fully combined, then set aside.
Heat the Milk and Butter (Plus the Vanilla Infusion)
- Place butter and milk in a heatproof jug and microwave 2 minutes on high to melt the butter. Do not let the milk bubble and boil, foam is fine.
- For the “secret bakery twist,” add a split vanilla bean pod to the jug now, then briefly return to heat just until the butter smells toasty and turns lightly golden. Cover and leave in the microwave to keep very warm.
Whip the Eggs and Build the Batter
- In a separate, preferably heavy based glass bowl, beat eggs for 30 seconds on speed 6 of a handheld beater.
- With the beater still running, pour the sugar in over 30 seconds.
- Beat for 6 minutes on speed 8, until tripled in volume and almost pure white, it should fall in thick ribbons.
- Scatter 1/3 of the flour across the surface, then beat on Speed 1 for 5 seconds. Stop, add half the remaining flour, then mix on Speed 1 for 5 seconds.
- Add the remaining flour, then mix on Speed 1 for 5 to 10 seconds until the flour is just incorporated. The moment you cannot see flour, stop to avoid gluten development.
- Pour the hot milk, vanilla extract, and oil into the now empty flour bowl. Add about 3/4 cups of the egg batter into the hot milk and whisk until smooth, you can be vigorous here and it will look foamy.
- With the beater on Speed 1, pour the milk mixture into the egg batter over 15 seconds, then turn the beater off.
- Scrape down the sides and base of the bowl, then beat on Speed 1 for 10 seconds until the batter is smooth and pourable.
Bake and Cool
- Pour batter into the muffin tin, filling 2/3 of the way up. Do not fill more or you risk flat or sunken surfaces, an ice cream scoop with a lever makes this fast and even.
- Bake 22 minutes, until golden and a toothpick inserted into the middle comes out clean.
- Cool 2 minutes, then use a fork to lift them out onto a rack. Cool completely before frosting, or serving with cream plus fresh berries or jam.
The Science of the Hot Milk Method
The Hot Milk Method works differently than the creaming method because it builds structure from whipped eggs and dissolved sugar, then sets that foam with warm milk and melted butter. In practice, I notice the crumb stays springy and evenly fine, instead of getting coarse or dry around the edges.
A key advantage is moisture retention, the warm milk and fat create a more uniform mixture that resists staling. Food science on a stable emulsion that traps moisture helps explain why fats support softness.
High altitude baking changes everything because the leavening agent and the whipped-egg foam expand more aggressively. For reliable high altitude adjustments, slightly reducing baking powder and bumping oven temperature is common practice, and university guidance like high altitude adjustments offers specific ranges to use.
Bleached versus unbleached flour also shows up in the final color and tenderness. Bleached flour typically yields a lighter crumb and a softer bite because the protein behaves a bit differently, which is why many bakers reach for cake flour when they want that classic bakery-style white vanilla cupcake.
Pro Tips & Troubleshooting

Pro Tips
- Warm fridge-cold eggs by soaking them in warm tap water for 5 minutes, room temperature eggs whip taller and emulsify more smoothly.
- Test your leavening agent by sprinkling a little into boiling water, it should fizz vigorously if it’s still active.
- A Wilton 1M tip gives the classic bakery swirl, and an offset spatula helps tidy the base before you pipe.
- For bakes that must hold heavy frosting, the structure lessons from a Crumbl cookie recipe translate well to “bakery-style” density.
Common Mistakes to Avoid
- Overfilling liners, going past 2/3 full can cause muffin tops, then sinking as the sponge collapses.
- Using cold milk or eggs, temperature shocks can break emulsification and deflate your aeration.
- Leaving batter on the counter, the whipped bubbles start to pop, so bake right after mixing.
- Overmixing after adding flour, extra beating encourages gluten development and toughens the crumb.
Serving, Storage & Transport

Serving Ideas
Swiss Meringue Buttercream is my favorite finish here because it’s silky and not overly sweet, so the vanilla stays front and center. Fresh berries, a spoon of jam in the center, or a Victoria Sponge-inspired vibe makes them feel extra special without much effort.
If you want a richer dessert table option alongside these, the coconut-chocolate energy of Mounds cake balances vanilla nicely for parties.
Storage and Make-Ahead
These cupcakes stay moist for 4 days at room temperature when stored airtight, I keep them away from direct sun and heat. Unfrosted cupcakes freeze well, wrap tightly once fully cool, then thaw at room temperature still wrapped to prevent condensation.
Frosted cupcakes can be frozen, but texture depends on frosting type, buttercream tends to do well while whipped cream toppings usually weep after thawing.
Transport Tips
For clean arrivals, a non-slip mat under your cupcake box is a quiet lifesaver. A small dab of frosting under each liner can “glue” cupcakes in place so they do not skate around during turns.

Best vanilla cupcake recipe
Equipment
- Standard muffin tin
- Cupcake liners
- Large Mixing Bowl
- Heatproof jug
- Microwave
- Handheld beater
- Wire rack
Ingredients
- 1 cup plain / all purpose flour cake flour OK too
- 1 1/4 tsp baking powder NOT baking soda
- 1/8 tsp salt
- 2 large eggs at room temp (50–55g / 2 oz each)
- 3/4 cup caster / superfine sugar granulated/regular ok too
- 60 g unsalted butter cut into 1.5cm / 1/2” cubes
- 1/2 cup milk full fat
- 2 tsp vanilla extract the best you can afford
- 1 1/2 tsp vegetable or canola oil
Instructions
Prep the Pan and Dry Mix
- Preheat oven to 180°C/350°F (160°C fan) for 20 minutes before starting the batter. Keep the shelf in the middle so heat circulates evenly.
- Line a standard muffin tin with cupcake liners.
- Whisk flour, baking powder, and salt in a large bowl until fully combined, then set aside.
Heat the Milk and Butter (Plus the Vanilla Infusion)
- Place butter and milk in a heatproof jug and microwave 2 minutes on high to melt the butter. Do not let the milk bubble and boil, foam is fine.
- For the “secret bakery twist,” add a split vanilla bean pod to the jug now, then briefly return to heat just until the butter smells toasty and turns lightly golden. Cover and leave in the microwave to keep very warm.
Whip the Eggs and Build the Batter
- In a separate, preferably heavy based glass bowl, beat eggs for 30 seconds on speed 6 of a handheld beater.
- With the beater still running, pour the sugar in over 30 seconds.
- Beat for 6 minutes on speed 8, until tripled in volume and almost pure white; it should fall in thick ribbons.
- Scatter 1/3 of the flour across the surface, then beat on speed 1 for 5 seconds. Stop, add half the remaining flour, then mix on speed 1 for 5 seconds.
- Add the remaining flour, then mix on speed 1 for 5 to 10 seconds until the flour is just incorporated. The moment you cannot see flour, stop to avoid gluten development.
- Pour the hot milk, vanilla extract, and oil into the now empty flour bowl. Add about 3/4 cups of the egg batter into the hot milk and whisk until smooth; you can be vigorous here and it will look foamy.
- With the beater on speed 1, pour the milk mixture into the egg batter over 15 seconds, then turn the beater off.
- Scrape down the sides and base of the bowl, then beat on speed 1 for 10 seconds until the batter is smooth and pourable.
Bake and Cool
- Pour batter into the muffin tin, filling 2/3 of the way up. Do not fill more or you risk flat or sunken surfaces.
- Bake 22 minutes, until golden and a toothpick inserted into the middle comes out clean.
- Cool 2 minutes, then use a fork to lift them out onto a rack. Cool completely before frosting, or serving with cream plus fresh berries or jam.
Notes
Nutrition
Conclusion
The browned butter and vanilla bean infusion is the tiny step that makes these taste like a bakery case, even though the ingredients are everyday. If you nail the 6-minute egg whip, the cupcakes bake up light, plush, and confidently moist.
Print the recipe and start your oven, then have fun with small twists like a jam center or a different frosting swirl.
FAQ
Why are my cupcakes dry and how can I fix them?
Dry cupcakes are usually from overbaking or overmixing once the flour goes in. Bake only until a toothpick comes out clean, and keep the mixer on the lowest speed for the short bursts listed.
Do I really need room temperature eggs?
Yes, room temperature eggs whip more effectively for aeration, and they blend with the warm milk mixture more smoothly for proper emulsification. Cold eggs can reduce volume and make the batter less stable.
What is the difference between baking powder and baking soda in cupcakes?
Baking powder contains both an acid and a base, so it can rise without extra acidity in the batter. Baking soda needs an acidic ingredient to activate, which this recipe does not rely on.
How long do homemade cupcakes stay fresh?
Stored airtight at room temperature, these stay moist for up to 4 days. For longer storage, freeze unfrosted cupcakes and thaw still wrapped.
Can I substitute oil for butter in this recipe?
You will lose the browned-butter flavor and some richness, even if the texture stays tender. The fat balance question comes up in other bakes too, and the comparison in a homemade brookie shows how butter impacts flavor versus oil’s moisture.
How do I get a flat top for decorating?
Fill only 2/3 full, keep the oven properly preheated, and avoid extra baking powder. A stable temperature and correct portioning reduce doming and help you get a neat surface for piping.