Skip to content
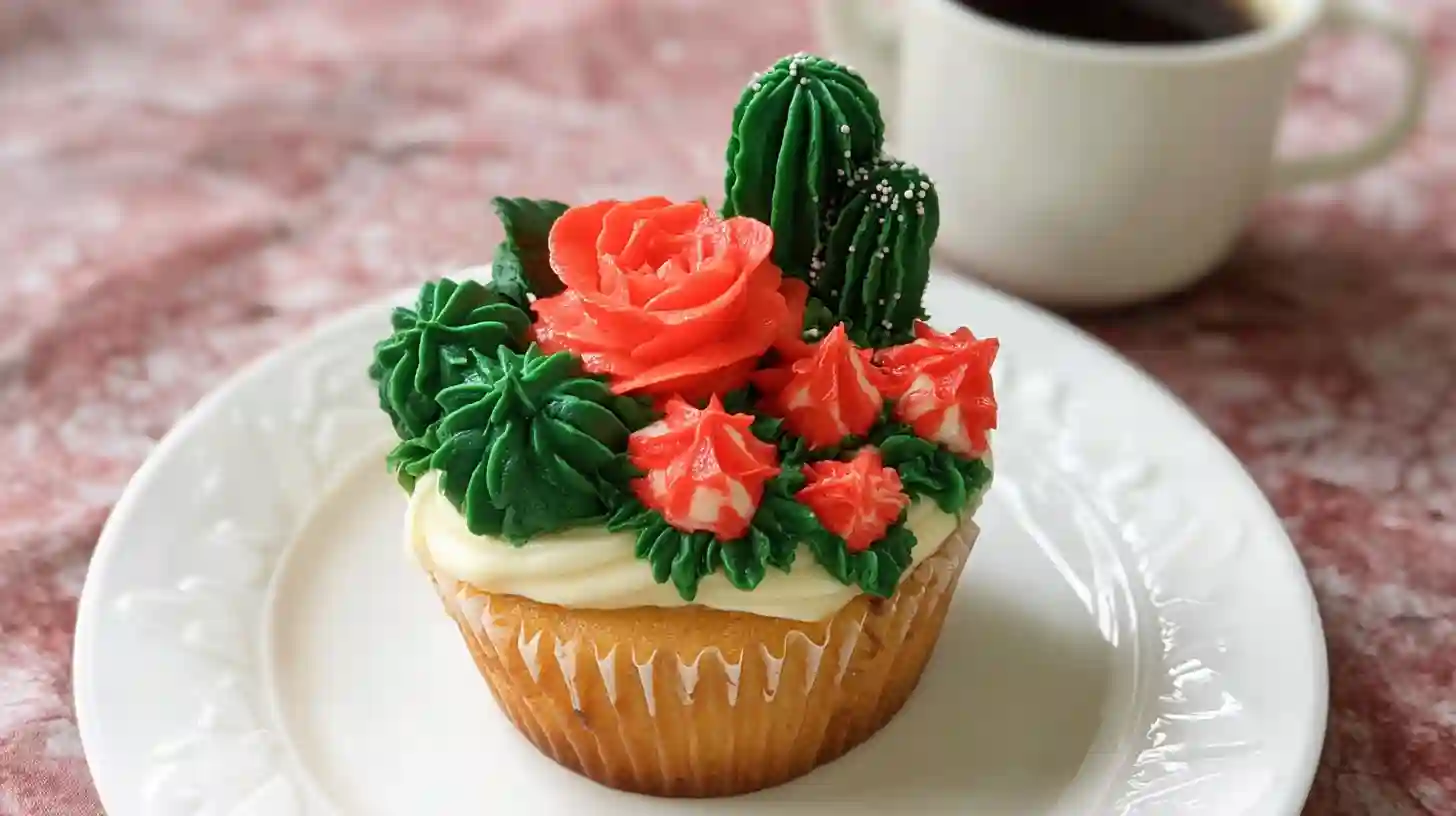
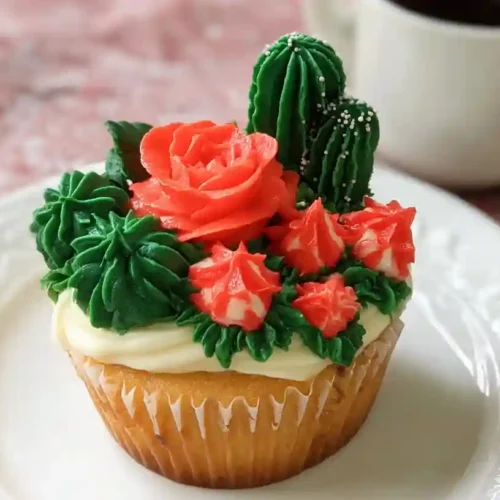
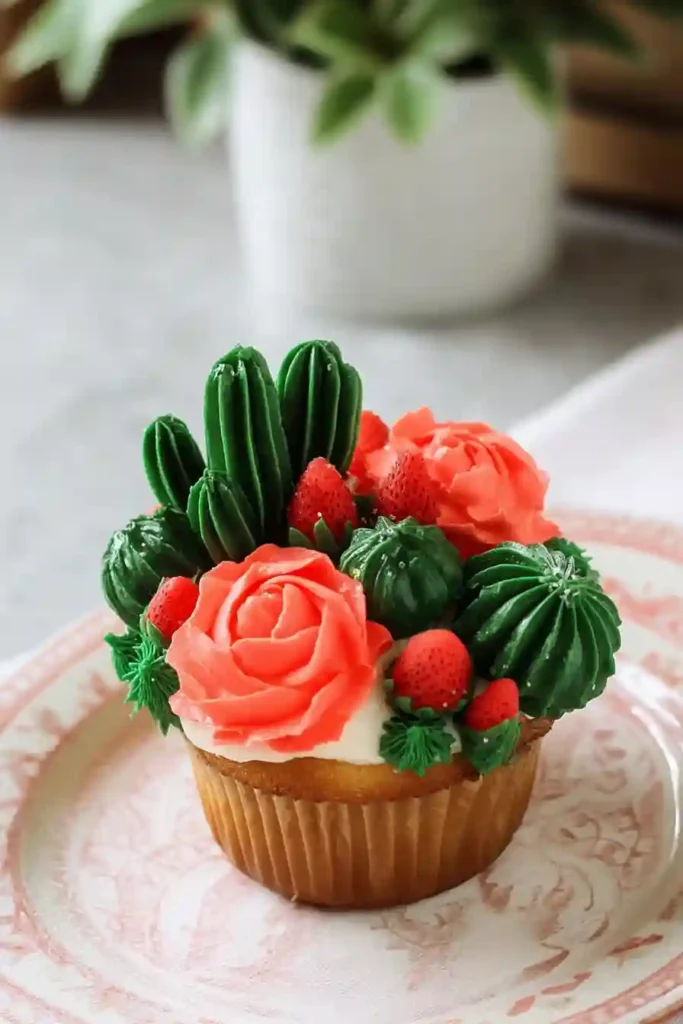
Succulent cupcakes are more than just desserts—they’re edible art. These charming little cakes mimic the look of real succulents with buttercream piping so precise, you’ll have to do a double take. Whether you’re planning a garden-themed party, a wedding, or simply want to try your hand at something creative, succulent cupcakes deliver beauty and taste in equal measure. What sets this version apart is its balance: easy enough for beginners, detailed enough for serious decorators. Plus, with tips for both traditional buttercream and vegan-friendly methods, anyone can master the craft and impress their guests. Let’s explore how to make these stunning treats at home—no florist required.
Why You’ll Love This Recipe
- Beginner-Friendly Yet Impressive – Whether you’re new to piping or already have some decorating skills, this guide breaks it down step by step with visual cues and simple techniques.
- Edible Art That Wows – These cupcakes double as showpieces. They’re perfect for birthdays, garden parties, baby showers, or even wedding favors.
- Flexible and Inclusive – Includes tested alternatives for vegan and gluten-free options without sacrificing flavor or texture.
- Customizable Designs – From tall cacti to delicate echeveria rosettes, you can mix and match styles to suit your event or season.
- Great Make-Ahead Option – Frosting elements can be piped ahead and stored, saving you time on the day of serving.
Unlike typical cupcake recipes, this one puts the focus on both flavor and creativity. It’s about more than baking—it’s about creating something joyful and personal. These succulent cupcakes invite you to slow down, try something new, and take pride in the details.
_________________________________
Succulent Cupcakes Recipe
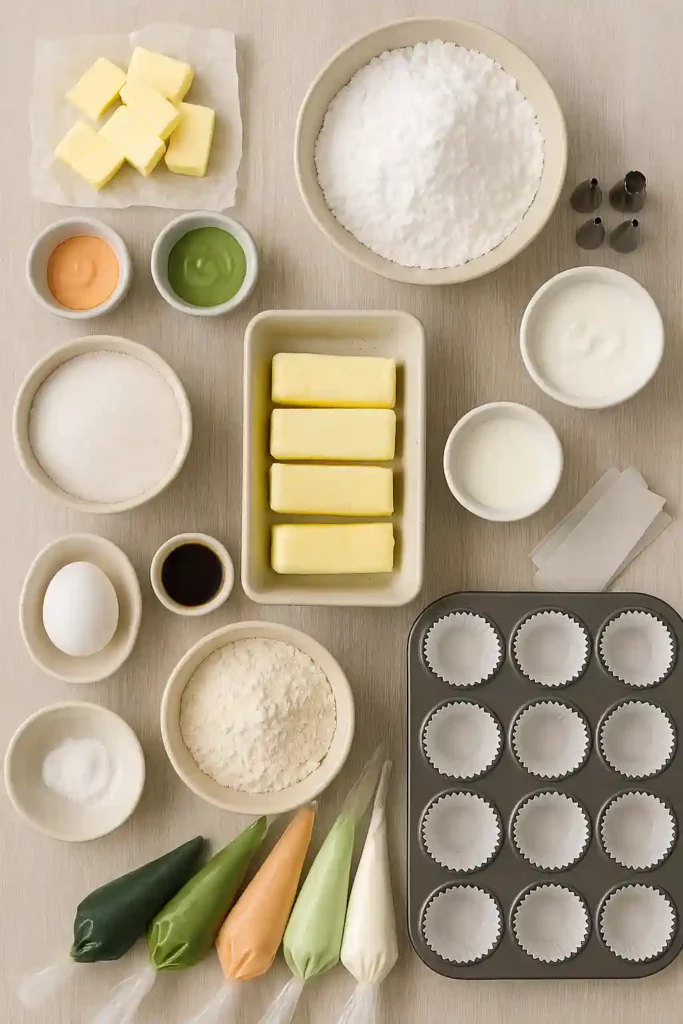
Equipment
- 4 piping bags
- Piping tips (#199, #352, #1, #4B, #102, #16)
- Decorating coupler set
- Flower nail
- Parchment or wax paper (2×2 inches)
Ingredients
Vanilla Cupcake Base
- 1 cup granulated sugar
- 1/4 cup unsalted butter softened
- 1 large egg
- 1/4 cup full-fat sour cream
- 1 1/4 cups all-purpose flour
- 1 1/2 tsp baking powder
- 1/2 tsp fine sea salt
- 1/2 cup whole milk
- 2 tsp vanilla extract
Buttercream Succulent Frosting
- 1 1/2 cups salted butter softened
- 3 cups powdered sugar sifted if clumpy
- 2 tsp pure vanilla extract
- Wilton Moss Green gel food coloring
- Wilton Peach gel food coloring
Instructions
- Preheat oven to 350°F (175°C) and line a 12-cup muffin tin with cupcake liners.
- Beat butter and sugar until light and fluffy. Add egg and sour cream, mix well.
- In a separate bowl, combine flour, baking powder, and salt.
- Alternately add dry ingredients and milk to butter mixture, beginning and ending with dry. Stir in vanilla.
- Divide batter among liners and bake for 18–20 minutes. Cool completely.
- Beat butter for frosting, gradually add sugar and vanilla. Beat until fluffy.
- Divide and tint frosting: dark green, light green, peach, and white.
- Fill piping bags fitted with appropriate tips. Pipe succulents onto parchment, chill to set.
- Spread base frosting on cupcakes. Transfer chilled succulents and finish with piped leaves.
Video
Notes
- Calories: 264 kcal
- Total Fat: 10 g
- Saturated Fat: 6 g
- Carbohydrates: 44 g
- Sugars: 36 g
- Fiber: 0 g
- Protein: 0 g
- Sodium: 98 mg
Nutrition
Ingredients Needed
Here’s everything you’ll need to create beautifully decorated succulent cupcakes, broken down into the cupcake base and the buttercream succulent frosting. Each item is selected for a reason—texture, flavor, or ease of use—and substitutions are included to help you adapt as needed.
For the Succulent Frosting
- 1½ cups salted butter, softened – Adds richness and helps balance the sweetness of the sugar. Unsalted butter works too—just add a pinch of salt.
- 3 cups powdered sugar – Essential for structure and smoothness in the buttercream. Sift if clumpy.
- 2 teaspoons pure vanilla extract – Brings warm, rounded flavor to the frosting.
- Wilton Moss Green gel food coloring – For deep green tones typical of many succulents.
- Wilton Peach gel food coloring – Adds warm contrast for cactus flowers or unique rosettes.
Optional Substitution: Use natural food powders like matcha (for green) or freeze-dried raspberry (for pink) if you prefer natural dyes, though results may vary in tone.
For the Vanilla Cupcakes
- 1 cup granulated sugar – For light sweetness and structure.
- ¼ cup unsalted butter, softened – Creates a tender crumb and adds flavor.
- 1 large egg – Provides structure and moisture.
- ¼ cup full-fat sour cream – Adds richness and keeps cupcakes extra moist.
- 1¼ cups all-purpose flour – Use a spoon-and-level method to avoid dry cupcakes.
- 1½ teaspoons baking powder – Helps the cupcakes rise evenly.
- ½ teaspoon fine sea salt – Balances the sweetness.
- ½ cup whole milk – Adds moisture; can sub with plant-based milk like oat or almond.
- 2 teaspoons vanilla extract – Enhances the base flavor.
- 12 paper cupcake liners – Use white or pastel to match the botanical theme.
Equipment
- 4 piping bags – For separating and controlling frosting colors.
- Piping tips:
- #199 – For small cactus shapes
- #352 – For pointed leaf accents
- #1 – For tiny cactus “spikes”
- #4B – For large barrel-style succulents
- #102 – For buttercream roses or petal succulents
- #16 – For miniature flowers on top of cacti
- #199 – For small cactus shapes
- Decorating coupler set – Optional, but helpful for switching tips quickly
- Flower nail – Useful for creating precise floral succulents
- Parchment or wax paper (cut into 2×2 inch squares) – For piping succulents before placing on cupcakes
Notes & Substitutions
- Gluten-Free Version: Use a 1:1 gluten-free baking blend. Ensure your baking powder is gluten-free.
- Dairy-Free Option: Swap butter with a plant-based stick (avoid tub-style spreads) and use dairy-free milk and sour cream.
- Flavor Adjustments: Add a hint of almond extract or citrus zest to the cupcake batter for added complexity.
- Budget Tip: You can use a single piping tip for multiple designs by adjusting pressure and angle.
Each ingredient and tool here serves a clear purpose, ensuring your final product not only looks professional but tastes delightful too.
How to Make Succulent Cupcakes
Creating succulent cupcakes involves two main components: baking the vanilla cupcakes and crafting the buttercream succulents. Follow these detailed steps to achieve beautiful and delicious results.
Step 1: Prepare the Vanilla Cupcakes
- Preheat the Oven: Set your oven to 350°F (175°C). Line a 12-cup muffin tin with cupcake liners.
- Cream Butter and Sugar: In a large mixing bowl, beat ¼ cup of softened unsalted butter with 1 cup of granulated sugar until the mixture is light and fluffy.
- Add Egg and Sour Cream: Mix in 1 large egg until well combined. Then, add ¼ cup of full-fat sour cream and blend until smooth.
- Combine Dry Ingredients: In a separate bowl, whisk together 1¼ cups of all-purpose flour, 1½ teaspoons of baking powder, and ½ teaspoon of fine sea salt.
- Alternate Adding Dry and Wet Ingredients: Gradually add the dry ingredients to the butter mixture, alternating with ½ cup of whole milk. Begin and end with the dry ingredients. Stir in 2 teaspoons of vanilla extract.
- Fill and Bake: Divide the batter evenly among the cupcake liners, filling each about halfway. Bake for 18–20 minutes, or until a toothpick inserted into the center comes out clean.
- Cool: Remove the cupcakes from the oven and let them cool in the pan for 5 minutes. Transfer them to a wire rack to cool completely.
Step 2: Prepare the Buttercream Frosting
- Beat the Butter: In a stand mixer fitted with a paddle attachment, beat 1½ cups of softened salted butter on high speed for 3–4 minutes until creamy.
- Add Powdered Sugar: Reduce the speed to low and gradually add 3 cups of powdered sugar, one cup at a time, beating well after each addition.
- Incorporate Vanilla: Add 2 teaspoons of pure vanilla extract and beat on high speed for an additional 3–4 minutes until the frosting is light and fluffy.
- Divide and Color the Frosting: Split the frosting evenly into four bowls. Tint one bowl with 1 teaspoon of Wilton Moss Green gel food coloring for a deep green hue. Tint another with ½ teaspoon of the same color for a lighter green. Color the third bowl with 1 teaspoon of Wilton Peach gel food coloring. Leave the fourth bowl white.
Step 3: Prepare Piping Bags and Tools
- Set Up Piping Bags: Fit four piping bags with the following tips:
- #199 for small cacti
- #352 for leaves
- #1 for cactus spikes
- #4B for large cacti
- #102 for flowers
- #16 for small flowers atop cacti
- #199 for small cacti
- Fill Piping Bags: Fill each bag with the corresponding colored frosting.
- Prepare Flower Nail: Attach a small square (about 2×2 inches) of parchment or wax paper to a flower nail using a dab of frosting.
Step 4: Pipe the Succulent Decorations
- Small Cacti: Using the #199 tip with dark green frosting, pipe small cacti by squeezing and pulling up to create a starburst shape. Add white spikes using the #1 tip.
- Large Cacti: With the #4B tip and light green frosting, pipe tall cacti by holding the bag vertically, squeezing, and pulling upward. Add white spikes with the #1 tip and top with a peach flower using the #16 tip.
- Succulent Rosettes: Using the #102 tip with peach frosting, pipe rosettes by starting in the center and creating overlapping petals around it.
- Chill Decorations: Place the piped succulents on a baking sheet and refrigerate for at least 1 hour to set.
Step 5: Assemble the Cupcakes
- Apply Base Frosting: Once the cupcakes are completely cool, spread a thin layer of white frosting on top of each to act as a base.
- Add Succulent Decorations: Carefully transfer the chilled buttercream succulents from the parchment paper to the cupcakes using a small offset spatula or butter knife.
- Add Finishing Touches: Use the #352 tip with green frosting to pipe leaves around the succulents, filling in any gaps and enhancing the overall design.
By following these steps, you’ll create stunning succulent cupcakes that are as delightful to look at as they are to eat.
For a fruity twist, consider trying our Honey Peach Cream Cheese Cupcakes for inspiration.
Pro Tips & Troubleshooting
Creating succulent cupcakes can be incredibly rewarding, especially when you understand the nuances behind each step. These tips and common pitfalls will help you elevate your results and avoid the frustration that can come with detailed decorating.
Expert Tips
- Start with Room Temperature Ingredients
Cold butter or eggs can cause separation in your batter or frosting. Leave them out for 30–60 minutes before baking. - Chill Piped Succulents Before Transferring
Always refrigerate your buttercream succulents for at least an hour before moving them onto cupcakes. This ensures they hold their shape and don’t soften on contact. - Use Gel Food Coloring, Not Liquid
Gel coloring produces rich hues without thinning your frosting. This is critical for creating distinct succulent shades. - Pipe Onto Parchment, Not Cupcakes
Trying to decorate directly on the cupcakes limits control. Use parchment on a flower nail for precision, then transfer the succulents once they’re set. - Practice First
Don’t jump straight into decorating your cupcakes. Practice shapes on parchment first until you’re confident with pressure, angles, and spacing.
Common Mistakes to Avoid
- Overmixing the Batter
Once you add flour, mix only until combined. Overmixing creates dense, dry cupcakes. - Using the Wrong Tip for the Wrong Shape
If you’re unsure which piping tip creates which succulent, practice with each one. Mixing them up can lead to unrecognizable designs. - Applying Too Much Frosting Pressure
This often results in blobby or droopy shapes. Apply steady, gentle pressure for definition. - Not Letting the Cupcakes Cool Fully
Warm cupcakes will melt your buttercream. Always cool them completely before decorating. - Skipping a Crumb Coat
Even a thin base layer of frosting can help your succulent decorations adhere better and stand out visually.
Bonus Trick: Use a Toothpick for Realism
Once your buttercream succulents are piped and chilled, use a clean toothpick to lightly score vertical ridges or poke in realistic details. This adds texture and depth—especially on barrel cacti or aloe shapes.
With these pro strategies, you’ll feel more confident and produce cleaner, more visually appealing results. Small changes make a big difference in both presentation and ease.
Serving, Storage & Variations
These succulent cupcakes are show-stoppers on any dessert table. Whether you’re hosting a birthday, bridal shower, or spring brunch, they fit right in—and might even steal the spotlight.
Serving Suggestions
- Themed Displays: Serve in mini terracotta pots to mimic actual succulents—just be sure they’re food-safe. Add edible “soil” using crushed chocolate cookies or brownies.
- Cupcake Bouquets: Arrange several cupcakes on a tray, nestled close together, to look like a blooming succulent garden.
- With Tea or Citrus Drinks: Pair with a light herbal tea (like mint or chamomile) or citrus-infused beverages to complement the delicate vanilla and buttercream flavors.
- As Party Favors: Place each decorated cupcake in a clear plastic box tied with a ribbon for elegant takeaway gifts.
Storage Guidelines
- Short-Term (1–2 Days): Store decorated cupcakes in an airtight container at room temperature if the environment is cool and dry.
- Medium-Term (Up to 5 Days): Keep them in the refrigerator. Allow them to sit at room temperature for 30 minutes before serving for best flavor and texture.
- Make-Ahead Frosting: Pipe your succulents ahead of time and freeze them on parchment in a flat container. Once frozen solid, transfer to a sealed bag or box for up to 1 month.
- Avoid Direct Sunlight: Buttercream decorations will soften or melt if exposed to heat or sunlight. Keep your cupcakes cool during display.
Recipe Variations
- Vegan Version: Swap the butter for plant-based margarine, the egg for a flax egg, and the milk for oat or almond milk. Use vegan gel colors and frost with aquafaba meringue for delicate, plant-based succulents.
- Gluten-Free: Use a 1:1 gluten-free flour blend with xanthan gum included. Double-check your baking powder and vanilla extract are certified gluten-free.
- Flavor Twists:
- Add lemon zest or lavender extract for a floral cupcake base.
- Replace vanilla with almond extract for a slightly nutty profile.
- Add lemon zest or lavender extract for a floral cupcake base.
These options let you adapt the recipe to suit different needs without compromising beauty or taste. Whether you want allergen-friendly options or bold new flavors, there’s plenty of room to get creative.
Nutritional Information
Here’s the estimated nutritional breakdown for one standard succulent cupcake with vanilla base and buttercream succulent frosting. These values are based on typical ingredients and standard portion sizes.
| Nutrient | Amount per Cupcake |
| Calories | 264 kcal |
| Total Fat | 10 g |
| Saturated Fat | 6 g |
| Carbohydrates | 44 g |
| Sugars | 36 g |
| Fiber | 0 g |
| Protein | 0 g |
| Sodium | 98 mg |
Note: Nutritional values may vary depending on ingredient brands, substitutions, and portion sizes. Use free tools like MyFitnessPal or Cronometer to recalculate if you change the recipe or modify for gluten-free/vegan versions.
Nutritional Highlights:
- High Sugar Content: As expected with buttercream frosting, these cupcakes are sweet. For reduced sugar, you can decrease the frosting or use a low-sugar base.
- Low Protein, High Energy: These are indulgent treats, ideal for celebrations. If desired, you can balance your snack with a protein-rich drink or a handful of nuts on the side.
- Customization Impacts Values: A vegan version made with aquafaba meringue will be lower in saturated fat, while a chocolate version might slightly increase the calorie count.
This nutritional profile helps you stay informed without missing out on the fun of baking and decorating.
Conclusion
Succulent cupcakes are more than just a baking project—they’re an experience. This recipe brings together the soft crumb of a classic vanilla cupcake with the artistry of piped buttercream succulents. Whether you’re a beginner or a seasoned baker, the clear steps and flexible options make it easy to create cupcakes that both taste and look beautiful.
From detailed decorating tips to vegan-friendly alternatives and creative serving ideas, this guide is designed to help you succeed and enjoy the process along the way. With proper tools, chilled hands, and a little patience, you’ll end up with cupcakes that could pass for a mini garden display—and just might outshine the rest of the dessert table.
💬 Tried the recipe? Leave a comment and a star rating below!
📸 Share your creations with us on Pinterest or Facebook—tag us so we can see your masterpiece.
❓ What succulent design did you enjoy making most? Or did you create your own variation? Let us know below!
FAQs
1. What tips to use for succulent cupcakes?
For detailed succulent designs, a variety of piping tips helps bring realism to your cupcakes. Popular choices include:
– #199: Ideal for small, spiky cacti.
– #4B: Best for creating barrel cacti or rounded succulents.
– #352: Perfect for sharp-edged leaves and finishing touches.
– #102: Used to craft rosettes and flower petals.
– #1: For adding fine spikes or dots.
– #16: Great for tiny blooms on top of larger succulents.
2. How to make cactus cupcakes?
Start with a solid base—use a flat-top vanilla or chocolate cupcake. Prepare buttercream in various succulent colors (green, peach, white). Pipe barrel cacti using the #4B tip and tall spiked cacti with #199. Add white spikes using #1, and top with tiny peach flowers using #16. Chill before placing them on the cupcakes to prevent melting or deformation.
3. Can I put succulents on a cake?
Yes, absolutely. Buttercream succulents are just as stunning on a large cake as they are on cupcakes. Pipe the succulents on parchment, freeze them briefly, and then transfer them to your cake using an offset spatula or knife. This makes it easier to arrange them without damaging your frosting work. They’re perfect for wedding cakes, birthdays, or garden-themed events.
4. How to make succulent starters?
If you’re new to piping, start with just two piping tips: #352 for simple leaves and #4B for rounded succulents. Practice on parchment paper first. Keep your frosting cool but not stiff—it should hold shape without being hard to squeeze. Begin by piping basic shapes, then move to multi-layered designs like echeveria rosettes.
5. How do you keep cupcakes moist and fluffy?
Here are a few key tips:
– Use room temperature ingredients to ensure smooth mixing.
– Don’t overmix once the flour is added—this can create dense, chewy cupcakes.
– Add sour cream or yogurt to the batter for extra moisture.
– Store cupcakes in an airtight container once cooled to prevent drying out.
– Serve at room temperature, not cold, for the best texture.
6. What piping tips to use for succulents?
Aside from the ones mentioned earlier, consider these combinations:
– #104 or #125: For wider petals or larger floral succulents.
– #2 or #3: For tiny detail work like veins or pebbles.
– Multi-chamber couplers: To blend two or more frosting colors in one tip for gradient effects.
💬 Have another question? Drop it in the comments — we may add it here!
Your feedback helps improve this guide and gives other readers even more to work with.