Skip to content
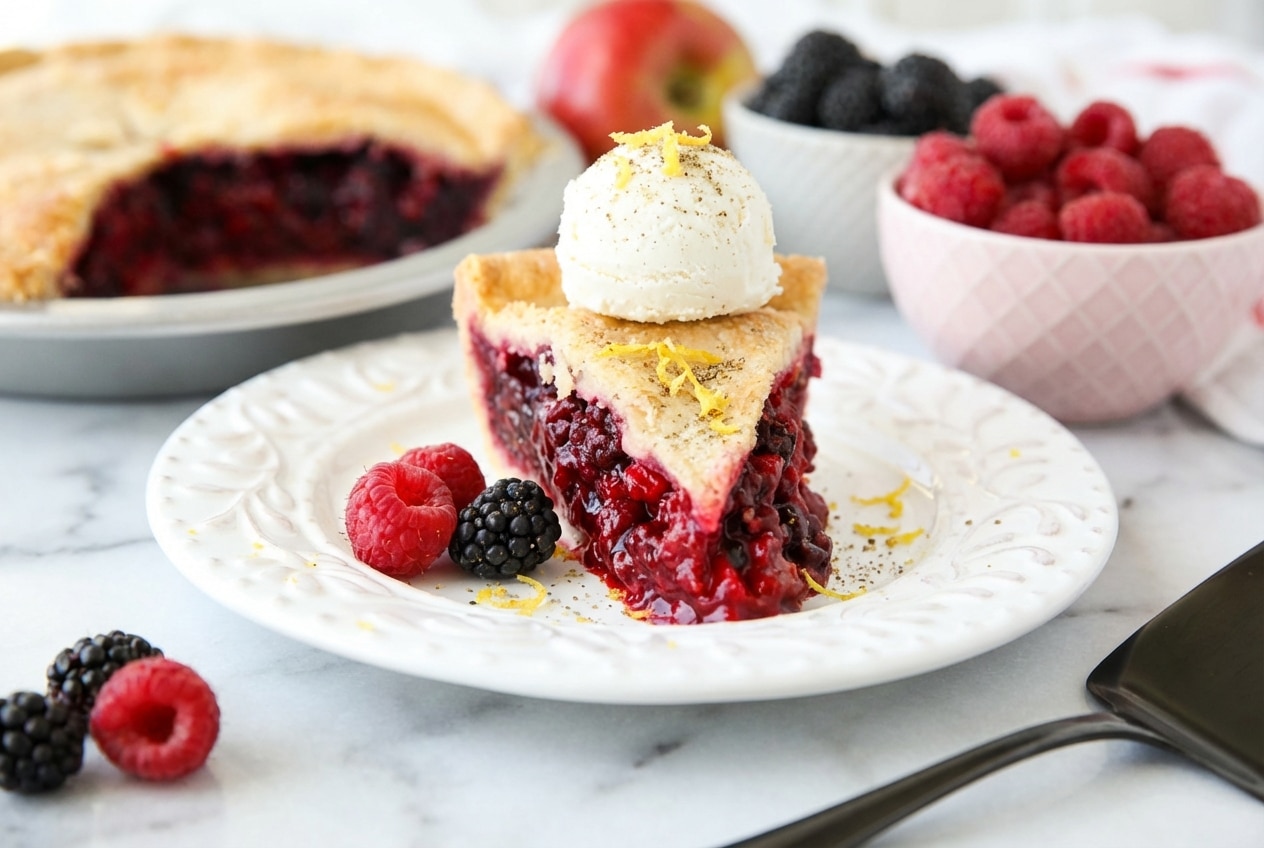
In my American kitchen, razzleberry pie is the kind of dessert that makes people linger at the table, forks in hand, “just one more bite” turning into a second slice. It’s got that late-summer berry perfume and the cozy, old-school comfort of a double crust.
This version keeps the classic tart-sweet raspberry and blackberry punch, but I add one small twist that changes everything. If you want a sturdy crust, a jammy filling that actually sets, and flavor that tastes like it came from a real pie shop, you’re in the right place.
Why You’ll Love This Recipe
The fragrant sugar trick: I rub lemon zest and a 1/4 teaspoon of ground cardamom into the sugar, and the whole bowl smells like a citrusy flower market. That aroma threads through the Raspberries and Blackberries, so the filling tastes brighter without being sharper.
Jammy, not soupy: Between the Cornstarch and the small diced apple, you get structure that slices clean. The apple’s natural Pectin adds a gentle bite so the filling isn’t just soft berry collapse.
It bakes like a pro pie: This method focuses on the moment the center bubbles, that’s the “set point” for fruit pies. Once you learn that cue, your razzleberry pie becomes repeatable, not a gamble.
Ingredients and Substitutions

These ingredients are simple, but they each pull their weight. Frozen berries deliver bold flavor, cornstarch brings the set, and the apple quietly supports the filling so every slice holds together.
Ingredients
- 2 pie crusts
- 280g frozen raspberries
- 280g frozen blackberries
- 1 large apple cored, peeled, and diced small
- 200g granulated sugar
- 40g cornstarch
- 1 Tbsp lemon juice
- 1 egg whisked
- 1 tsp granulated sugar
Ingredient Notes & Substitutions
The berries: Frozen berries are my go-to here because they keep their shape longer in the oven, especially with a long bake in a double crust. If you use fresh berries, reduce the cornstarch to 4 tablespoons since fresh fruit usually releases less liquid.
The apple: A firm apple like Honeycrisp or Granny Smith is ideal, because it holds its little cubes instead of melting away. That tiny bit of texture keeps the filling from turning one-note, and it supports slicing.
The thickener: Cornstarch sets reliably, but it can look a touch cloudy compared to specialty thickeners. Instant ClearJel can be swapped in at an equal amount for a clearer, more “bakery window” shine.
Gluten-free: A 1-to-1 gluten-free flour blend works well for the crust, and cornstarch remains the thickener. I still chill the dough thoroughly because gluten-free crusts soften quickly once warm.
Berry variations: Store-bought frozen mixed berries can work, but I prefer keeping the raspberry-blackberry identity strong for that classic razzleberry flavor. If you add blueberries, treat it like a triple-berry pie and expect a slightly darker, deeper filling.
How to Make razzleberry pie
Chill the crust and warm up the oven
- Split your pie dough into two halves, shape each into a disk, wrap well, and chill until firm. Cold dough is what gives you flaky layers instead of a slumped, greasy crust.
- Heat the oven to 350 degrees Fahrenheit, and let it fully preheat so the crust starts baking immediately. I like to get the oven going early so the filling isn’t waiting around once it’s mixed.
Mix the filling and let it macerate
- In a large bowl, whisk the 200g granulated sugar with the 40g cornstarch until the mixture looks uniform and powdery. This simple whisking step prevents those starchy “gummy pockets” later on.
- Gently fold in the 280g frozen raspberries, 280g frozen blackberries, the diced apple, and the 1 Tbsp lemon juice until everything looks evenly dusted. Let it sit while you roll the crust, and you’ll see glossy juices begin pooling, that’s maceration doing its job.
Roll, fill, and cap the pie
- Roll one chilled crust into a round about 1/8-inch thin, then drape it into a standard 9-inch pie dish without stretching it. Trim the overhang so you have enough to seal, but not so much it gets bulky.
- Spoon in all the fruit and every bit of juice, then spread it to the edges so the apple and berries are evenly distributed. When it’s level, the pie bakes more predictably and sets more evenly.
- Brush the edge of the bottom crust with the whisked egg, then roll the top crust to about 1/8-inch thin and place it over the filling. Trim the excess, then press the two crusts together, crimp the edge, or build a lattice crust if you like that classic bakery look.
- Brush the top crust with the remaining egg, cut ventilation slits with a knife, and sprinkle the 1 tsp granulated sugar over the top. The egg wash gives you that deep golden sheen, and the sugar adds a delicate crunch.
Bake, shield, and cool completely
Cover the pie loosely with foil or a crust shield, then bake at 350 F for 1 hour and 15-30 minutes, until the crust is browned on top and bottom and the filling is bubbling in the center. Let the pie cool completely before slicing, because the filling tightens as it rests.
The Secret To A Perfect Razzleberry Filling Every Time

The best defense against a soggy bottom is simple heat management. I bake the pie on a preheated heavy-duty baking sheet on a lower rack, so the bottom crust gets a strong blast of heat right away.
With cornstarch, bubbling is not decoration, it’s the finish line. The center has to reach a real boil for thickening to fully activate, and that’s why I wait to see the middle burping thick purple bubbles, not just the edges.
The sentence that explains it best comes from extension baking science. Their notes on thickening power match exactly what I see in my oven.
If the crust is browning faster than the filling is bubbling, keep the pie baking and protect the top. A foil shield on the edges buys you time, so the filling reaches that set point without sacrificing your crust.
One more little advantage, use a glass pie plate if you have one. Being able to peek underneath and confirm the bottom is truly golden saves you from that underbaked, gummy slice.
Pro Tips & Troubleshooting
Pro Tips
- Keep the fruit folding gentle, so the berries stay mostly whole and pretty when sliced.
- Whisk sugar and cornstarch together first, it prevents starchy clumps in the filling.
- Frozen berries are ideal for a double-crust pie because they hold structure longer.
- Ventilation slits matter, steam needs an exit so the top crust stays crisp.
- A lattice crust evaporates moisture faster than a solid top, which can help set the filling.
That “handle the fruit carefully” lesson shows up in other bakes too. The same idea keeps pockets of berry intact in blueberry cream cheese, so you get bursts instead of purple streaks.
Common Mistakes to Avoid
- Slicing while warm, it almost guarantees a runny, soupy center.
- Pulling the pie when only the edges bubble, the center must bubble too.
- Under-venting the top crust, trapped steam softens the pastry.
- Over-mixing the fruit, the berries break down and the filling turns jammy and loose.
Serving & Storage

Serving Ideas
I love razzleberry pie slightly rewarmed, with vanilla bean ice cream melting into the juices. The tart berries, buttery crust, and creamy cold scoop feel like a full-on diner dream, just prettier.
If you’re a cheddar-with-apple-pie person, this one will make you smile too. A thin slice of sharp white cheddar alongside the berries tastes bold and salty in the best way.
A cozy drink pairing matters more than people think. A mug of French hot chocolate tastes rich enough to stand up to the berries.
Storage & Make-Ahead
Covered loosely, the pie can sit at room temperature for up to two days. Michigan State’s official storage guidelines align with that practical kitchen rule.
For day two crispness, I reheat a slice in a 350°F oven for 10 minutes. The microwave softens the crust fast, but the oven brings back that flaky snap.
Freezing works well if you want to get ahead of a holiday. Assemble the pie unbaked, wrap tightly, freeze up to 3 months, then bake from frozen by adding about 20 minutes to the total baking time.

Classic Homemade Razzleberry Pie
Equipment
- 9-inch Pie Dish
- Large Mixing Bowl
- Whisk
- Rolling Pin
- Heavy-duty baking sheet
Ingredients
- 2 pie crusts
- 280 g frozen raspberries
- 280 g frozen blackberries
- 1 large apple cored, peeled, and diced small
- 200 g granulated sugar
- 40 g cornstarch
- 1 Tbsp lemon juice
- 1 egg whisked
- 1 tsp granulated sugar
Instructions
Chill the crust and warm up the oven
- Split your pie dough into two halves, shape each into a disk, wrap well, and chill until firm to ensure flaky layers.
- Heat the oven to 350 degrees Fahrenheit, allowing it to fully preheat so the crust begins baking immediately upon entry.
Mix the filling and let it macerate
- In a large bowl, whisk the 200g granulated sugar with the 40g cornstarch until the mixture is uniform and powdery to prevent gummy pockets.
- Gently fold in the 280g frozen raspberries, 280g frozen blackberries, the diced apple, and the 1 Tbsp lemon juice until evenly dusted. Let the mixture sit while you roll the crust to allow the juices to macerate.
Roll, fill, and cap the pie
- Roll one chilled crust to 1/8-inch thickness and drape it into a 9-inch pie dish. Trim the overhang, leaving enough to seal.
- Spoon in the fruit and all accumulated juices, spreading them to the edges so the berries and apple are evenly distributed.
- Brush the edge of the bottom crust with the whisked egg. Roll the top crust to 1/8-inch thickness, place it over the filling, and press the edges together to crimp and seal.
- Brush the top crust with the remaining egg wash, cut ventilation slits with a knife, and sprinkle the 1 tsp granulated sugar over the top for a golden crunch.
Bake, shield, and cool completely
- Place the pie on a preheated baking sheet on the lower rack. Cover loosely with foil or a crust shield and bake at 350 F for 75 to 90 minutes until the filling bubbles in the center.
- Remove from the oven and let the pie cool completely for 3 to 4 hours before slicing to allow the filling to tighten and set.
Notes
Nutrition
Conclusion
This pie is all about small choices that pay you back, a cold crust, a properly bubbling center, and that lemon-cardamom perfume tucked into the sugar. When it’s done right, you get a slice that stands tall and tastes like pure berry nostalgia.
If you like citrus-balanced sweets, the bright, creamy vibe of lemon lush dessert scratches a similar itch in a totally different way. In my kitchen, both recipes live in the “bring it to a gathering” folder.