Skip to content
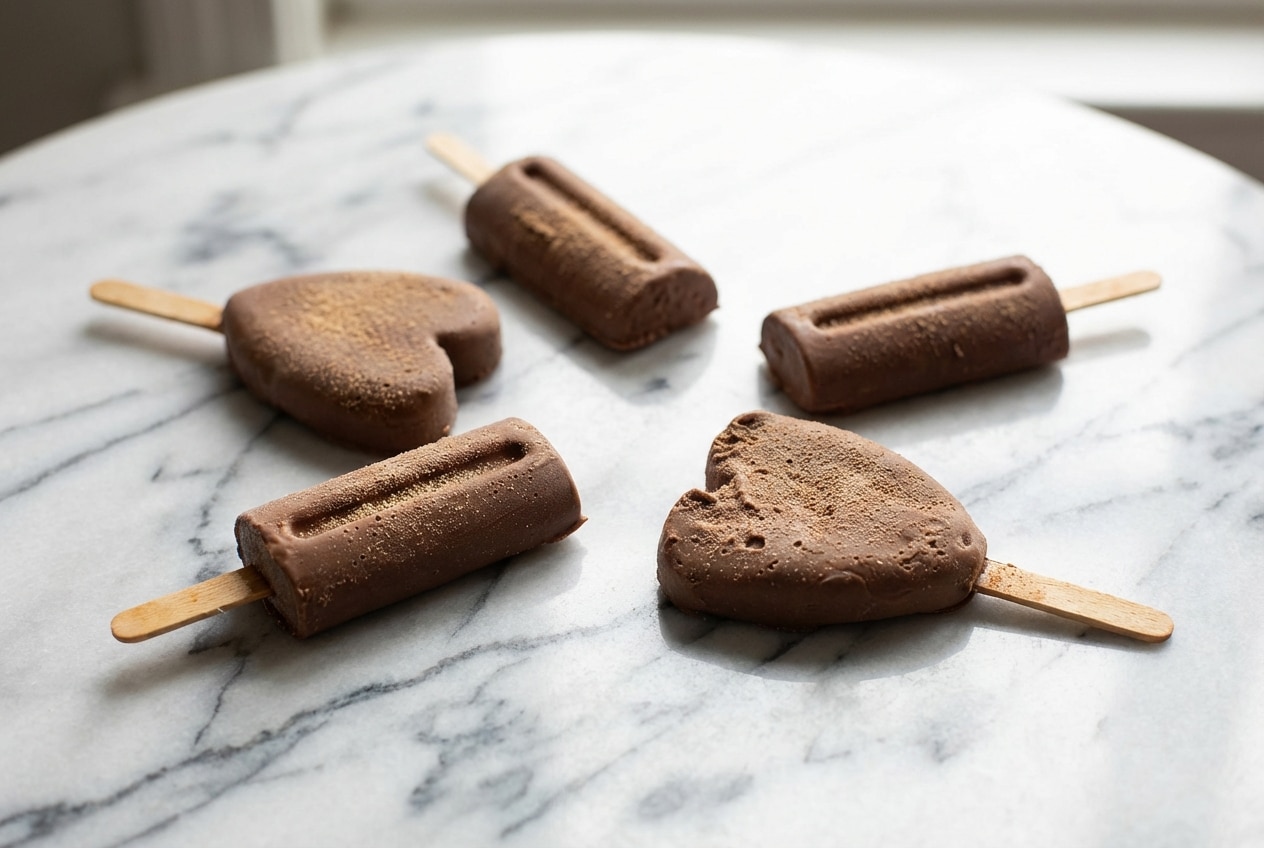
Every American summer I know starts the same way, sticky fingers, a humming freezer, and that itch for something chocolatey that tastes like childhood. These homemade fudge popsicles are the grown-up version of the ice cream truck classic, deeply cocoa-forward, silky on the tongue, and somehow even more nostalgic.
If you’ve ever made pops that turned out icy or strangely layered, this is the fix. I lean on good 54% cacao chocolate, whole milk, and one old-school twist that makes the texture feel like true frozen fudge.
Why You’ll Love This Recipe
Nostalgic malt-shop depth: I stir malted milk powder into the warm base, and the flavor turns into that “malted milkshake” richness that makes chocolate taste bigger and rounder.
Velvety, not icy: Between whole milk, heavy cream, and the extra milk solids, the bite stays dense and creamy instead of crunchy with ice crystals.
No sad chocolate settling: Blending the hot base with the chocolate creates real emulsification, so the unsweetened cocoa powder doesn’t sink and leave you with a two-toned pop.
Decadent but simple: The method feels almost as plush as a cheesecake mousse, yet it’s just a saucepan, a blender, and a freezer.
Ingredients and Substitutions

These ingredients are all about texture, fat for creaminess, cocoa for depth, and salt to sharpen the chocolate. Use the best chocolate you can, because in a frozen treat, every note shows up loud and clear.
Ingredients
- 6 ounces good-quality chocolate, at least 54 percent cacao
- 2 cups whole milk
- ½ cup cream
- ¼ cup sugar
- 2 tablespoons unsweetened cocoa
- 2 teaspoons vanilla
- ½ to 1 teaspoon kosher salt, to taste
Ingredient Notes & Substitutions
54% cacao chocolate: This percentage lands right in the sweet spot, bold chocolate flavor without harsh bitterness. If all you have are chocolate chips, they can work, but stabilizers sometimes mute the melt and you lose a little of that satin finish.
Whole milk and heavy cream: This is where the “fudge” feeling comes from, because fat keeps frozen desserts tender. Low-fat swaps tend to freeze hard and watery, no matter how much you blend.
Unsweetened cocoa powder: I like to sift it before whisking, because dry cocoa loves to hide in little pockets that later become bitter specks.
Malted milk powder: If you keep it in the pantry, use it, it gives that classic diner vibe and helps the mouthfeel. If you skip it, you’ll still get a good pop, just less nostalgic and a touch less chewy.
Kosher salt: Kosher salt is gentler by volume, so you can season without fear. If you only have table salt, use about half, otherwise the chocolate can taste oddly sharp.
How to make homemade fudge popsicles
Chocolate prep
Break the chocolate into small pieces and drop them straight into the blender jar. Smaller shards melt faster, so you don’t have to overheat the dairy to get everything smooth.
Warm the dairy base
- Add the whole milk, cream, sugar, and unsweetened cocoa to a medium saucepan. Whisk over medium heat until the cocoa dissolves and the mixture looks evenly mocha-brown.
- Bring it to a light boil, then immediately pull it off the heat. You want it hot and steamy, not furiously bubbling, so the dairy stays sweet and clean.
Emulsify for that fudge texture
- Pour the hot milk mixture over the chocolate in the blender. Add the vanilla and kosher salt, then let it sit for a few minutes so the chocolate softens into a glossy puddle.
- Blend until completely smooth and emulsified, with no specks and no chocolate stuck at the bottom. The mixture should look shiny and uniform, like a pourable ganache.
Mold and freeze
- Pour into eight 3-ounce paper cups, or use popsicle molds, and fill them evenly. Tap the cups or molds once on the counter to pop any hidden air bubbles.
- If you’re using the small cups, freeze for about 1 hour before inserting wooden craft sticks, so they stand straight. Then freeze well for 24 hours, until the centers are fully set.
Secrets for a Professional Texture

The biggest difference between “nice” and “wow” homemade fudge popsicles is emulsification. When I blend the hot dairy into the chocolate, the fats and liquids hold together, so you don’t get that dusty cocoa layer at the bottom.
Cocoa clumps are sneaky, even in a blender. Sifting the unsweetened cocoa before it hits the saucepan keeps the base silky, and your popsicles freeze with a clean, even bite.
Molds matter more than people think, especially for unmolding. For food-contact reassurance, silicone molds are superior when you want easy release and less stick-pull drama.
Pro Tips & Troubleshooting

Pro Tips
- Start with room temperature milk if you can, it helps the dry ingredients whisk in smoothly.
- Let the hot base sit on the chocolate for a few minutes before blending, the melt becomes glossy and effortless.
- If you’re using paper cups, freezing about 1 hour before adding sticks keeps them upright.
- For easy release, run the outside of the mold under warm water for 10-15 seconds.
- A 3-ounce Dixie cup works beautifully when you don’t have a popsicle mold.
Common Mistakes to Avoid
- Letting the milk boil vigorously too long, which can scorch the dairy and dull the chocolate.
- Swapping in low-fat milk, which is the fastest route to icy popsicles.
- Using table salt 1:1 for kosher salt, since it’s roughly twice as salty by volume.
- Skipping the blender step, which often causes separation and a two-toned look.
Serving & Storage
Serving Ideas
For a “fancy fair” moment, dip the frozen pops in melted chocolate, then sprinkle crushed hazelnuts or sea salt flakes. The snap of the shell against the fudgy center is pure summer luxury.
When the day is blazing hot, I serve these with berries or fruit kabobs so every bite feels bright and refreshing. Something icy to sip alongside helps too, and a tart strawberry lemonade balances the richness perfectly.
Storage & Shelf Life
Once fully frozen, pull the pops from the molds or peel away the paper cups. Store in a heavy-duty freezer bag with the air pressed out, because trapped air is what brings freezer burn.
They’re best within 2 to 3 weeks, when the chocolate flavor still tastes vivid and the texture stays velvety. After that they’re still safe to eat, but the surface can dry out and pick up “freezer perfume.”

Velvety Homemade Fudge Popsicles
Equipment
- Medium saucepan
- Blender
- Popsicle molds or 3-ounce paper cups
- Wooden craft sticks
Ingredients
- 6 ounces good-quality chocolate, at least 54 percent cacao
- 2 cups whole milk
- ½ cup cream
- ¼ cup sugar
- 2 tablespoons unsweetened cocoa
- 2 teaspoons vanilla
- ½ to 1 teaspoon kosher salt, to taste
Instructions
Chocolate prep
- Break the chocolate into small pieces and place them directly into the blender jar.
Warm the dairy base
- In a medium saucepan, combine the whole milk, cream, sugar, and unsweetened cocoa. Whisk over medium heat until the cocoa is fully dissolved.
- Bring the mixture to a light boil, then immediately remove it from the heat.
Emulsify for that fudge texture
- Pour the hot milk mixture over the chocolate in the blender. Add the vanilla and kosher salt. Let it sit for a few minutes to allow the chocolate to soften.
- Blend until the mixture is completely smooth, shiny, and emulsified.
Mold and freeze
- Pour the mixture into eight 3-ounce paper cups or popsicle molds. Tap them on the counter to remove any air bubbles.
- If using cups, freeze for 1 hour before inserting wooden craft sticks. Freeze for a total of 24 hours until the centers are fully set.
Notes
Nutrition
Why These Are the Ultimate Summer Treat
These homemade fudge popsicles hit that rare sweet spot, a childhood classic with a genuinely gourmet texture. The malted milk powder gives old-school soda fountain flavor, and the blender method keeps every pop dark, uniform, and creamy.
If you grew up on frozen classics like ice cream sandwiches, this is the chocolate upgrade I keep in my own freezer. One bite and you’ll understand why I insist on the emulsification step.
Frequently Asked Questions
Why are my homemade fudge popsicles icy?
Most often it’s low fat, or big ice crystals from a watery base. Whole milk and heavy cream help, and extra milk solids can inhibit crystal growth in frozen dairy desserts.
Can I substitute the sugar for maple syrup or honey?
Yes, the pops will still freeze, but the flavor shifts slightly and the sweetness can read more “caramel.” Keep the method the same, and expect a softer set depending on how much liquid sweetener you use.
How do I get the popsicles out of the mold without breaking the stick?
Warm water is your best friend, 10-15 seconds over the outside of the mold usually does it. You’re only melting the thinnest outer layer so the pop slides out instead of yanking.
Do I need to use cornstarch to thicken the mixture?
No, not for this style. The chocolate solids and cocoa provide body, and the blended emulsification gives that fudgy chew without a starchy aftertaste.
How long do they need to freeze before they are ready to eat?
They may feel firm after 6 to 8 hours, but the best texture comes after a full 24 hours. That longer freeze sets the center so it doesn’t slump or slide off the stick.
When you make a batch, don’t be surprised if the freezer suddenly feels like summer headquarters. Keep the malted milk twist, and once you’ve nailed the texture, play with little touches like a chocolate dip or a pinch of flaky salt right before serving.