Skip to content
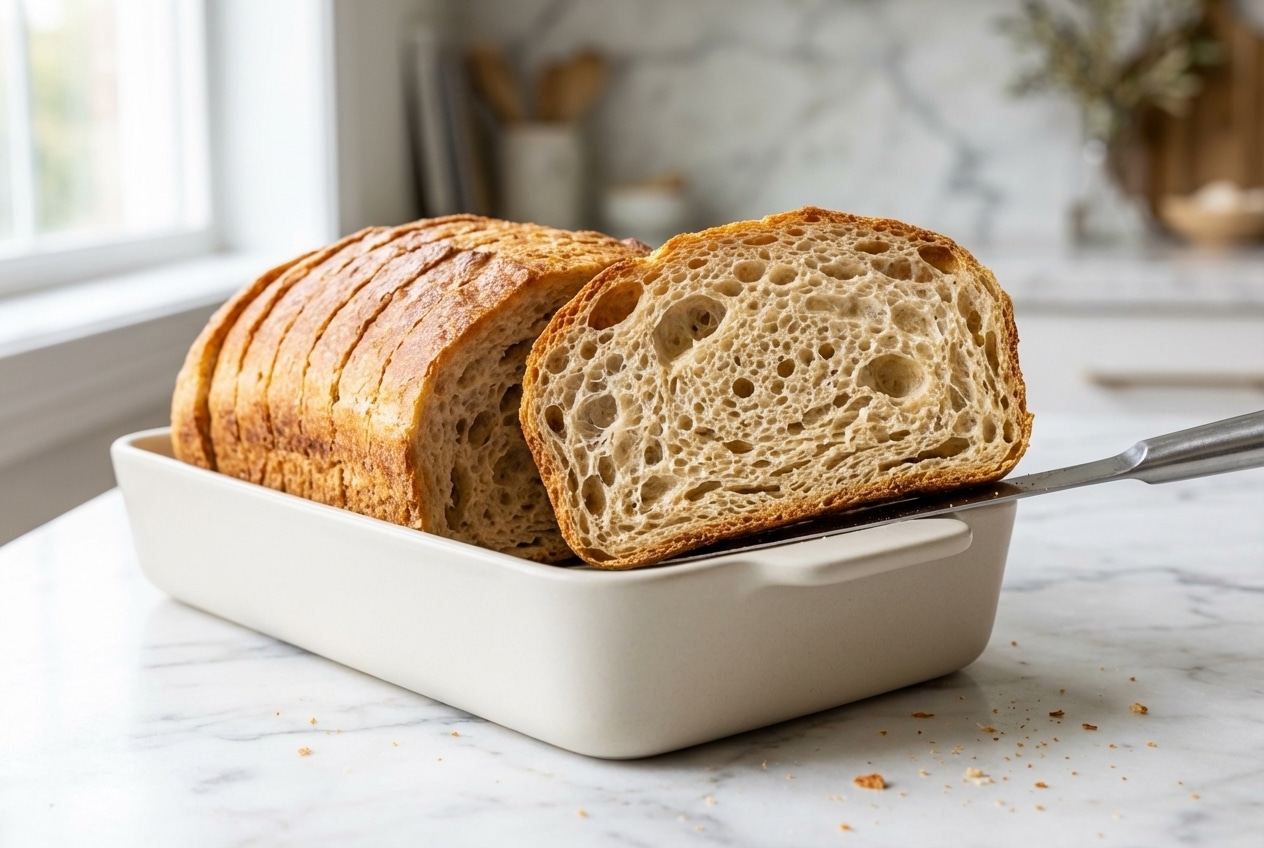
In my US kitchen, gluten-free bread used to be the heartbreak loaf, pretty in the pan, then crumbly, gummy, or sadly sunken by the time it cooled. After enough test bakes to make my flour canister look like a snow globe, I landed on a gluten free bread recipe that finally behaves like real bread, soft, flexible, and proudly sliceable.
This one is especially comforting if you are baking for Celiac disease, or simply cutting gluten and missing that sandwich-ready crumb structure. The little “sparkle” trick in the yeast step gives you a better rise and a lighter bite, without turning your pantry into a specialty store.
Why You’ll Love This Recipe
The carbonated lift: In my kitchen, swapping in sparkling water gives the batter an instant boost, like it took a deep breath before the oven. Those tiny bubbles help the loaf rise higher, even without gluten’s elastic net.
Real bread texture: Xanthan gum and the yeast team up to support a soft crumb structure, so you get slices that bend instead of shatter. The result is sturdy enough for sandwiches, but still tender.
Reliable oven spring: Gluten-free dough is really a thick batter, so the mixing and proofing matter more than you think. With a proper Proofing window, the loaf sets up taller and stays lighter.
Everyday ingredients: White rice flour, Tapioca starch, and potato starch build that classic, golden, bakery-style bite. It’s a practical formula, not a scavenger hunt.
Ingredients and Substitutions

These ingredients are all about balance, starch for lift, binders for structure, and just enough enrichment for a tender, sliceable loaf.
Ingredients
- 1 1/4 cup (10 oz.) water between 95°F-110°F
- 2 tablespoons (25g.) sugar (or honey)
- 2 1/4 teaspoons dry active yeast (a 7g. packets worth)
- 1 cup (145g.) white rice flour
- 3/4 cup (85g.) tapioca starch
- 3/4 cup (92g.) potato starch (or arrowroot starch)
- 1/2 cup (60g.) millet flour (or almond flour)
- 1/4 cup (25g.) ground flaxseed (flaxseed meal)
- 2 1/2 teaspoons (9g.) xanthan gum
- 1 teaspoon (5g.) baking powder
- 1 teaspoon (6g.) salt
- 1/4 cup (2 oz.) oil of choice (I used avocado oil)
- 3 egg whites (75g.)
- 1 teaspoon (6g.) apple cider vinegar
Ingredient Notes & Substitutions
Xanthan gum: Think of it as the glue that replaces gluten’s stretch, it helps trap gas, hold moisture, and keep the crumb from crumbling. If you are curious about the scientific role of hydrocolloids, the research is fascinating and very practical.
Millet flour: Millet brings a subtle buttery flavor that reads “bakery” to me, especially once the crust browns. If you need a swap, the almond flour option in the ingredient list works, but expect a slightly richer, more tender bite.
“1-to-1” gluten-free blends: Many cup-for-cup mixes are fantastic for cookies and quick breads, but can be too low in protein and structure for yeast bread. With yeast, you need a deliberate starch and binder balance so the loaf can rise and then set.
Psyllium husk as an alternative: If xanthan gum is not for you, psyllium husk is the closest stand-in, and it can add a pleasantly whole-grain chew. The crumb will usually be a touch less soft, but still very workable for sandwiches.
How to Make gluten free bread recipe
Pan prep and yeast proof
- Line a standard-size metal loaf pan with parchment paper and spray it with cooking spray; set it aside.
- Add the sugar and yeast to your warm water (95-110 degrees F) and stir; set it aside for 5-10 minutes but no longer. You want it foamy and alive, like a cappuccino head.
Mix the dry and build the batter
- While your yeast is proofing, in the bowl of a stand mixer fitted with the paddle attachment, add the flours, flax seed meal, xanthan gum, baking powder, and salt. Turn your mixer to low and mix just until combined.
- With the mixer still going, add the oil, egg whites, vinegar, and proofed yeast mixture.
- Turn the mixer to a medium speed and mix for an additional 2 minutes. The dough will be thick and sticky, closer to a thick cake batter than a kneadable dough.
Shape and rise
- Using a rubber spatula, add the dough to your prepared loaf pan making sure to fill in the corners of the pan and level the top. Wet your fingers and smooth the top.
- Cover the dough with a lightly oiled piece of plastic wrap and allow it to rise in a warm place for 45 to 60 minutes, or until it has risen slightly above the loaf pan.
- When the dough is near the top of the pan, preheat your oven to 350°F.
Bake and cool for the best crumb
- Remove the plastic wrap and bake for 60 – 65 minutes. Half way through baking, cover the bread loaf with a piece of foil to keep it from over-browning.
- Remove the loaf from the oven and let cool completely before slicing. This is where the crumb structure finishes setting, and patience pays.
- Slice the entire loaf and store in a container at room temperature for up to 4 days or in the freezer for up to a month.
The Secrets to a Perfect Bake

Metal pan matters: I only bake this in metal because it conducts heat quickly and evenly, which helps oven spring happen before the loaf sets. Glass heats slower, and that delay can leave gluten-free bread squat and dense.
Precision is your best friend: Gluten-free baking is sensitive to hydration level, and volume scoops can vary wildly. If you can, lean on the gram weights listed so the texture is repeatable, not a weekly surprise.
The dreaded cave-in: When a loaf collapses during cooling, it usually rose too far or did not build enough internal structure. Keep the proof to slightly above the rim, and bake until the center is truly set.
Steam like a bakery: A shallow pan of hot water in the oven mimics the environment used in artisan bread methods, helping the crust develop beautifully. It also buys you time for the loaf to expand before the exterior firms up.
High altitude tweaks: Above 3,500 ft, reduce the yeast slightly and add 1 to 2 tablespoons more water. In thin, dry air, the loaf can race upward, then drop if it sets too late.
Pro Tips & Troubleshooting
Pro Tips
- Use a digital thermometer and aim for 210°F in the center, it is the simplest way I know to prevent a gummy middle.
- University guidance supports this benchmark for target internal temperature in gluten-free yeast breads. It is a small step that saves whole loaves.
- Steam in the first part of baking encourages a thinner, crisper crust and better color, especially on gluten-free doughs that brown unpredictably.
- An FDA memo explains the Maillard reaction process in bakery foods with moisture present. In plain terms, steam helps you get golden without drying out.
- Keep egg whites at room temperature so they do not chill the batter and slow yeast activity.
Common Mistakes to Avoid
- Letting the yeast proof too long, stop at 5 to 10 minutes or the lift weakens.
- Over-proofing the loaf, once it rises too high, it often collapses during cooling.
- Using a “measure for measure” blend meant for cakes, it can turn yeast bread heavy.
- Slicing while warm, trapped steam makes the interior feel damp and gummy.
Serving & Storage

Serving Ideas
My favorite is the simple joy, thick toast with salted butter, then a second slice with avocado and a pinch of salt. This loaf also stands up to a hearty mortadella sandwich, because the crumb stays flexible instead of shattering.
For “single lady” nights, I brush slices with olive oil and grill them for crostini with cheese and olives. The structure is also sturdy enough for a saucy pimento chicken sandwich, without turning into crumbs in your hands.
Storage & Freezing
At room temperature, store slices in an airtight container for up to 4 days. If your kitchen runs dry, a quick toast brings the crumb back to life.
For freezing, slice first, then seal in a freezer bag for up to a month. Toasting straight from frozen gives the best texture, especially for morning sandwiches.
Master the Loaf
Once you feel that first light, springy slice, you will understand why the carbonated lift idea is worth keeping in your back pocket. Gluten-free bread is part comfort food and part kitchen science, and when the measurements are steady, the results are too.
After this base loaf feels easy, your confidence carries into other flavors and shapes. A festive bake like cranberry orange bread becomes a fun next step, using the same patience and the same respect for structure.

Easy Gluten Free Bread Recipe
Equipment
- Standard-size metal loaf pan
- Parchment Paper
- Cooking spray
- Stand mixer with paddle attachment
- Rubber spatula
- Plastic wrap
- Aluminum Foil
Ingredients
- 1 1/4 cup water between 95°F-110°F
- 2 tablespoons sugar or honey
- 2 1/4 teaspoons active dry yeast a 7g packets worth
- 1 cup white rice flour
- 3/4 cup tapioca starch
- 3/4 cup potato starch or arrowroot starch
- 1/2 cup millet flour or almond flour
- 1/4 cup ground flaxseed flaxseed meal
- 2 1/2 teaspoons xanthan gum
- 1 teaspoon baking powder
- 1 teaspoon salt
- 1/4 cup oil of choice I used avocado oil
- 3 egg whites
- 1 teaspoon apple cider vinegar
Instructions
Pan prep and yeast proof
- Line a standard-size metal loaf pan with parchment paper and spray it with cooking spray; set it aside.
- Add the sugar and yeast to the warm water (95–110°F) and stir. Set aside for 5–10 minutes but no longer, until foamy.
Mix the dry and build the batter
- While the yeast is proofing, add the flours, flax seed meal, xanthan gum, baking powder, and salt to the bowl of a stand mixer fitted with the paddle attachment. Mix on low just until combined.
- With the mixer still going, add the oil, egg whites, vinegar, and the proofed yeast mixture.
- Increase to medium speed and mix for 2 minutes. The dough will be thick and sticky, closer to a thick cake batter than a kneadable dough.
Shape and rise
- Use a rubber spatula to add the dough to the prepared loaf pan, filling the corners and leveling the top. Wet your fingers and smooth the top.
- Cover with a lightly oiled piece of plastic wrap and let rise in a warm place for 45 to 60 minutes, or until it has risen slightly above the loaf pan.
- When the dough is near the top of the pan, preheat the oven to 350°F.
Bake and cool for the best crumb
- Remove the plastic wrap and bake for 60–65 minutes. Halfway through baking, cover the loaf with foil to prevent over-browning.
- Remove from the oven and let cool completely before slicing.
- Slice the entire loaf and store in a container at room temperature for up to 4 days, or freeze for up to a month.
Notes
Nutrition
Frequently Asked Questions
Why does my gluten-free bread collapse after baking?
The most common reasons are over-proofing or under-baking. Let it rise only slightly above the pan rim, and make sure the center is fully set before cooling.
Is it better to bake gluten-free bread in a bread machine or an oven?
A bread machine is convenient, but the oven gives you better control over browning and timing. With this loaf, the foil tent halfway through baking is especially helpful for a balanced crust.
What can I use as a substitute for xanthan gum?
Psyllium husk is the closest alternative for structure and elasticity. The texture usually leans a bit more rustic and whole-grain, but it still helps hold gas and support the rise.
How long should I let gluten-free bread cool before slicing?
Cool it completely on a rack before slicing. Cutting early traps steam and leaves the crumb sticky, even if the loaf baked for the full time.
Why is my bread so dense?
Dense loaves usually come from flour ratios being off, expired yeast, or a proof that never really activated. Also, gluten-free bread benefits from strong mixing and a properly warm proof, since there is no gluten network to build by kneading.