Skip to content
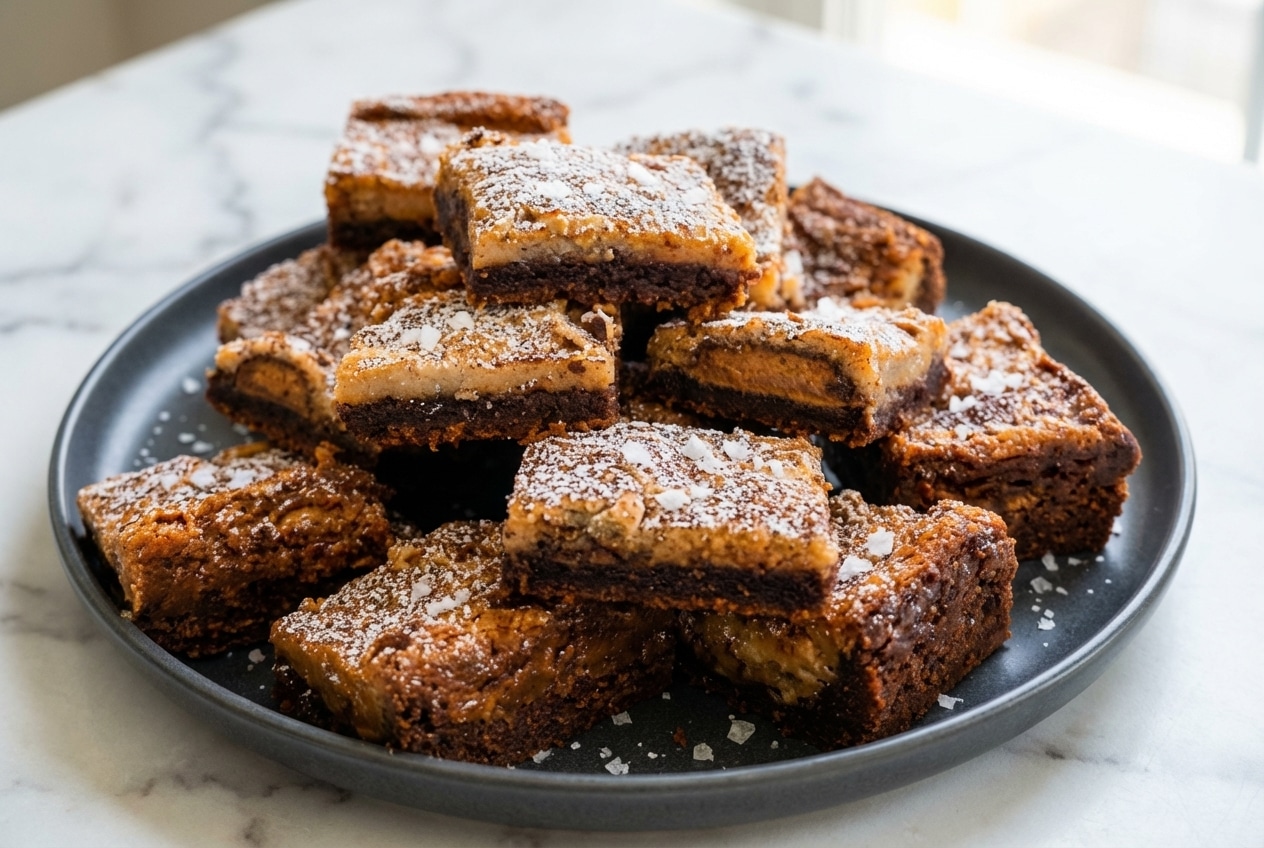
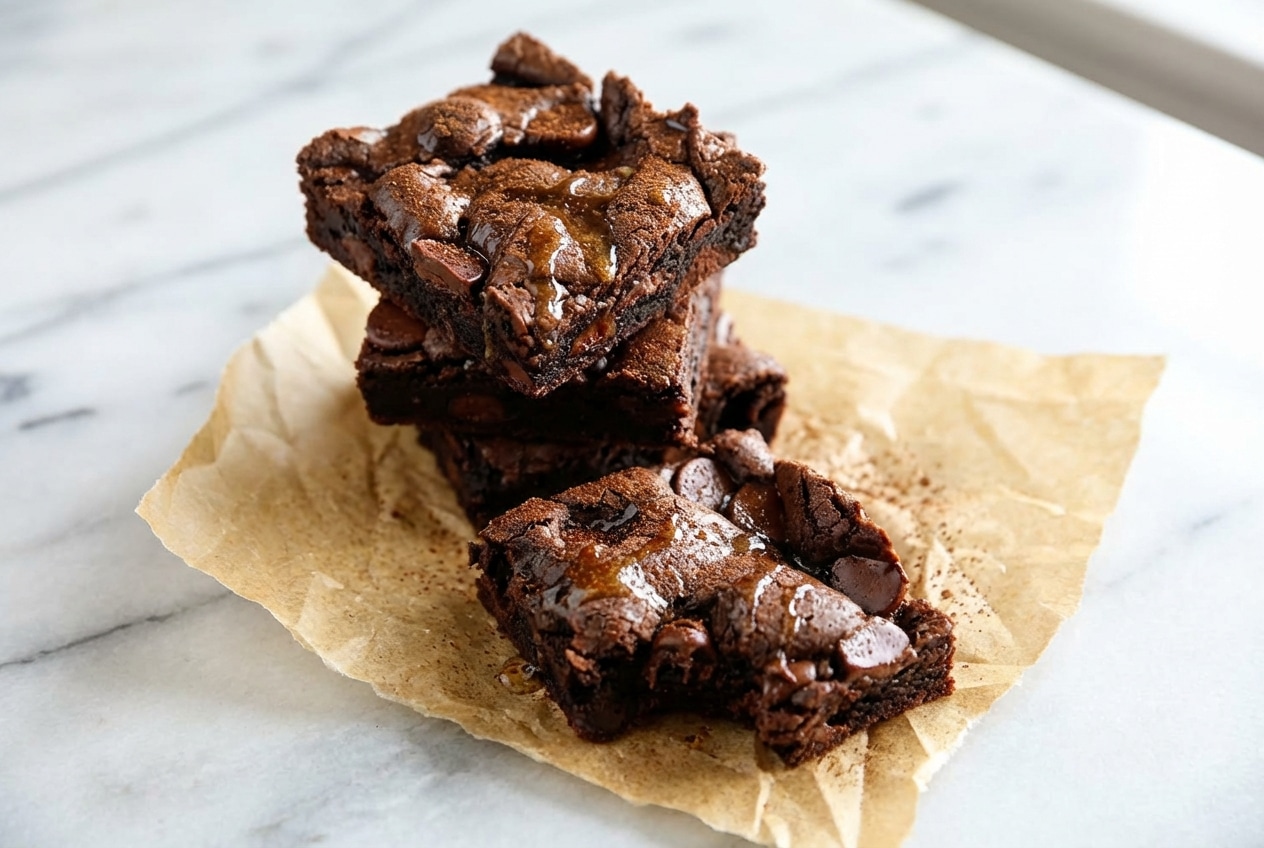
In my kitchen, ooey gooey cake always brings me right back to St. Louis potlucks, where the pan comes out and everyone suddenly “just needs a tiny piece.” This chocolate peanut butter ooey gooey cake keeps that same nostalgic spirit, but pushes it into decadent, modern territory.
Think part cookie bar, part brownie, part cheesecake, with a fudgy chocolate base and a molten, velvety top. The peanut butter layer and those Reese’s cups make it feel like a candy bar grew up and learned a little sophistication.
Why You’ll Love This Recipe
Salted Espresso Cocoa depth: I whisk 1 tablespoon instant espresso powder into the cocoa powder for a darker, rounder chocolate flavor, it doesn’t scream “coffee,” it just tastes more like a bakery-level cocoa hit.
Sweet meets sharp: A pinch of flaky Maldon on the warm top cuts the richness of peanut butter cups and all that confectioners sugar, and suddenly every bite tastes balanced instead of cloying.
Two textures, one pan: You get a firm, fudgy base underneath a gooey, cream-cheese-soft layer, and an electric hand mixer makes the filling turn silky fast.
Old-school comfort, upgraded: If you love butter-cake energy in general, the vibe is similar to this kentucky butter cake, just more molten and chocolate-forward.
Ingredients and Substitutions

This recipe is all about simple grocery-store staples that behave predictably, unsalted butter for control, cocoa powder for depth, and cream cheese for that signature gooey layer that sets but never turns cakey.
Ingredients
For the Crust:
- 1 cup sugar
- 1 cup unsalted butter room temperature
- 1 teaspoon vanilla extract
- 1 3/4 cup all-purpose flour
- 1/4 cup unsweetened cocoa powder
- 1/2 teaspoon baking powder
- 1/2 teaspoon baking soda
- 1/2 teaspoon salt
For the Chocolate Peanut Butter Layer:
- 2/3 cup peanut butter
- 16 Reese’s Peanut Butter Cups snack size
For the Filling:
- 8 oz. cream cheese room temperature
- 1/2 cup unsalted butter melted
- 2 eggs
- 1 teaspoon vanilla extract
- pinch of salt
- 3 cups powdered sugar plus more for decorating
Ingredient Notes & Substitutions
Peanut butter: Stick with shelf-stable creamy peanut butter (think Jif or Skippy style) because it stays emulsified while baking, and natural peanut butter tends to separate into oil and solids, which can leave greasy pockets.
Unsweetened cocoa powder: Unsweetened is non-negotiable here since the filling has 3 cups of powdered sugar, sweetened cocoa can push the whole pan into “toothache” territory instead of deep chocolate.
Cream cheese: Room temperature cream cheese is the difference between a smooth top and a lumpy one, I let it sit out until it yields easily when pressed but still feels cool.
Reese’s Peanut Butter Cups: Snack size is ideal because they melt into distinct, candy-bar-like pockets, larger cups can create thick sections that slice messier.
How to Make chocolate peanut butter ooey gooey cake
Prep the pan and mix the chocolate crust
- Preheat oven to 350°F and grease a 9″-x-13″ baking pan with cooking spray.
- In a large mixing bowl, beat together the sugar and unsalted butter until it looks lighter and fluffy, then beat in the vanilla extract.
- In a separate bowl, whisk the dry ingredients together, then slowly blend them into the butter mixture until a smooth ball of dough forms, it should smell like dark cocoa and vanilla.
- Press the dough evenly into the baking pan, getting into the corners, then set it aside in a cool place so it firms slightly.
Whip the gooey filling until silky
- In a mixing bowl, beat together the cream cheese and melted unsalted butter until smooth.
- Add the vanilla extract, eggs, and salt, and mix well, keep it smooth, not overly airy.
- In another bowl, whisk the powdered sugar to remove clumps, then slowly beat it into the filling until it turns silky and glossy.
Build the peanut butter core and bake
- Spread a thin layer of peanut butter over the rested dough.
- Arrange Reese’s Peanut Butter Cups 4 x 4 top side down, then gently press them into the peanut butter layer.
- Pour the filling over the Reese’s cups and spread it evenly across the pan.
- Bake at 350°F for 40 minutes, until the top is golden brown, puffed, and slightly cracked, the middle should still be gooey.
Cool, finish, and slice
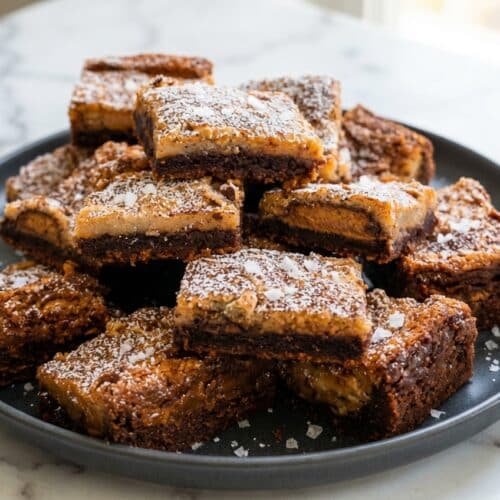
Cool completely, cut into squares, sprinkle with powdered sugar, and serve, this is the moment patience pays off because the goo sets into clean, rich layers.
The Science of the Perfect Gooey Layer

Gooey butter cake is famous because it isn’t trying to be “cake” in the traditional, airy sense. The filling has a high fat-to-flour ratio, so it sets like a soft custard-cheesecake hybrid instead of baking into a normal crumb.
If you love desserts designed to stay molten, a spoonable example is this chocolate cobbler, where the texture is intentionally saucy and rich. This cake does the same trick, just in neat little squares.
The espresso twist works because it boosts chocolate aroma compounds more than it adds coffee flavor. I notice the cocoa tastes “deeper” and less flat, especially once the crust bakes and the kitchen smells like brownies meeting roasted cocoa nibs.
Salt helps the sweetness feel brighter and the chocolate feel fuller. Researchers discuss sweetness perception pathways like sodium-glucose co-transporters (SGLT1), which is exactly why a flaky finish can make this taste more intense, not simply “saltier.”
Pan size matters more than people think. In a 9×13 baking dish the layer thickness is calibrated for 40 minutes, but in an 8-inch round pan the filling will sit thicker and need longer, so watch the jiggle rather than the clock.
If your filling puffs dramatically and then sinks, it’s usually air. Over-aerating the eggs can make the top rise like a soft soufflé, then collapse as it cools, so mix until smooth, not until foamy.
Pro Tips & Troubleshooting
Pro Tips
- Mise en place saves gooey cakes, I measure everything before mixing so the melted butter for the filling never gets forgotten.
- Use the jiggle test, edges set and center 2 to 3 inches still wobbly is perfect.
- Keep cream cheese strictly room temperature for a smooth, luxurious filling.
- Press the crust firmly and evenly, thin spots can let the filling sink.
Common Mistakes to Avoid
- Using brownie mix creates a tougher, denser base, and the from-scratch dough gives that tender bite people love in fudgy brownies.
- Overbaking by even 5 minutes can turn gooey into firm cheesecake, pull it when the center still looks underdone.
- Improper greasing is heartbreak, the sugar makes everything sticky, so coat the whole pan well.
- Beating the filling too long adds air, which encourages puffing and sinking.
Serving & Storage

Serving Ideas
Let it cool at least 4 to 5 hours before slicing, otherwise it will smear instead of cutting into clean squares. I like serving it at room temperature so the peanut butter cups stay soft and the top feels velvety.
A dollop of unsweetened whipped cream or a scoop of vanilla bean ice cream calms the intensity and makes the salted finish pop. If you want to get fancy, a light drizzle of warmed peanut butter across each square is pure candy-shop joy.
Storage & Food Safety
Because the filling uses cream cheese, I store leftovers in the refrigerator once cooled. Documents like USDA storage temperature guidelines are a good reminder that cream-cheese products need cold holding for safety.
For the best texture, cover the pan tightly or move squares into an airtight container, then chill. When serving, I let pieces sit out 15 to 20 minutes so the gooey layer relaxes again.
Freezing works beautifully for up to 3 months, wrap individual squares tightly in plastic wrap, then a layer of foil, and freeze. Thaw overnight in the fridge, then bring to room temp before eating so the center feels lush again.
Decadent Chocolate Peanut Butter Ooey Gooey Cake
Equipment
- 9×13 inch baking pan
- Electric hand mixer
- Mixing Bowls
Ingredients
For the Crust:
- 1 cup sugar
- 1 cup unsalted butter room temperature
- 1 teaspoon vanilla extract
- 1 3/4 cup all-purpose flour
- 1/4 cup unsweetened cocoa powder
- 1/2 teaspoon baking powder
- 1/2 teaspoon baking soda
- 1/2 teaspoon salt
For the Chocolate Peanut Butter Layer:
- 2/3 cup peanut butter
- 16 Reese’s Peanut Butter Cups snack size
For the Filling:
- 8 oz. cream cheese room temperature
- 1/2 cup unsalted butter melted
- 2 eggs
- 1 teaspoon vanilla extract
- pinch salt
- 3 cups powdered sugar plus more for decorating
Instructions
Prep the pan and mix the chocolate crust
- Preheat your oven to 350°F and grease a 9-x-13 inch baking pan thoroughly with cooking spray.
- In a large mixing bowl, beat together the sugar and room temperature unsalted butter until the mixture is light and fluffy, then mix in the vanilla extract.
- In a separate bowl, whisk together the flour, cocoa powder, baking powder, baking soda, and salt. Slowly blend the dry ingredients into the butter mixture until a smooth dough ball forms.
- Press the dough evenly into the bottom of the prepared baking pan, ensuring it reaches the corners, then set it aside in a cool place to firm up slightly.
Whip the gooey filling until silky
- In a mixing bowl, beat the room temperature cream cheese and melted unsalted butter together until completely smooth.
- Add the vanilla extract, eggs, and a pinch of salt. Mix well until the consistency is smooth without being overly airy.
- Whisk the powdered sugar to remove any clumps, then slowly beat it into the cream cheese mixture until it becomes silky and glossy.
Build the peanut butter core and bake
- Spread a thin layer of peanut butter over the top of the rested chocolate crust.
- Arrange the 16 Reese’s Peanut Butter Cups in a 4×4 grid top side down, pressing them gently into the peanut butter layer.
- Pour the prepared filling over the Reese’s cups and spread it evenly to the edges of the pan.
- Bake at 350°F for 40 minutes. The top should be golden brown and slightly cracked, while the center should still have a slight jiggle.
Cool, finish, and slice
- Allow the cake to cool completely for at least 4 to 5 hours. This patience ensures the gooey layers set properly for clean slicing.
- Once cooled, sprinkle with additional powdered sugar, cut into squares, and serve.
Notes
Nutrition
Conclusion
This is the kind of dessert that makes people pause mid-bite, buttery, ultra-rich, fudgy, and unapologetically gooey. The espresso-in-the-cocoa and the flaky salt finish are small moves that make it taste like a grown-up candy bar.
If you’re in the mood to keep exploring decadent chocolate desserts, the super-moist style of a chocolate poke cake scratches a similar itch with a totally different texture.
Frequently Asked Questions
Do you have to refrigerate ooey gooey cake?
Yes. With 8 oz. cream cheese in the filling, it should be refrigerated after it has cooled, though it can sit out briefly while serving.
How do I know when the cake is done?
Use the jiggle test. The edges should be set and the center 2 to 3 inches should still jiggle, if the center is fully firm, it’s overbaked.
Can I make this ahead of time?
Absolutely, and it’s better that way. Make it at least 5 hours ahead so it cools and slices cleanly, a full day ahead is even easier.
What is the difference between a gooey butter cake and a regular cake?
A gooey butter cake has a dense, cookie-like crust and a cream-cheese-based topping that stays soft. Regular cake relies on more flour structure and leavening for a light crumb.
Can I use natural peanut butter?
I don’t recommend it. Natural peanut butter tends to separate during baking, and a shelf-stable creamy peanut butter keeps the layer smooth and cohesive.
Can I make this as cupcakes?
You can, but expect them to be very dense, more like mini-cheesecakes than fluffy cupcakes. They also need full cooling time to set enough to unmold cleanly.
Why did my filling sink?
Most often it’s from over-beating the eggs or not pressing the crust firmly and evenly. Mix just until smooth, and compact that base so it can support the filling.