Skip to content
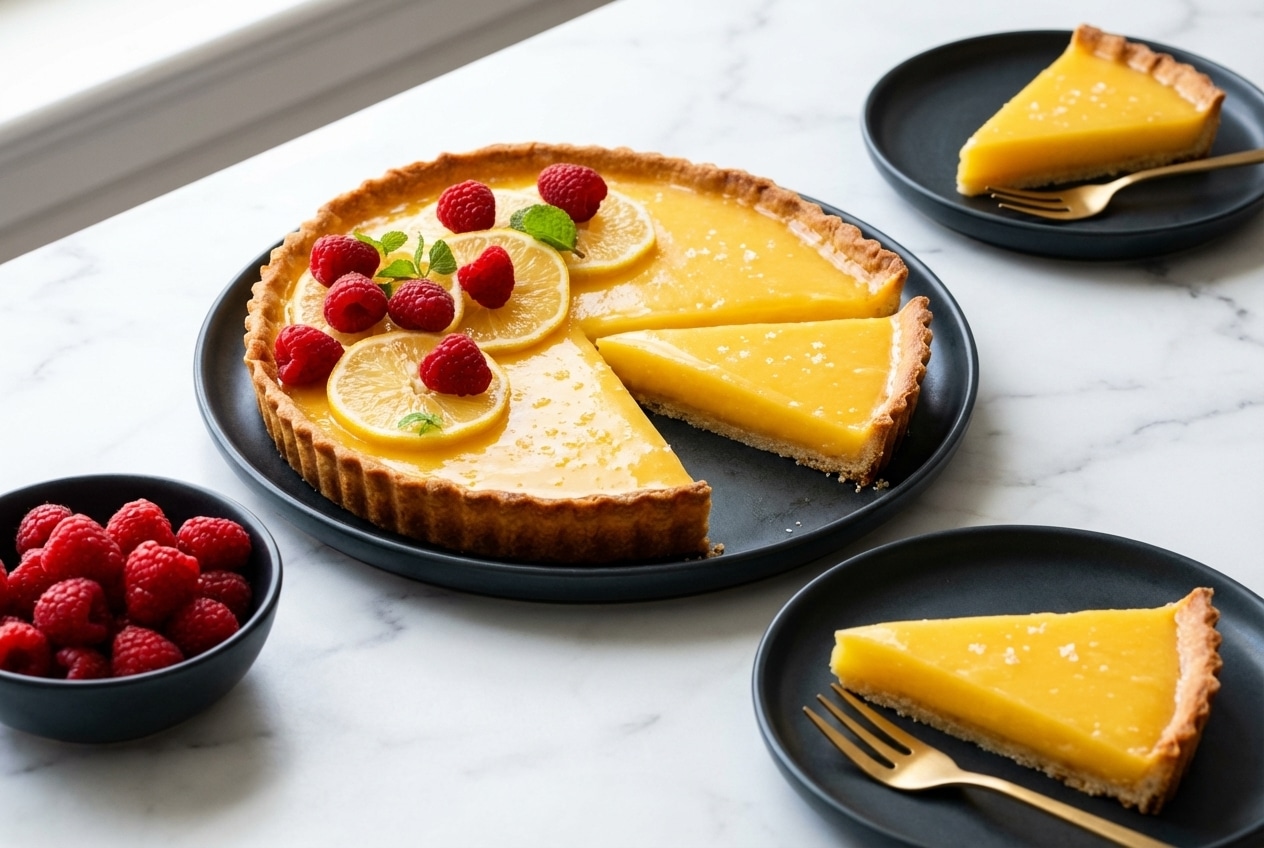
Some nights, I want my kitchen to feel like a little Paris pastry case, all butter perfume and bright citrus in the air. That is exactly what this lemon tart recipe delivers, a clean snap of crust followed by a silky, sunlit lemon curd that tastes like it was made by someone who owns a copper jam pan and a perfect apron.
It is friendly enough for first-time tart bakers, but it still has that grown-up finesse: a brown butter crust and a whisper-thin honey glaze that makes the lemon taste even more lemony. If you have ever chased the perfect set or fought a soggy bottom, you are in the right place.
Why You’ll Love This Recipe
Brown butter depth: In my kitchen, beurre noisette turns the crust into toasted-hazelnut magic, giving your Pâte Sucrée style base a warm counterpoint to sharp lemon.
Sea salt honey shine: That tiny salty honey glaze is a flavor bridge, it brightens citrus while rounding off sugar’s edge, the same grown-up trick I love in salted brownie cookies when salt makes chocolate taste more like itself.
Silky lemon curd: The filling is whisked into a glossy emulsion, then strained for a Lemon Curd texture that feels like velvet on the tongue.
No weird aftertaste: With the right bowl and whisk choices, you skip the metallic twang that can sneak into very acidic fillings.
Crisp, not soggy: Proper Blind Baking and cooling time mean your tart pan releases a crust that stays crisp under the curd.
Ingredients and Substitutions

This ingredient list is short on purpose. When lemon, eggs, sugar, and unsalted butter are treated gently, they make a tart that tastes far more complex than the shopping cart suggests.
Ingredients
- 1 sweet tart crust (or homemade pie crust, or store bought 23cm / 9″ sweet pie or tart crust)
Lemon Tart filling:
- 1 tbsp lemon zest (1 lemon’s worth)
- 1/2 cup lemon juice (from 1 – 2 lemons)
- 3/4 cup white sugar
- 12 tbsp / 170g unsalted butter, cut in 1cm (1/2″) cubes
- 3 whole eggs large
- 3 egg yolks (from large-size eggs)
Ingredient Notes & Substitutions
Large eggs: For the most reliable custard set, “large” ideally lands around 50g per egg without the shell. If your eggs are much smaller, the curd can set firmer, and if they are jumbo, it can stay softer.
Meyer lemons: They’re sweeter and more floral, so the tart reads gentler and almost perfumed. If you use them, reduce the sugar by 2 tablespoons so the lemon stays in charge.
Unsalted butter: Choose a good one, because its flavor is front-row here, especially once you brown it. Clean, high-quality unsalted butter gives you a clearer toasted note and a smoother emulsification.
Caster sugar vs. white sugar: White sugar works perfectly as written, but if you have caster sugar, it dissolves a touch faster on the stove. Either way, keep the heat low so the eggs stay silky.
Citrus swaps: Lime makes it sharper and more tropical, orange makes it softer and rounder. When you swap, taste the juice first and adjust your expectations about tang and sweetness, since the base ratios are tuned for lemon.
How to Make lemon tart recipe
Preparing the Brown Butter Crust
- If you are making your own crust, start by browning the butter first: melt it gently until the foam settles, the milk solids turn amber, and the kitchen smells like toasted nuts. Let it cool until warm, not hot, so it won’t scramble anything when mixed into dough.
- Prepare your sweet tart crust as you normally would, then blind bake the empty shell until it looks dry and set, not pale and damp. Let the crust cool completely before filling, a warm shell invites steam that softens the bottom.
Crafting the Silky Lemon Filling
- Set the oven to 180℃/350℉ (160℃ fan) so it is ready when you are. This last bake is quick, so preheating is not optional.
- In a medium saucepan, whisk together the lemon zest, lemon juice, white sugar, whole eggs, and egg yolks until the mixture looks uniform and slightly frothy at the edges.
- Place the pan over low to medium-low heat and whisk constantly, especially while the butter cubes melt. After about 5 minutes, you want a thick, glossy curd that can briefly mound on itself when you lift the whisk and let a dollop fall back onto the surface.
- Do not pull it early, because a too-thin curd will not set cleanly later. When it is right, it smells boldly lemony, looks satiny, and leaves a clear trail when your whisk passes through.
- Strain the hot curd through a fine mesh strainer into a bowl, pressing gently so only the smoothest curd goes through. This one step is the difference between “homemade” and “patisserie.”
Assembly and the Final Bake
- Pour the strained lemon curd into the fully cooled tart shell, then smooth the top with an offset spatula until it looks like a calm, glossy lake.
- Bake for exactly 5 minutes. When you tap the pan, the center should wobble slightly like soft custard, it should not look liquid or sloshy.
- Cool the tart completely before slicing, because the set finishes as it cools. Once chilled and settled, you will get clean wedges instead of a sunny puddle.
The Honey Glaze Finish
Whisk a small amount of honey with a tiny pinch of sea salt, then brush it in a thin veil over the cooled tart. The surface turns softly shiny, and the flavor lands sweeter, brighter, and more balanced.
The Secrets to a Perfect Citrus Set

Avoiding the metallic taste: Lemon acidity can react with metal bowls and some metal whisks, giving a tinny edge. I stick to glass or ceramic bowls and a silicone whisk when possible, especially once zest and juice are in play.
Precision in emulsification: Low heat and constant whisking keep the butter suspended with the lemon and eggs, which is what “silky” actually means here. If you rush the heat, the butter can separate and the eggs can tighten into tiny curds.
The zest hack: Before you whisk anything, rub the zest into the sugar with your fingertips until the sugar feels slightly damp and smells like lemon candy. Those essential oils cling to sugar, so the aroma carries through the whole tart.
Rescuing a split curd: If the curd looks oily or broken, pull it off the heat and whisk firmly. If it still will not come back together, whisk in 1 tablespoon of cornstarch mixed with a little water, or whisk in an extra yolk to help it re-emulsify.
The crust science matters too, because steam and fat behavior decide whether you get crisp layers or a dense bite. The sentence that finally made blind baking click for me mentioned the physics of steam-driven flakiness in simple, practical terms.
Pro Tips & Troubleshooting
Pro Tips
- Strain the curd twice if you want ultra-polished texture, once after the stove and once again before pouring.
- Use a fine mesh strainer, because it catches tiny egg bits without thinning the curd.
- Keep the heat low and stay with the whisk, steady emulsification beats speed every time.
- Smooth the top with an offset spatula for that mirror-like bakery finish.
- Let the shell cool fully before filling, that one pause prevents sogginess.
Common Mistakes to Avoid
- Cooking over high heat, which can scramble the eggs and split the butter.
- Stopping the stovetop cooking before the curd can mound, because it will not set later.
- Overbaking past 5 minutes, the center should still wobble slightly when it comes out.
- Slicing while warm, which almost guarantees a runny filling.
- Skipping blind baking, the bottom will soften under the curd.
Serving & Storage

Elegant Serving Ideas
A dollop of crème fraiche is my favorite, its gentle tang makes the lemon feel even brighter. Fresh raspberries, candied peel, edible flowers, or a light snowfall of powdered sugar all look right at home.
For a citrus-themed table, the soft, cake-like crumb of lemon blueberry cake pairs beautifully with the tart’s creamy curd. Something cold and creamy to sip, like lemonade cold foam, keeps the whole spread feeling fresh and sunny.
Storage and Freezing Guidance
Refrigerate the tart, covered, for up to 3 days. For the cleanest flavor, store it away from strong fridge aromas, butter and zest love to pick up smells.
Freezing is best done in parts: freeze the baked crust and the cooked curd separately. A fully assembled frozen tart often thaws with a softer crust, because moisture migrates from the curd into the shell.

Silky Lemon Tart With Brown Butter Crust
Equipment
- 23cm (9 inch) Tart Pan
- Fine mesh strainer
- Offset spatula
- Whisk
Ingredients
- 1 sweet tart crust (or homemade pie crust, or store bought 23cm / 9″ sweet pie or tart crust)
Lemon Tart filling:
- 1 tbsp lemon zest 1 lemon’s worth
- 0.5 cup lemon juice from 1 – 2 lemons
- 0.75 cup white sugar
- 170 g unsalted butter 12 tbsp, cut in 1cm cubes
- 3 whole eggs large
- 3 egg yolks from large-size eggs
Instructions
Preparing the Brown Butter Crust
- If making a homemade crust, brown the butter by melting it until the milk solids turn amber and smell toasted. Let it cool until warm. Prepare the dough and blind bake the shell until dry and set. Cool completely.
Crafting the Silky Lemon Filling
- Preheat your oven to 180℃/350℉ (160℃ fan). In a medium saucepan, whisk the lemon zest, juice, sugar, whole eggs, and egg yolks until frothy.
- Place over low heat. Whisk constantly as you add the butter cubes. Cook for about 5 minutes until the curd is thick, glossy, and leaves a clear trail when whisked.
- Immediately strain the hot curd through a fine mesh strainer into a bowl to ensure an ultra-smooth patisserie texture.
Assembly and the Final Bake
- Pour the filling into the cooled tart shell and smooth the surface with an offset spatula. Bake for exactly 5 minutes until the edges are set but the center still wobbles slightly.
- Cool the tart completely to allow the set to finish. Once chilled, whisk a small amount of honey with sea salt and brush a thin veil over the surface before serving.
Notes
Nutrition
Conclusion
What I love most is the first bite, a crisp brown-butter edge, a satin lemon center, and that faint snap of salted honey on top. It is classic lemon tart energy, but with a deeper, toastier bass note and a patisserie shine.
If you play with variations, keep the method gentle and the timings exact, then let your citrus choice set the mood. For lemon lovers who need something portable, strawberry lemon blondies bring the same bright flavor in a picnic-ready form.
Frequently Asked Questions
Why did my lemon filling split or become oily?
Heat is usually the culprit. Keep the pan on low to medium-low and whisk constantly as the butter melts so the mixture stays emulsified, then use the rescue trick: off-heat whisking, or a small cornstarch slurry, or an extra yolk.
How can I prevent a soggy bottom on my tart crust?
Blind bake the shell and let it cool completely before you add the curd. A warm crust creates steam, and steam is what turns crisp pastry into a soft bottom.
Can I make the lemon filling ahead of time?
Yes. Store the strained curd airtight in the fridge, with plastic wrap pressed directly onto the surface so it doesn’t form a skin, then fill and bake the tart when you are ready.
What is the best way to get a clean slice of lemon tart?
Chill the tart until fully set, then use a knife warmed in hot water and wiped dry between cuts. A clean, dry blade glides through the curd instead of dragging.
How do I know when the tart is perfectly baked?
After exactly 5 minutes, the edges should look set and the center should wobble slightly when you nudge the pan. If it looks liquid, it needs a touch more time on the stove next round, not extra baking.