Skip to content
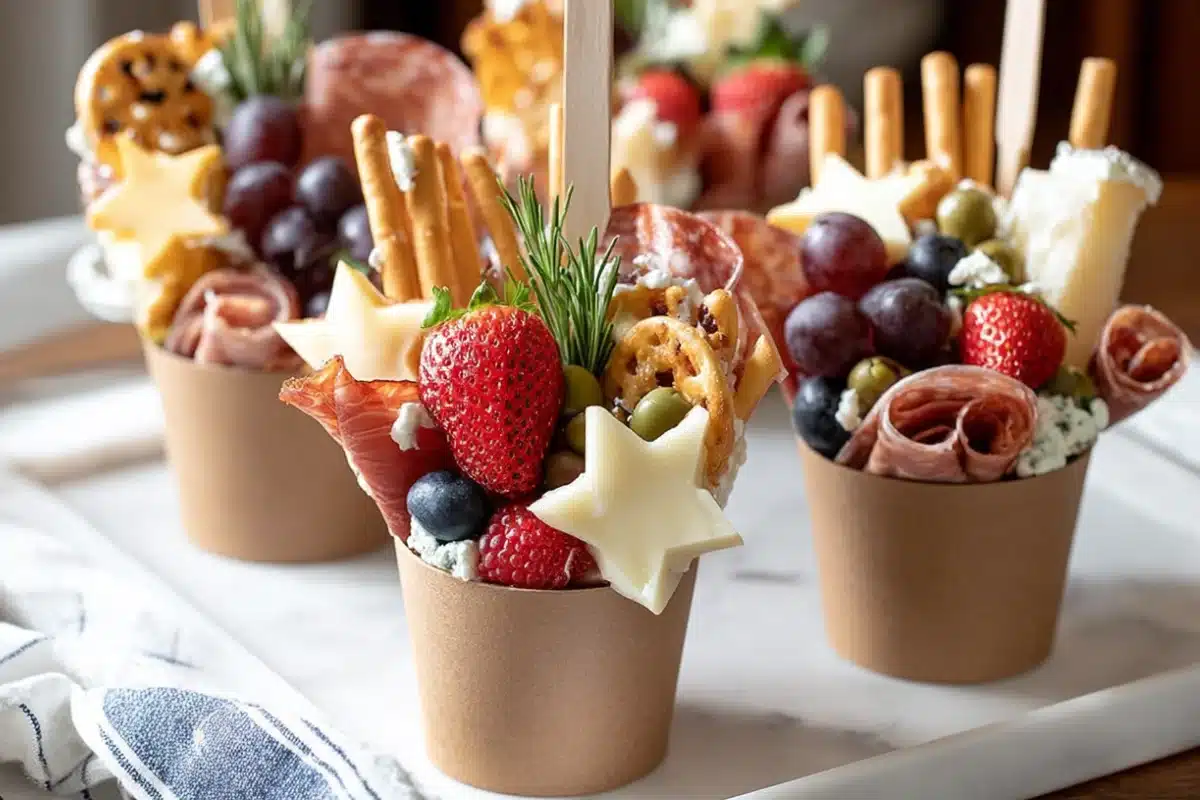
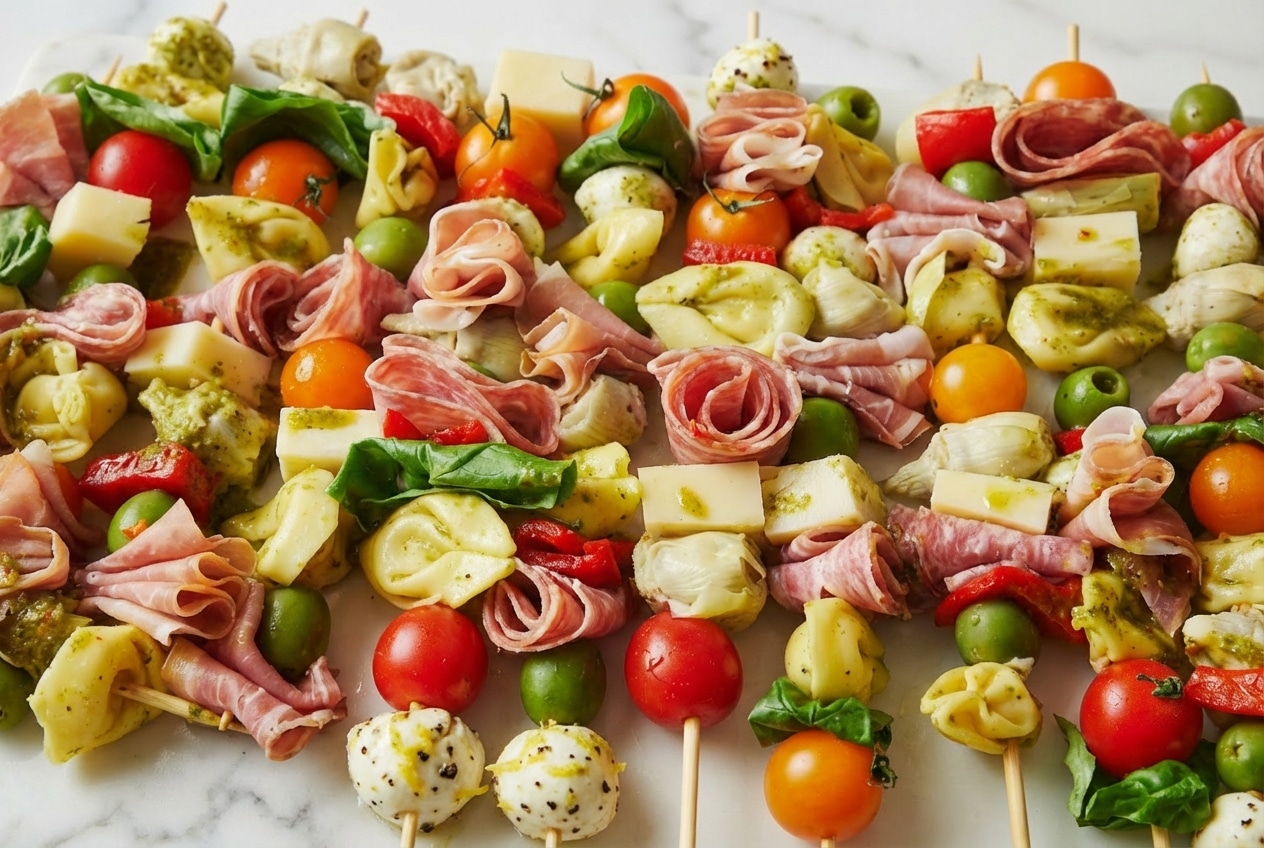
If you ever stared at a charcuterie board and thought, “Cute, but everyone’s fingers are on everything,” charcuterie cups solve that problem in one shot. Charcuterie cups turn a classic spread into individual, handheld portions that look fancy and feel hygienic.
You load each cup with cheeses, cured meats, fruits, nuts, crackers, and a few pretty garnishes. Guests grab a whole cup, walk away, and start snacking. No awkward hovering over the board. No crowding. No double dipping.
This recipe gives you the exact amounts you need for 8 cups, plus planning tips, food safety rules that actually matter, and plenty of ideas for different occasions. Ready to build charcuterie cups that people photograph before they eat?
Why You Will Love These Charcuterie Cups
- Perfect for parties and gatherings
You prep everything once, assemble the cups, and park them on a tray. Guests help themselves and you actually enjoy your own party. - Customizable for any taste or diet
You tweak the mix for meat lovers, vegetarians, kids, or “I only eat cheese and carbs” guests. The basic framework stays the same, the fillings stay flexible. - Less mess and fewer shared hands
Every guest gets a personal grazing cup. That setup keeps the table neater and reduces the “everyone grabs from the same pile of salami” vibe. - Effortless wow factor
These cups look like you hired a caterer. In reality, you follow a simple step order and stack ingredients in a smart way. - Scales like a dream
You want 8 cups, 24 cups, or 60 cups for a wedding welcome party. You multiply the ingredients and repeat the same process.
Ingredients and Substitutions
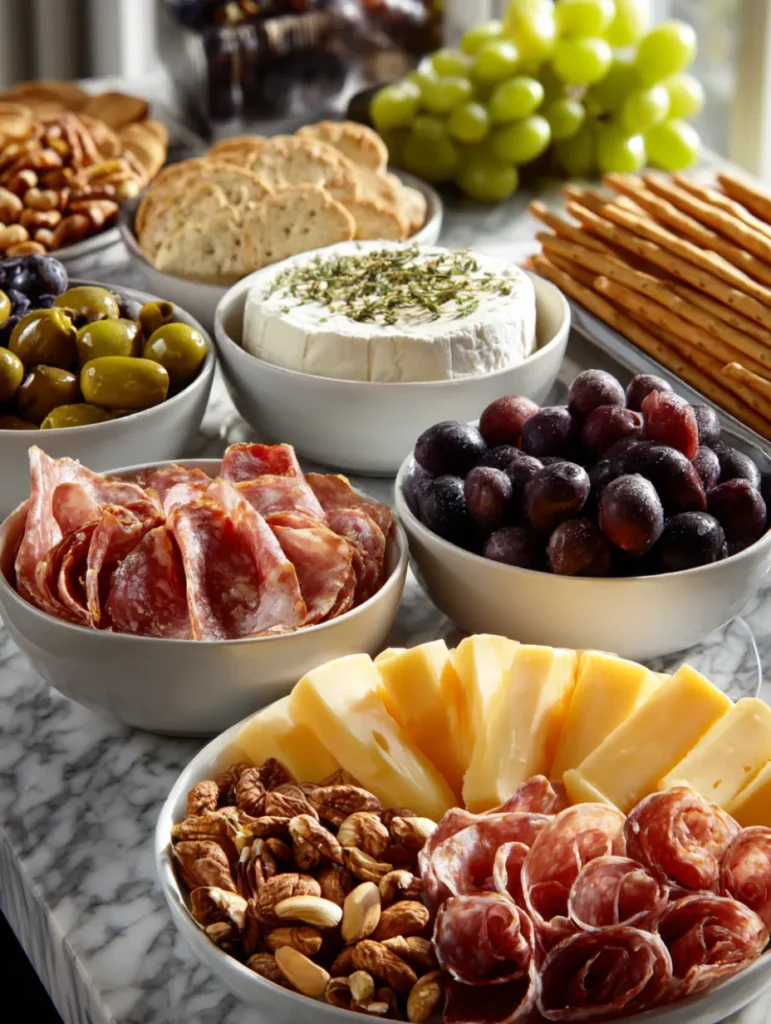
You make 8 charcuterie cups with this base ingredient list. The amounts give you a solid starting point. You might need a little more or a little less depending on cup size, but this works beautifully for standard party cups.
Base Ingredients For Charcuterie Cups
Use these exact amounts:
- 16 ounces assorted cheeses
- 24 slices/pieces cured meats
- 1 cup mixed berries
- 1/2 cup grapes
- 1/2 cup olives
- 1 cup nuts
- 16 long thin crackers
- 8 pieces fresh herbs
Equipment You Will Need
- small jar / paper cup
- various toothpicks
- mini cookie cutters
Now let’s talk strategy so you know why each piece matters and how to swap smartly.
Cheese Ideas And Easy Swaps
Use a mix of firm and semi soft cheeses. Firm cheese, like cheddar or pepper jack, holds its shape in skewers and stands upright in the cups. Soft cheeses, like mini mozzarella balls, add creaminess and look great on small forks.
You can use cheddar, pepper jack, mozzarella balls, gouda, manchego, or whatever you love. If you want a budget option, choose block cheddar and slice it yourself. For a more premium feel, add a few cubes of smoked gouda or aged cheddar.
Meats And Protein Choices
Cured meats slide right into this format. Salami, prosciutto, pepperoni, soppressata, or Spanish chorizo all work well. Fold slices into loose ribbons and thread them onto toothpicks.
For pork free cups, use turkey pepperoni, beef salami, or even grilled chicken chunks that you chill before assembly. For vegetarian cups, skip meat and double up on cheese, nuts, and marinated veggies.
Fruits, Veggies, Nuts, And Crunch
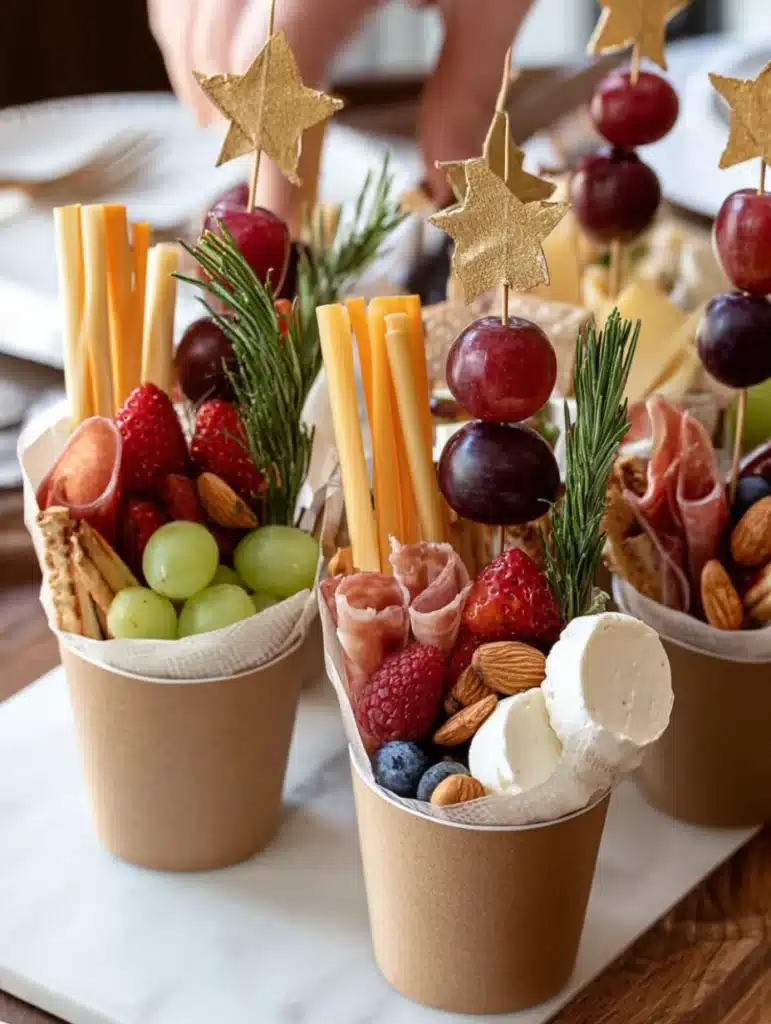
Grapes, berries, figs, dried apricots, and apple slices bring sweetness and color. You keep berries on skewers or cluster them in the base to avoid bruising.
Nuts like almonds, cashews, pistachios, or walnuts fill gaps and add crunch. Think of them as tasty “glue” that holds the base layer in place. You can also add cherry tomatoes, cucumber slices, or mini pickles for brightness and acidity.
Crackers, Cups, And Garnishes
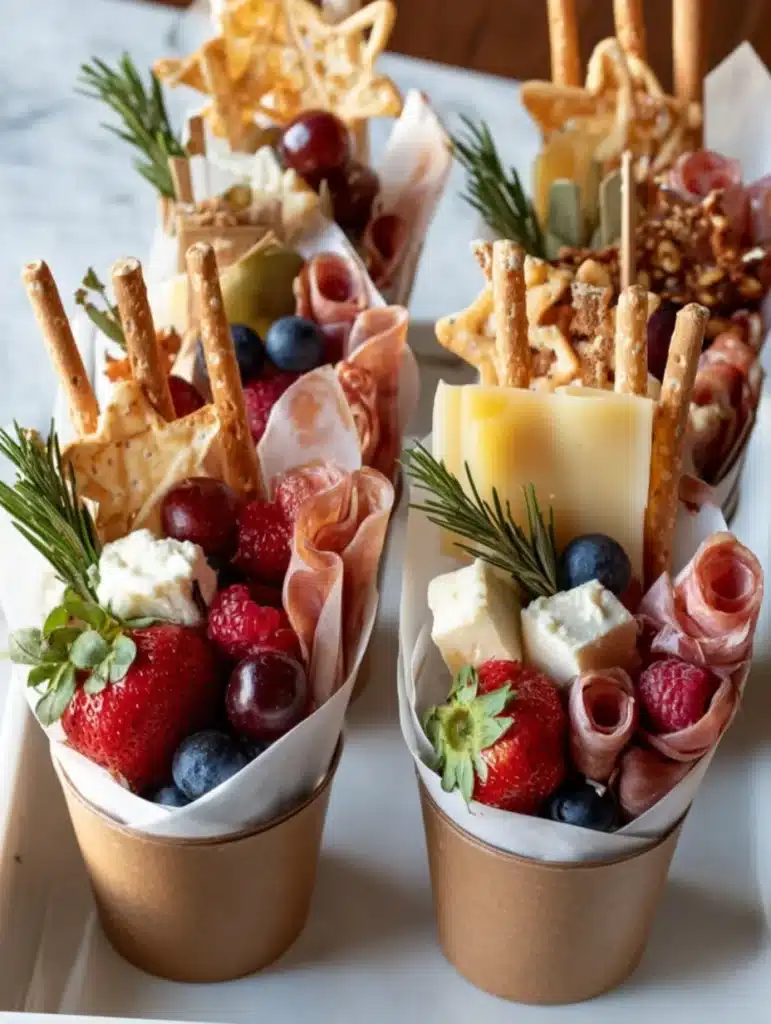
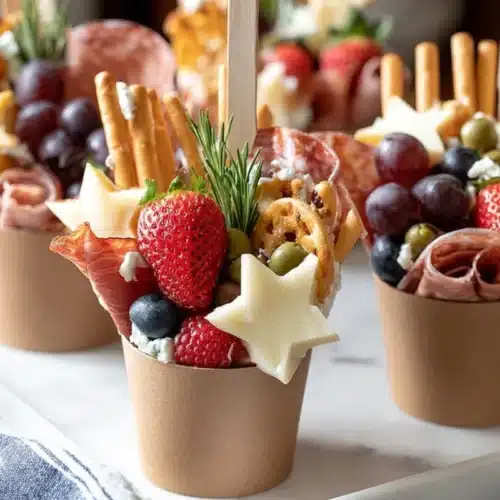
Tall, thin crackers fit cups best. Breadstick style crackers, crisp flatbreads, or slim artisanal crackers give height and texture. Long crackers sit at the back of each cup, frame the ingredients, and stay visible.
For cups, you can use sturdy paper cups, clear plastic tumblers, or small jars. Twelve ounce cups usually feel generous without overwhelming guests. Fresh herbs like rosemary, thyme, or sage finish each cup and make everything look intentionally styled.
Dietary And Budget Friendly Variations
- Gluten free: Use gluten free crackers and breadsticks and keep everything else the same.
- Vegetarian: Replace meat with extra cheese, marinated artichokes, roasted peppers, or extra nuts.
- Kid friendly: Swap olives for mild pickles, use mild cheddar and turkey, and add a few kid safe sweets like grapes or pretzel sticks.
- Budget build: Focus on one or two cheeses, one meat, seasonal fruit, and a store brand cracker. You still fill each cup generously.
Step By Step Instructions
You follow seven simple steps every time. Once you do this once, you can almost assemble charcuterie cups with your eyes closed.
This recipe makes about 8 charcuterie cups and takes roughly 25 minutes of hands on prep.
1. Build A Solid Base Layer
Start by filling each container with the small items that like to roll around. Divide the nuts and grapes across all of your cups so every guest gets a little of each. If you want to tuck a dip in the bottom, add a spoonful before you drop in nuts and grapes and keep those dips slightly thicker so they do not run.
2. Set Crackers As The Backdrop
Slide the long thin crackers along the back edge of each cup. Angle them slightly outward so they frame the rest of the ingredients. Leave open space toward the front of the cup so you have room for the skewers. This setup creates height and keeps crackers visible instead of hiding them in the base.
3. Skewer Your “Hero Bites”
Use toothpicks to build little snack stacks. Thread cubes or slices of cheese, folded cured meats, olives, and berries onto each pick. Change the order, colors, and textures so each skewer looks a little different. These skewers become the first thing everyone sees when they pick up a cup.
If you want a warm baked bite on the side, you can also serve these cups with these easy cranberry brie bites recipe on a separate platter for a more complete appetizer spread.
4. Add Minis On Forks Or Extra Picks
Use mini forks or extra picks for pieces of cheese that you do not want on a toothpick stack. Place a fork loaded with a small mozzarella ball or a special cheese front and center. Treat those as the “premium” bites and give each guest at least one.
5. Arrange Skewers In The Cups
Insert toothpick skewers into each container and push them gently into the base layer of nuts and grapes. Vary the heights of the picks and rotate the colors so every angle looks interesting. Aim for a little bit of organized chaos. You want cups that feel full without looking cramped.
6. Fill Every Gap
Look straight down into each cup. Drop extra nuts, berries, grapes, or olive pieces into little gaps until everything feels snug. That extra filling helps keep skewers upright and stops crackers from shifting when guests pick up the cups or move around the room.
7. Finish With Herbs And Fun Shapes
Cut slices of cheese with mini cookie cutters to create stars, hearts, or seasonal shapes. Tuck those near the top where guests can see them. Add one piece of fresh herb to each cup as a final garnish. That small sprig makes the entire charcuterie cup feel intentional and polished.
Expert Tips And Troubleshooting
You already have the framework. Now let’s make your life easier when you scale this up or bring these cups to bigger events.
How Many Charcuterie Cups Per Person?
For light snacking before a full meal, plan one cup per person and add a couple of extras “just in case.” For events where charcuterie cups act as a heavier appetizer, plan two cups per guest, especially if you know people will linger.
If you serve other hearty appetizers, you can stick closer to one cup per person and fill in with dips, sliders, or warm bites.
Best Cup Size And Tools
Twelve ounce paper or plastic cups strike a great balance. They feel generous, hold everything upright, and stay easy to hold in one hand. Smaller four to eight ounce cups work for shorter events or very light bites.
Keep plenty of toothpicks, mini forks, and a few pairs of scissors handy to trim herbs, cheese slices, or crackers that sit too tall. You assemble faster when you set up a mini “assembly line” station.
Avoid Soggy Crackers And Dry Cheese
You protect your crackers in two ways. First, you keep dips and juicy foods in the bottom so they stay away from crackers. Second, you add crackers near assembly time, not hours ahead. If you need to prep very early, store crackers separately and slide them into cups right before guests arrive.
You keep cheese soft and fresh by cutting it close to assembly time and keeping everything chilled until you move the tray to the serving area.
Food Safety And How Long Cups Can Sit Out
Charcuterie cups still count as perishable food. You treat them like any other meat and cheese platter. As a general rule, room temperature cheese and meat should not sit out longer than about 2 hours. When temperatures rise above 90°F, you follow a stricter 1 hour limit, which matches official USDA guidance on perishable foods.
For outdoor summer events, set cups out in smaller waves instead of one massive tray. Refill from a chilled backup tray so everything stays safe and fresh.
Serving And Storage
You created these beautiful cups, so let’s help them shine on the table and survive the fridge when people inevitably leave leftovers.
Serving Ideas And Pairings
Serve charcuterie cups on a low tray, cake stand, or large board so guests can grab them easily. Mix different heights with risers or stacked plates to create a more dynamic look.
These cups pair well with sparkling water, wine, prosecco, or simple batch cocktails. For a fuller snack spread, serve them alongside a warm dip like this creamy corn dip recipe for parties so guests can mix hot and cold bites.
Occasion Based Ideas
- Weddings and showers: Use neutral cups, lots of pale cheeses, fresh herbs, and mild fruits.
- Game day: Add bolder meats, spicier cheeses, and a few pickled jalapeños.
- Holiday parties: Use berries, rosemary, and shaped cheese stars or trees for a festive look.
- Brunch: Lean into fruit, nuts, mild cheeses, and maybe a few mini waffle pieces on skewers.
You keep the same assembly method and swap ingredients to match the mood.
Storing Leftovers
Pop leftover cups into the fridge as soon as the party ends. Cover trays with plastic wrap or slide cups into airtight containers to protect them from drying out.
You can remove crackers from leftover cups and store them separately so they stay crisp. Eat leftover meats and cheeses within a day or two for the best flavor and texture. If anything sat out too long, do your future self a favor and throw it out without overthinking it.
Variations To Try Next Time
Try breakfast themed cups with mini pancakes, berries, and sausage bites. Play with dessert style cups with brownie bites, fruit, and chocolate covered pretzels. Build Mediterranean cups with pita chips, hummus, olives, and feta.
Once you master the base recipe, you build whatever vibe you want right inside the same little cup.
Charcuterie Cups Recipe
Ingredients
Main Ingredients
- 16 ounces assorted cheeses
- 24 slices/pieces cured meats
- 1 cup mixed berries
- 1/2 cup grapes
- 1/2 cup olives
- 1 cup nuts
- 16 long thin crackers
- 8 pieces fresh herbs
Instructions
- Set out eight sturdy jars or paper cups along with your ingredients. Divide the nuts and grapes between all of the containers so each cup gets a base layer of small items. If you plan to use a thick dip in the bottom, spoon it in before you add the nuts and grapes.
- Slide the long thin crackers into the back of each container. Angle them slightly outward so they frame the other ingredients and leave open space near the front of the cup for skewers.
- Thread cubes or slices of cheese, folded pieces of cured meats, olives, berries, and any other bite sized items onto toothpicks. Build a variety of small stacks so each skewer looks slightly different.
- Load mini forks or extra picks with single pieces of cheese or other special ingredients that you want to highlight. Tuck these into the cups so they sit toward the front and stay easy to grab.
- Insert the toothpick skewers into each container, pushing them gently into the base layer so they stand upright. Vary the heights and rotate colors and textures so the cups look full and visually interesting from every angle.
- Look down into each cup and fill any gaps with extra nuts, berries, grapes, or olives. Add enough extra pieces so everything feels snug and the skewers and crackers stay secure when someone lifts the cup.
- Use mini cookie cutters to punch shapes from slices of cheese and place them near the top of each cup. Finish each charcuterie cup with a sprig of fresh herb as a garnish just before serving.
Notes
Nutrition
FAQ
1. What do you put in charcuterie cups?
You fill charcuterie cups with a mix of cheeses, cured meats, crackers, fruits, nuts, olives, and a few pretty garnishes. Think of a classic charcuterie board and shrink it into a single serving. You want salty, sweet, crunchy, creamy, and a mix of colors.
2. How many charcuterie cups per person?
For light snacks before a meal, plan one cup per guest. For heavier grazing style events, plan closer to two cups per person, especially if you do not serve many other appetizers. Always make a few extra cups for surprise guests or big appetites.
3. How far in advance can you make charcuterie cups?
You can prep ingredients a few hours ahead and assemble the cups up to several hours before your event. Keep completed cups tightly covered in the refrigerator until just before guests arrive. Add crackers shortly before serving if you worry about moisture.
4. How long can charcuterie cups sit out?
Treat charcuterie cups like any other meat and cheese platter. Keep them at room temperature for up to about two hours, or one hour if the environment feels very hot. After that, move them back to the fridge or discard them.
5. What size cups work best for charcuterie cups?
Twelve ounce cups work very well for most events because they hold enough food without feeling huge. Smaller cups between four and eight ounces work for shorter events or when you serve lots of other appetizers. You want cups that feel full but not overloaded.
6. Can you make charcuterie cups without meat?
Yes, you can make fantastic meat free charcuterie cups. Use extra cheese, roasted vegetables, marinated artichokes, nuts, olives, and fresh fruit. The visual drama and flavor still show up, and vegetarian guests feel very seen.
7. How do you keep crackers from going soft?
Keep wet ingredients and dips away from crackers and add crackers closer to serving time. You can also store crackers in a separate bowl and let guests slide a few into their cups when they pick them up. That simple move keeps everything crisp.
Have more questions? Ask in the comments!